The Ultimate Guide to Squat
Preface
Before You Read
Everyone has an opinion on the squat. Few of those opinions are grounded in anatomy or biomechanics.
The standard advice, feet shoulder width, toes forward, knees out, works well for some people and poorly for others. Not because they are doing it wrong, but because their skeleton was never consulted. Your hip socket depth, your femur length, your ankle mobility, these are not minor details. They are the architecture that determines what your squat should look like.
This guide is built differently. It draws on current biomechanical research and anatomical science to explain not just what to do, but why, and more importantly, why it might look different on you than on the person squatting next to you. Every major cue is examined through three lenses: the anatomy behind it, the biomechanics that explain why it works, and the individual differences that determine how it applies to your body specifically. The science is here, but it is always in service of practical understanding.
Whether you are a complete beginner learning the movement from scratch, an experienced lifter troubleshooting a persistent fault, or a coach looking to deepen your evidence base, this guide was written for you.
How to Use This Guide
This is a long, detailed resource. You do not need to read it in one sitting, and you do not need to start at the beginning.
If you are a beginner, start from the introduction and read in order. The guide builds progressively, and each section prepares you for the next.
If you are an experienced lifter, go directly to the cue that is giving you trouble. Each section is self contained and can be read independently.
If you are a coach or fitness professional, use the biomechanics and individual differences sections as your reference material. The coaching guides within each cue section include cues broken down by lifter level.
If you are short on time, every cue section ends with a summary table. Start there, then go deeper into the sections that are most relevant to you.
One principle runs through everything in this guide: biomechanics always wins over fixed rules. Your squat should be built around your anatomy, not someone else’s ideal. Keep that in mind as you read through the guide.
In This Guide
Introduction
The squat is one of the most fundamental and widely used exercises in fitness, rehabilitation, sports performance, and strength training [1]. It is a functional, closed kinetic chain movement accomplished by flexing and extending the hip, knee, and ankle joints, a pattern that mirrors many daily activities and athletic demands [1, 11]. Whether performed with just body weight or loaded with a barbell, the squat is considered a cornerstone of lower-body development [2].
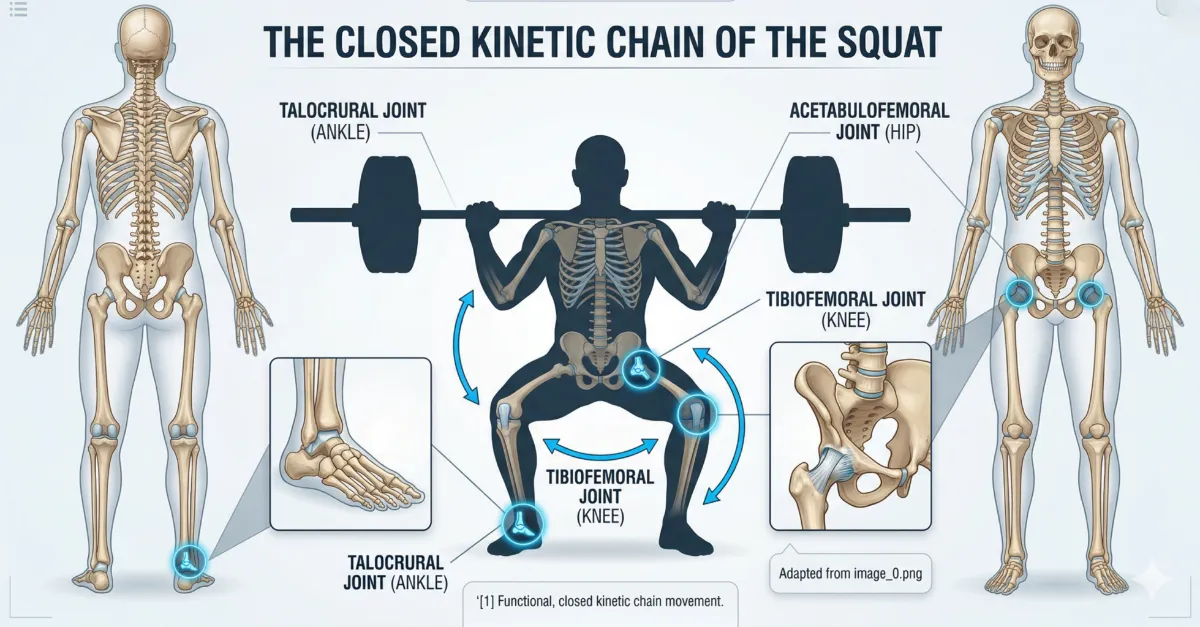
Figure 1: The Barbell Squat as a Closed Kinetic Chain [1]. The simultaneous, synchronised movement of the ankle, knee, and hip joints forms a foundational blueprint that requires coordinated muscular action and skeletal alignment. This image visually tracks the anatomical ‘bony pillars’ that support the movement [1, 2].
But what makes the squat so effective? Research shows that proper squat technique does more than just build stronger legs. A 2025 systematic review found that actively engaging the core during deep squats increases activation of key lower limb muscles, specifically the rectus femoris, biceps femoris, and gluteus maximus, while also improving body stability and helping to avoid potential injury [3]. This highlights that the squat is not just a leg exercise; it is a full-body movement that demands coordinated work from the core, hips, and lower limbs.
The Core: Midline Stabilisation and the "Cylinder"
The core plays a particularly important role, serving as the “transmission” that allows force to travel from the legs to the barbell without “leaking” through the spine. Anatomically, it is described as a “box” or “cylinder” that includes the rectus abdominis in the front, the internal and external obliques on the sides, and the erector spinae, multifidus, and quadratus lumborum in the back [4, 12]. The diaphragm forms the top, the pelvic floor the bottom, and the iliopsoas the base [4].
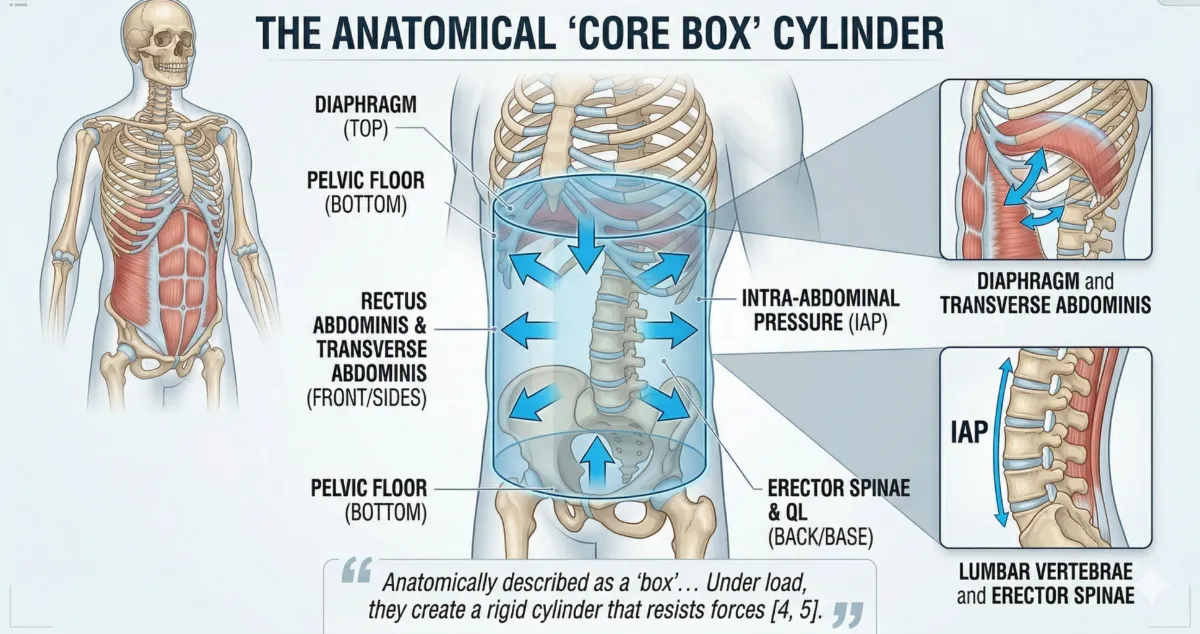
Figure 2: The Anatomical ‘Core Box’ Cylinder [4, 5]. This scientific diagram visualises how the core operates as a pressurised canister. Under load, the co-contraction of the abdominal wall, diaphragm, and pelvic floor creates hydraulic support (Intra-Abdominal Pressure) that resists destabilizing forces [4]. This cylinder forms a rigid pillar that ensures force is transmitted efficiently from the lower extremities to the barbell [5].”
Under load, these muscles must create Intra-Abdominal Pressure (IAP) to support the spine from the inside out [5]. In professional coaching models, this is referred to as “bracing”, a sequence that organizes the spine into a neutral position before movement begins [12]. Choosing the right strategy (bracing vs. hollowing) helps maintain a neutral spine, protects the lower back, and transfers power efficiently [5, 12].
The Sticking Point: A Biomechanical Challenge
If you’ve ever felt a squat slow down or stall halfway up, you’ve experienced the sticking point. This occurs during the ascent (concentric phase), typically when the hips are just above parallel [6]. At this specific joint angle, the mechanical advantage of your hip and knee extensors is at its lowest [6, 13]. Research has shown that this sticking region exists even in well-trained individuals and is not simply a matter of relative strength [7]. Understanding the sticking point is crucial because it is where technique often breaks down and where targeted training is most effective [6, 7].
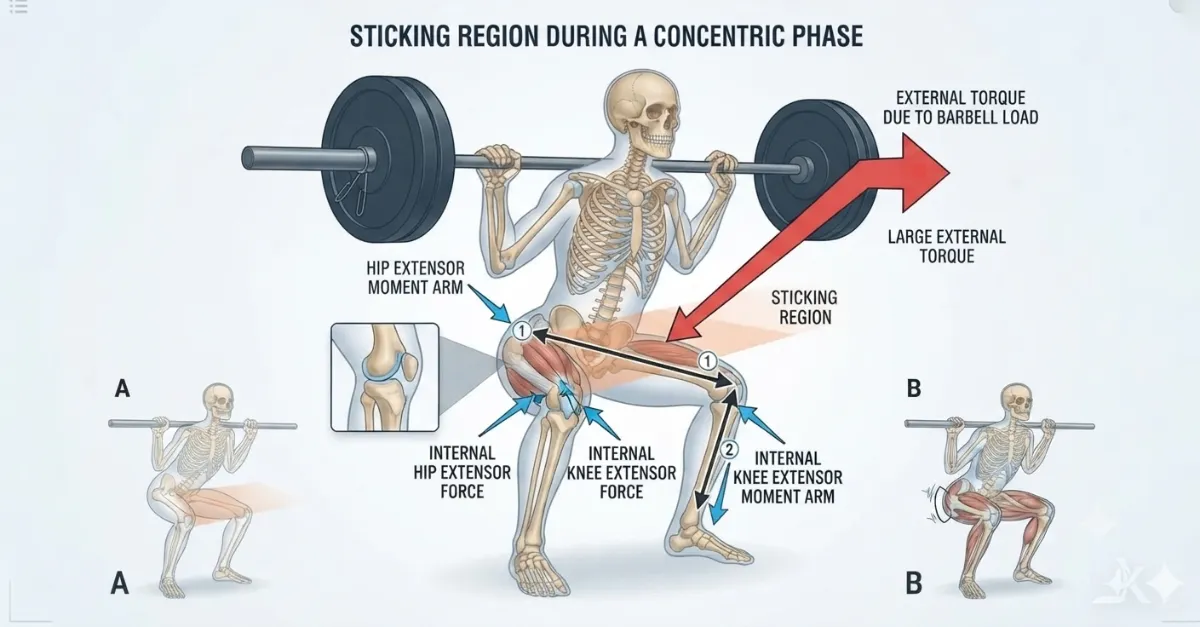
Figure 3: The biomechanical sticking point. During the ascent (concentric phase), the hips are just above parallel. At this joint angle, the moment arms of the hip and knee extensors are at their longest, placing the muscles at a mechanical disadvantage. The barbell load (red arrow) creates a large external torque that must be overcome by the hip and knee extensors. The sticking region is where technique most often breaks down and where targeted training, such as pause squats, is most effective [6, 7, 13].
Individual Differences: Your Squat Is Unique
Perhaps the most important finding from recent biomechanical research is that no two squats look exactly alike, and that’s perfectly normal [8]. Your individual strengths, mobility, and even your unique anatomy will shape your optimal technique [1, 9].
Factors such as anthropometry (body proportions) play a massive role; for example, a lifter with long femurs relative to their torso must lean forward more to keep the bar balanced over the mid-foot [11, 14]. Furthermore, the shape of your acetabulum (hip socket) can dictate whether a narrow or wide stance is required to avoid bony impingement, which often manifests as the “butt wink” or a pinching sensation in the hip [14, 15].
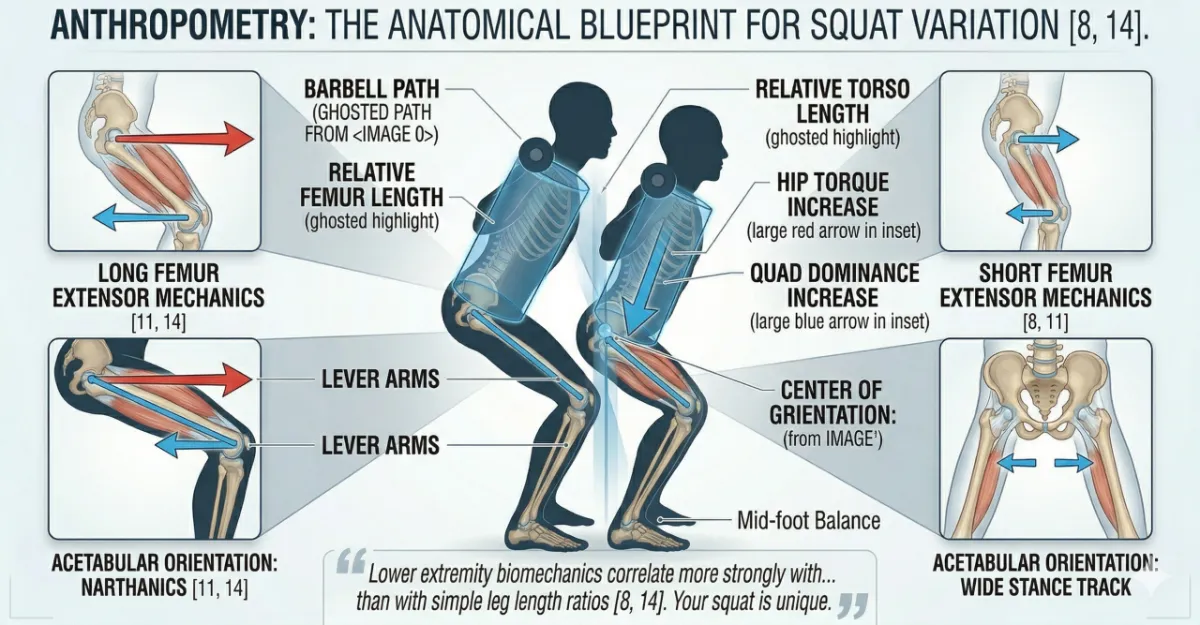
Figure 4: Anthropometry: The Anatomical Blueprint for Squat Variation [8, 14]. This side-by-side comparison reveals why a standardised squat instruction is physiologically flawed. Lifter A (Long Femurs) must lean forward significantly to keep the barbell over the mid-foot. This drastically increases the horizontal moment arm (the red torque arrow) at the hip, placing greater demand on the posterior chain [11]. In contrast, Lifter B (Short Femurs) can remain upright, shifting the mechanical work toward the quadriceps [8]. Despite these skeletal differences, both lifters maintain the same core stability and mid-foot balance shown in Figures 1 and 2.
Before You Descend: Your Footprint
Before we break down the six cues that happen during the descent and ascent, we must start at the very beginning, your feet. The way you place your feet determines everything that follows. Stance width, toe angle, and foot pressure affect how your hips, knees, and ankles move, how deep you can squat, and where you feel the load.
No two squats look the same, and that is because no two skeletons are the same. Your femur length, hip socket orientation, ankle mobility, and even the twist of your thigh bone all dictate the stance that will allow you to squat safely and deeply.
The following section will help you find your own starting position, not a generic rule, but a stance based on your anatomy. Once you have set your feet correctly, we will then apply the six key coaching cues that govern the movement itself.
Starting Position: Foot Stance and Individual Differences
Before you even start to descend, the way you place your feet decides the whole shape of your squat. Where you put your feet changes how your hips, knees and ankles move, how deep you can go, and where you feel the weight. There is no single correct stance. Your ideal stance is written by your own bones and joints.
The Myth of the Standard Stance
For years, the “shoulder width, toes forward” stance was taught as the one correct way to squat. But kinematic analysis shows that forcing someone into a stance that does not match their bone structure leads to bony impingement and early technical breakdown. A stance that works perfectly for one person can cause pain and limit depth for another.
How Your Hip Socket Shapes Your Stance
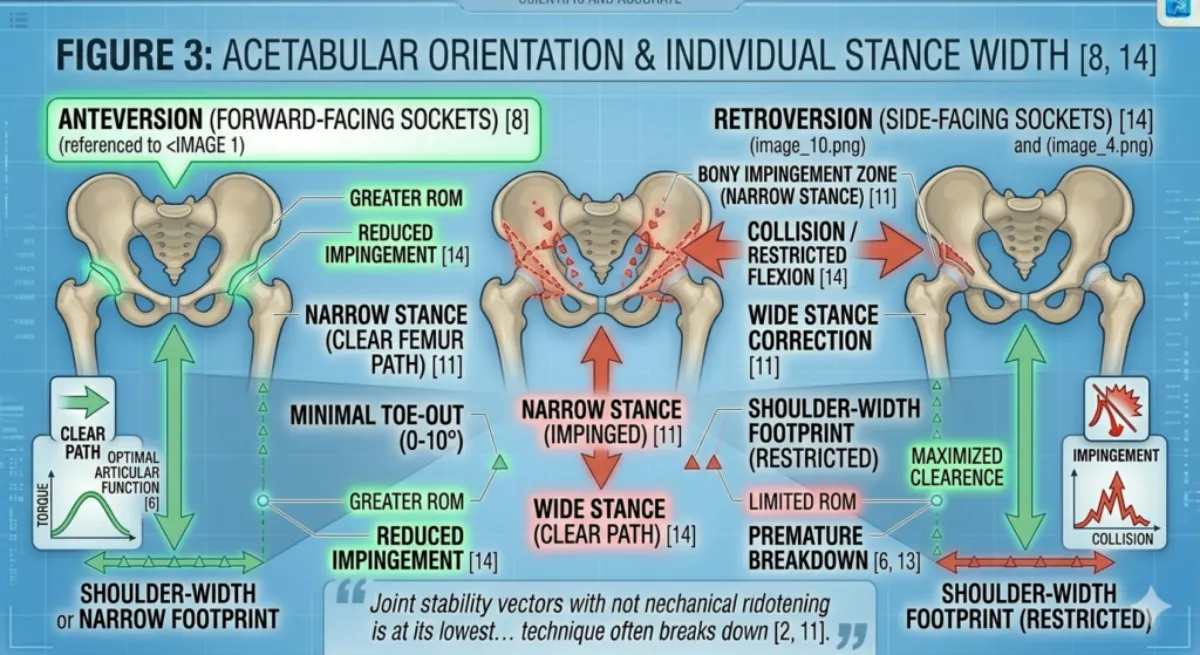
Figure 5: Acetabular Orientation and Individual Stance Width [8, 14]. This top-down (superior) view of the pelvis illustrates why a ‘standard’ stance is anatomically impossible. Lifters with Anteversion (forward-facing sockets) naturally suit a narrower footprint. Conversely, lifters with Retroversion (side-facing sockets) must use a wider stance and greater toe-out to prevent bony impingement between the femur and the pelvic rim.
The main driver of your starting position is the acetabulum – the socket where your thigh bone meets your pelvis.
Anteversion (forward-facing sockets): The sockets sit towards the front of the pelvis. These people naturally feel strongest in a narrow stance with toes pointed relatively straight ahead.
Retroversion (side-facing sockets): The sockets sit more towards the sides. If these people try a narrow stance, the thigh bone hits the edge of the pelvis and stops depth. They must use a wide stance with toes turned out between 15 and 30 degrees to create space in the joint.
The Twist in the Thigh Bone
The angle of your femur (the thigh bone) also dictates where your feet go.
Internal torsion: Leads to a pigeon-toed natural walk. These people often prefer a narrower, straighter foot position.
External torsion: Leads to a duck-footed walk. These people need a significant toe out to keep their knees tracking safely over the midfoot.
Stance Width
| Stance Width | Heel Distance | Best For | Anatomical Fit |
|---|---|---|---|
| Narrow | Hip width or less | Quadriceps emphasis, Olympic weightlifting | Long femurs often need a wider stance; narrow stance may cause too much forward lean |
| Shoulder width | Roughly shoulder width | General strength training, powerlifting | Suits most people; a good starting point |
| Wide | Wider than shoulders | Squatting with long femurs, people with deep hip sockets | Reduces forward lean, allows a more upright torso |
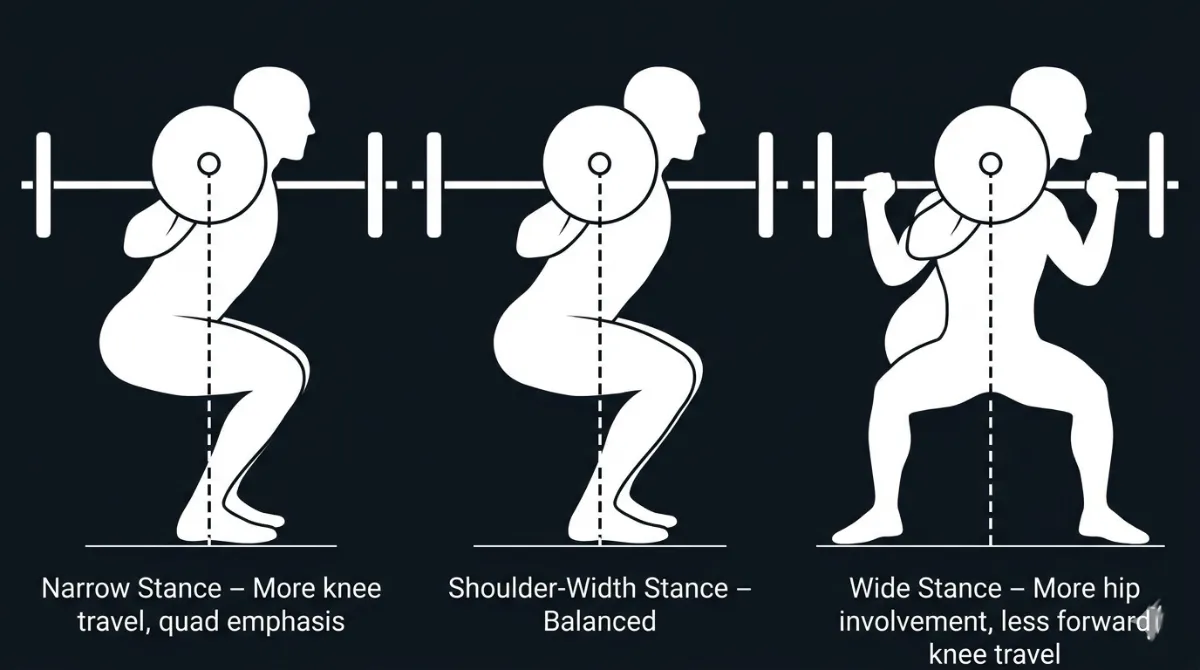
Figure 6. Three Squat Stance Widths. Narrow (left) increases knee travel and quadriceps demand. Shoulder‑width (middle) provides a balanced starting point. Wide (right) increases hip involvement and reduces forward knee travel [8, 11].
Individual differences that affect stance width
Long femurs (relative to your torso length): A wider stance shortens the effective length of the femur, allowing you to keep a more upright torso and stay balanced over the midfoot.
Short femurs: A shoulder-width or narrower stance works well. You can stay upright without needing a wide base.
Hip socket depth: People with deep hip sockets or femoroacetabular impingement (FAI) often need a wider stance to create space for the femoral head to move without pinching. A narrow stance may cause pain or restrict depth.
Hip mobility: If you have limited hip external rotation, a slightly wider stance with toes turned out can help you reach depth without rounding your lower back
How to find your stance width
Start with your heels shoulder width apart. Do a bodyweight squat. If your torso collapses forward or your heels lift, try a slightly wider stance. If you feel pinching in the front of your hips, widen your stance further.
Foot Angle (Toe Position)
Foot angle means how far your toes point outward. Most people squat with their toes turned out between 5 and 30 degrees from straight ahead.
| Foot Angle | Effect | Best For |
|---|---|---|
| Straight (0 to 5 degrees) | Greater quadriceps activation, needs excellent ankle dorsiflexion | People with very mobile ankles and short femurs |
| Moderate (15 to 20 degrees) | Balanced activation of quads and adductors; most common | Most people – a good starting point |
| Wide (25 to 30 degrees) | Greater glute and adductor activation, reduces the need for ankle dorsiflexion | People with long femurs, limited ankle mobility, or a wide hip structure |
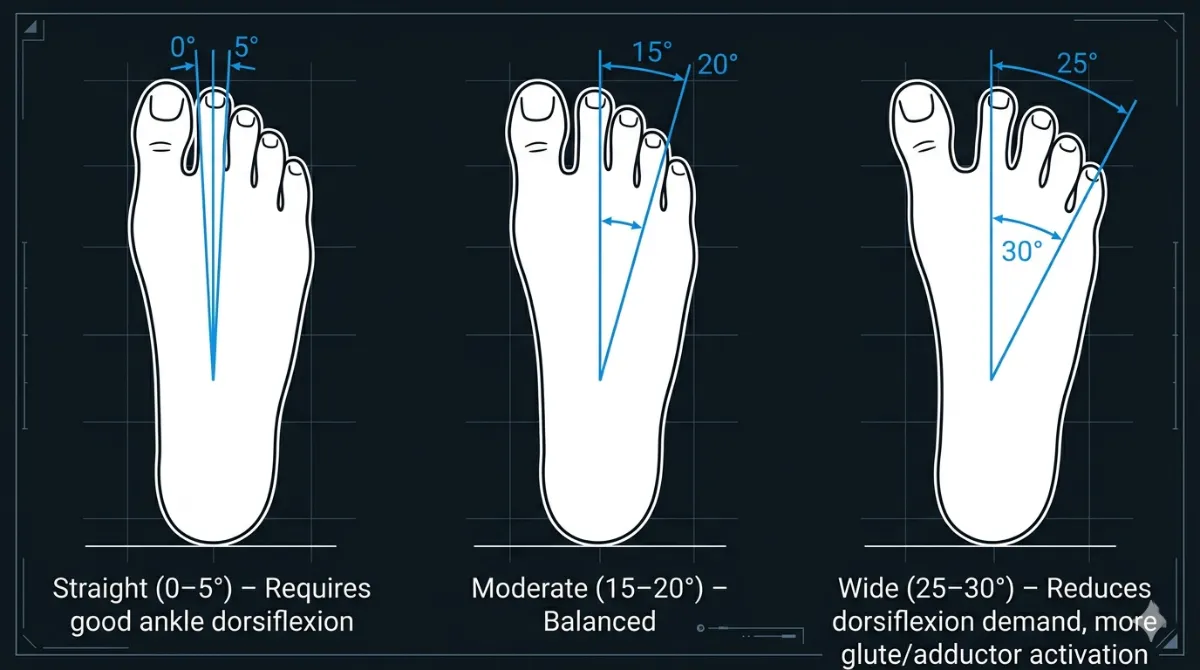
Figure 7. Toe Angles for Squatting. A straighter foot (left) demands more ankle dorsiflexion. A wider toe angle (right) reduces ankle demand and increases glute and adductor activation [10]
Individual differences that affect foot angle
Ankle dorsiflexion range: If you have limited ankle mobility, a wider foot angle reduces the amount of forward knee travel required. This allows you to reach depth without your heels lifting.
Hip external rotation: Your foot angle must match your hip’s ability to externally rotate. Your knees must track in the same direction as your toes. Forcing a foot angle that your hips cannot handle will cause knee valgus (your knees caving in).
Femoral neck angle: The angle at which the femoral head sits on the thigh bone varies between people. Some naturally squat better with toes pointed further out; others need a straighter foot position
How to find your foot angle
Stand with your feet shoulder-width apart. Squat down to depth. Without standing up, look at your feet. Your toes will naturally point to the angle that your hips and ankles prefer. That is your starting point. From there you can make small adjustments.
How Stance Width and Foot Angle Work Together
Stance width and foot angle are not independent. A wider stance often allows or needs a greater foot angle to keep the knees tracking over the toes. A narrow stance usually works best with a straighter foot angle.
| Stance | Typical Foot Angle | Kinematic Effect |
|---|---|---|
| Narrow | 5 to 15 degrees | More forward knee travel; greater quad demand |
| Shoulder width | 15 to 20 degrees | Balanced; good for most people |
| Wide | 20 to 30 degrees | More hip involvement; less forward knee travel |
Other Individual Factors
Torso length relative to femur
Your torso to femur ratio is one of the most important factors in your squat mechanics.
Long femurs, short torso: You will need to lean forward more to keep the bar over your midfoot. A wider stance helps reduce the required forward lean.
Short femurs, long torso: You can stay relatively upright. A shoulder-width stance is usually enough.
Ankle dorsiflexion
Limited ankle dorsiflexion is the most common mobility restriction affecting squat depth.
If you have good ankle mobility: You can squat with a narrower stance and straighter feet, reaching deep squats with an upright torso.
If you have limited ankle mobility: You may need a wider stance, toes turned out further, and possibly heel elevation (weight plates or squat wedges) to reach depth without rounding your back or lifting your heels.
Quick test: Place a ruler 10 to 12 centimetres from a wall. With your foot flat on the floor, try to touch your knee to the wall without lifting your heel. If you cannot, your ankle dorsiflexion is limited.
Hip socket shape
The shape and orientation of your acetabulum is purely anatomical – you cannot change it.
Deep sockets with a prominent anterior rim: May cause impingement (pinching) in deep flexion, especially with a narrow stance. A wider stance and greater foot angle create more room.
Shallow sockets: Allow a greater range of motion. These people can often squat deep with a narrow stance.
Signs of hip impingement: A pinching feeling in the front or side of the hip at depth, or the feeling that you have hit a wall and cannot go deeper, even though your muscles feel strong.
Summary Table of Individual Differences and Adjustments
| Anatomical Factor | Effect on Squat | Recommended Adjustment |
|---|---|---|
| Long femurs | Too much forward lean, bar drifts forward | Wider stance; moderate foot angle (15 to 20 degrees) |
| Short femurs | Upright torso; may feel unstable | Shoulder width stance; straighter feet (5 to 15 degrees) |
| Limited ankle dorsiflexion | Heels lift; shallow depth | Wider stance; toes turned out more (20 to 30 degrees); use heel elevation |
| Deep hip sockets or FAI | Pinching in front of hip; restricted depth | Wide stance; toes turned out; avoid narrow stance |
| Weak gluteus medius | Knees cave inward (valgus) | Resistance band around knees; focus on the knees out cue |
| Poor hip external rotation | Knees cannot track over toes | Reduce foot angle; adjust stance width as needed |
Practical Application
For beginners: Start with a shoulder-width stance, and toes turned out about 15 degrees. Do bodyweight squats and adjust based on how comfortable you feel and how deep you can go.
For lifters with long femurs: Do not try to force an upright torso. Accept some forward lean. Widen your stance and let your toes turn out.
For lifters with limited ankle mobility: Do not be afraid of heel elevation. Weight plates under your heels or dedicated squat wedges are not cheating. They are a legitimate tool that allows you to squat safely and effectively.
For lifters who feel hip pinching: Experiment with stance width. A wider stance with toes turned out often removes impingement. If pain continues, see a physiotherapist.
How to Find Your Ideal Stance – A Simple Test

Figure 8. A Simple Test to Find Your Natural Squat Stance. Let your body choose the path. Adjust your feet until you find a stable, pain‑free depth [8, 11].
Stand tall with your feet under your hips.
Squat down slowly and let your body choose the path.
Adjust your feet until:
your knees track over your toes
your hips feel free
your torso stays stable
there is no pinching in your hips
you reach depth comfortably
Mark that stance. That is your natural squat stance.
The Key Principle
The best stance is the one that allows you to keep a neutral spine, maintain a chest up posture, brace strongly, keep a vertical bar path, reach proper depth, and feel no pain. Biomechanics always wins over fixed rules.
The 6 Pillars of the Squat
In the following sections, we break down the 6 key squat cues through three distinct lenses:
Anatomy, the muscles involved and their specific actions.
Biomechanics, how the cue affects force production, torque, and joint safety.
Individual Differences: how your unique body proportions and mobility affect the application of the cue.
Let’s now apply these lenses to the 6 key coaching cues.
Chest Up + Bracing
1. Chest Up + Bracing
What it means:
Maintain an upright torso with an actively braced core throughout the entire squat. The chest stays proud (not hyperextended), the shoulders are back and down, and the spine remains in a neutral position, its natural curves preserved by intra‑abdominal pressure (IAP). This is not a passive posture; it is an active, engaged position that you must consciously create and hold.
Why it matters:
A tall, braced torso protects the spine from excessive flexion or extension under load. It prevents energy from “leaking” through a wobbly midsection, allowing the force produced by your glutes and quads to transfer efficiently to the barbell. Without this cue, the torso collapses forward, shifting load to the lower back, reducing squat depth, and increasing injury risk, especially during the ascent when fatigue is highest.
Anatomy of “Chest Up + Bracing”
When you hear the cue “Chest Up + Bracing,” you are engaging a 360° system of muscles known as the core canister. This system acts as your body’s natural weightlifting belt, stabilising the spine and transferring force efficiently during the squat. Let’s break down the anatomy into two parts: the Chest Up component (upper body) and the Bracing component (the core canister).
What it means:
Maintain an upright torso with an actively braced core throughout the entire squat. The chest stays proud (not hyperextended), the shoulders are back and down, and the spine remains in a neutral position, its natural curves preserved by intra‑abdominal pressure (IAP). This is not a passive posture; it is an active, engaged position that you must consciously create and hold.
Why it matters:
A tall, braced torso protects the spine from excessive flexion or extension under load. It prevents energy from “leaking” through a wobbly midsection, allowing the force produced by your glutes and quads to transfer efficiently to the barbell. Without this cue, the torso collapses forward, shifting load to the lower back, reducing squat depth, and increasing injury risk, especially during the ascent when fatigue is highest.
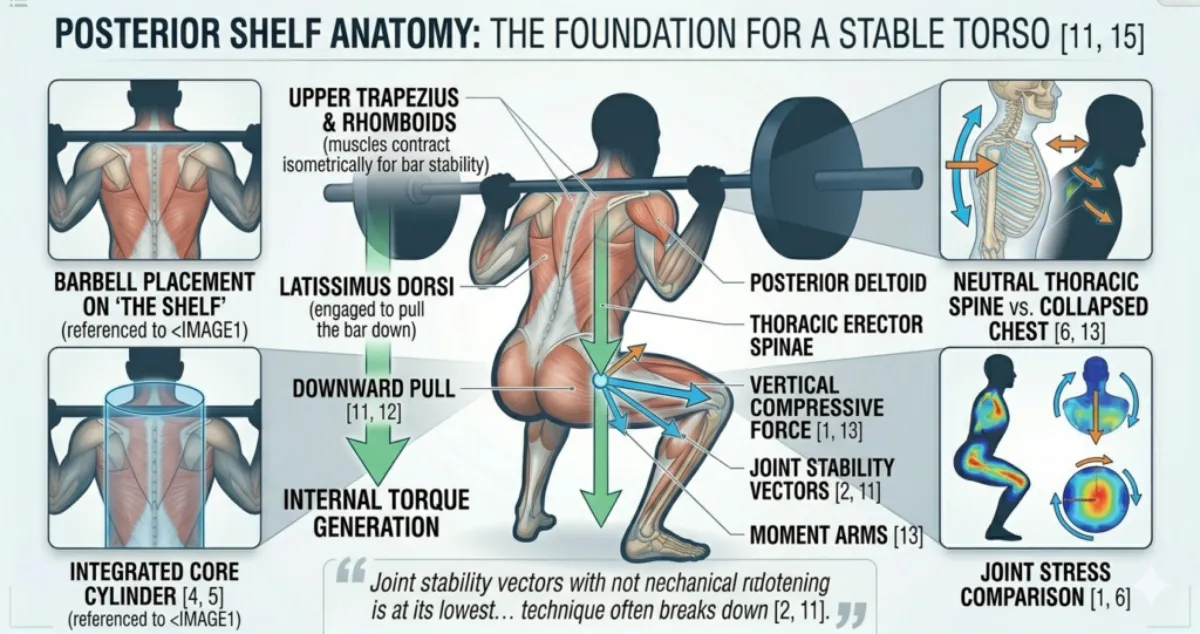
Figure 9: Posterior Shelf Anatomy: The Foundation for a Stable Torso [11, 15]. This complex diagram illustrates the integrated action of the upper back. The isometrically contracting Upper Trapezius and Rhomboids bunch together, forming the stable shelf where the barbell rests. Simultaneously, engaging the Latissimus Dorsi (represented by the Downward Pull arrows [11, 12]) generates torque that ‘locks’ the upper body to the pelvis. Note the magnified insets on the right, which show how a collapsed chest loses mechanical advantage and leads to dangerously high compressive forces [6, 13].”
Part 1: The Anatomy of “Chest Up” (Posterior Stability)
The goal of this cue is to prevent thoracic (upper back) flexion. If the upper back rounds, the centre of mass shifts forward, leading to mechanical failure and increased stress on the lower back.
Muscles Involved
| Muscle | Location | Role in Squat |
|---|---|---|
| Trapezius & Rhomboids | Upper back, between shoulder blades | Contract isometrically to pull the scapulae together and down, creating the muscular “shelf” (the traps) that supports the barbell [11, 15]. |
| Thoracic Erector Spinae | Parallel to the spine, mid‑back | Maintain an upright, extended upper torso. When these muscles “give out,” the chest caves and the bar path drifts forward [1, 6]. |
| Latissimus Dorsi (Lats) | Large wing‑shaped muscles on the back | By “pulling the bar” down into the back, the lats engage. They attach to the thoracolumbar fascia (the lower back’s biological weight belt), effectively “locking” the upper body to the pelvis [12]. |
| Serratus Anterior | Wraps around the ribcage, under the armpit | Stabilises the scapula, helping to keep the chest upright and prevent “winging” of the shoulder blades. |
| Upper Trapezius & Levator Scapulae | Neck and upper shoulder | Support neck and upper‑back alignment. However, overactivity here leads to neck tension, the cue is to keep shoulders down, not shrugged. |
Key concept: “Chest up” does not mean arching the lower back. It means lifting the sternum while keeping the ribs stacked over the pelvis. This puts the spine in a neutral, extended position where the deep stabilisers can fire together instead of fighting poor posture.
Part 2: The Anatomy of “Bracing” (The Core Canister)
Bracing is the co‑contraction of the abdominal “box” to create intra‑abdominal pressure (IAP) [3]. Think of the torso as a pressurised cylinder with four walls:
| Wall | Structure | Role |
|---|---|---|
| Top lid | Diaphragm | Descends during inhalation, compressing the internal organs and increasing IAP [4, 5]. |
| Front & side walls | Transverse abdominis & obliques | Compress the abdomen horizontally, creating a rigid cylinder that resists flexion, extension, and rotation [5, 12]. |
| Base | Pelvic floor | Seals the bottom of the canister, holding pressure from below. Works in a “push‑pull” action with the diaphragm [3, 4]. |
| Back wall | Multifidus & erector spinae | Stiffen the spine segment by segment, preventing it from buckling under load. |
Detailed Muscle Functions
- Diaphragm (Top Lid)
Location: Separates the chest from the abdomen (just below the ribs).
Role: Initiates the brace by descending during a diaphragmatic (belly) breath. This increases IAP and creates a pressure dome that stabilises the spine.
Why it matters: Without diaphragmatic engagement, your brace feels shallow and ineffective. A collapsed chest prevents the diaphragm from descending properly, weakening the entire system. Rectus Abdominis (Front Wall)
Location: Vertical muscle running from the ribcage to the pubic bone.
Role: Stiffens the anterior abdominal wall isometrically, preventing excessive bulging to contain IAP.
Why it matters: Cannot generate IAP on its own but acts as the front panel of the pressure vessel. Over-reliance on it without transverse abdominis creates a stiff but hollow brace.
Obliques (External & Internal) (Side Walls)
Location: Diagonal muscles along the sides and front of the abdomen.
Role: Internal obliques compress the abdomen to boost IAP; external obliques reinforce the side walls to prevent lateral pressure leakage.
Why it matters: Weak obliques cause pressure to leak sideways, reducing spinal stability. Balanced oblique function ensures 360° containment of IAP.
- Transverse Abdominis (Deep Wrap)
Location: Deepest layer of the abdominal wall, wrapping around the midsection like a corset.
Role: Compresses the abdomen horizontally, increasing IAP and stabilising the lumbar spine.
Why it matters: This is the most important muscle for spinal stability. Weak transverse abdominis = poor force transfer and higher injury risk. It is often underactivated in lifters who rely on the superficial “six‑pack” muscles. - Pelvic Floor (Base)
Location: Muscles at the base of the pelvis.
Role: Seals the bottom of the canister, working in opposition to the diaphragm. When the diaphragm pushes down, the pelvic floor lifts up, containing the pressure.
Why it matters: A weak pelvic floor leads to incomplete bracing and potential lower back instability. This is especially important for postpartum lifters or those with pelvic floor dysfunction. - Multifidus & Erector Spinae (Back Wall)
Location: Multifidus is a deep segmental stabiliser along the spine; erector spinae is a more superficial muscle running parallel to the spine.
Role: Multifidus provides fine‑tuned segmental control; the erectors provide global support to resist flexion. Together, they stiffen the spine so it stays neutral under load.
Why it matters: Weak multifidus = poor spinal control (common in chronic lower back pain). Overactive erectors without multifidus support can lead to hyperextension (e.g., “butt wink”).
Part 3: How the Core Canister Works Together
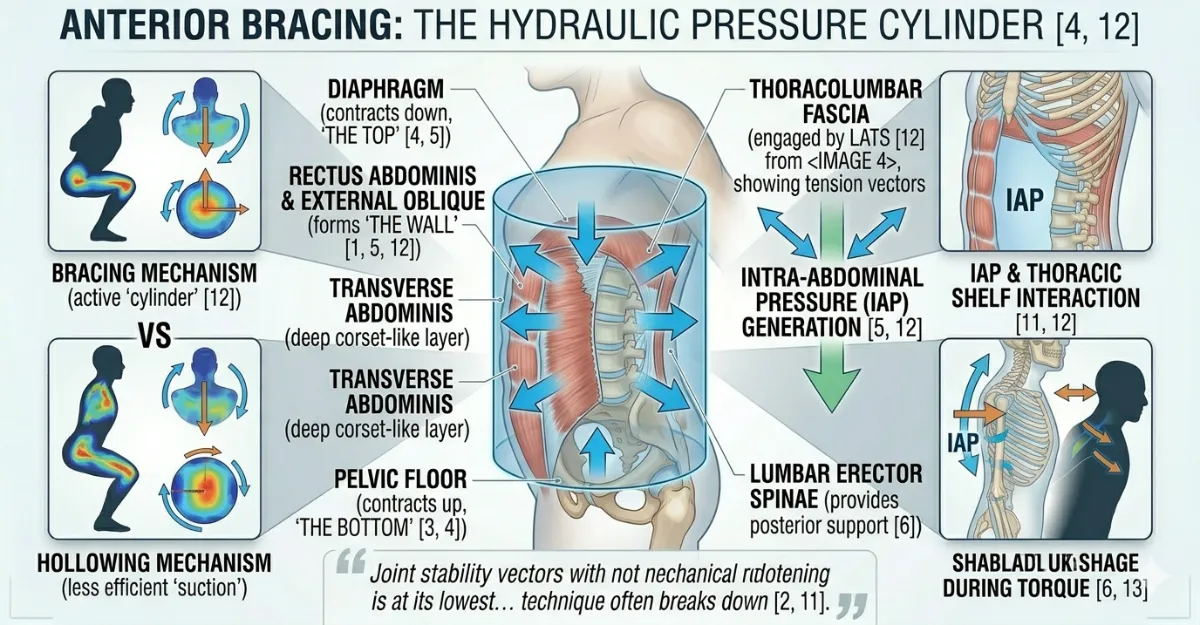
Figure 10: Anterior Bracing: The Hydraulic Pressure Cylinder [4, 12]. This mid-sagittal cross-section visualizes the co-contraction necessary for a stable brace. When the lifter takes a diaphragmatic breath and stiffens the core ‘wall’, the internal pressure (IAP arrows [5, 12]) acts as a supportive canister, protecting the lumbar spine from compressive forces [5]. Note the comparison in the inset: Active bracing (the ‘canister’) creates a superior structural support system compared to hollowing (‘sucking in’), which actually reduces spinal stability during high-torque movements like the squat [12].”
When you brace correctly, here is the sequence:
Diaphragm contracts downward → Increases intra‑abdominal pressure.
Transverse abdominis and obliques tighten → Compress the abdomen horizontally.
Pelvic floor lifts → Seals the base of the canister.
Multifidus and erector spinae stabilise → Lock the spine in a neutral position.
Lats and serratus anterior engage → Keep the chest upright and the bar path vertical.
The biomechanical result:
Your torso becomes a rigid pillar – a series of 24 movable vertebrae converted into a single, stable column [5, 11]. This ensures that the force generated by your legs is transmitted directly to the barbell with zero “energy leaks” through the midsection. Without active bracing, the spine relies on passive structures (ligaments and discs), which are far more vulnerable to injury under load.
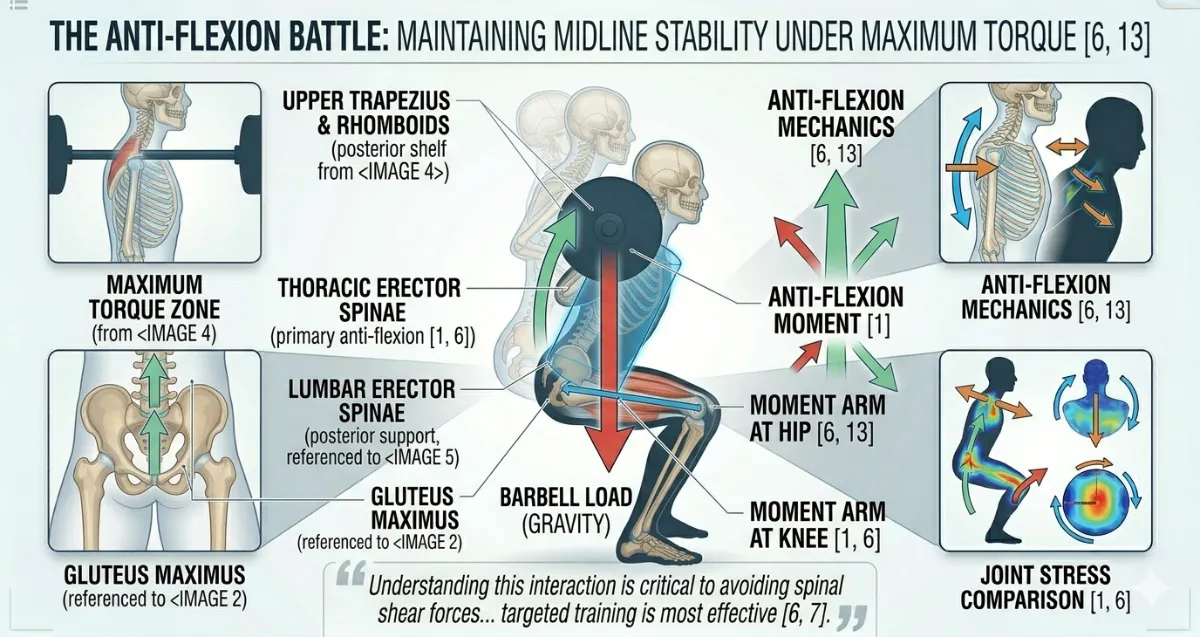
Figure 11: The Anti-Flexion Battle: Maintaining Midline Stability under Maximum Torque [6, 13]. This systematic diagram visualises the forces at play at the parallel position. The massive downward force of the barbell (red arrow [11, 13]) constantly tries to round the thoracic spine [6]. This gravity-driven force must be met by a coordinated, upward push, the ‘Anti-Flexion Moment’, generated by the Thoracic Erector Spinae, the Gluteus Maximus [1, 9], and the posterior shelf (from Figure 5 [1, 11]). Note that the integrated core canister (referenced from image_2 and detailed in image_10 provides essential hydraulic support (blue cylinder [4, 5, 12]) that reinforces the spine against these shear forces, keeping the lifter strong and stable precisely when the mechanical advantage is at its lowest [6, 13].”
Part 4: Common Anatomy‑Related Issues & Fixes
| Issue | Likely Cause | Suggested Fix |
|---|---|---|
| Soft core / energy leak | Weak transverse abdominis | Dead bugs, Pallof presses, diaphragmatic breathing drills. |
| Lower back pain during squat | Overactive erector spinae, weak multifidus | Strengthen multifidus with bird‑dogs; practice segmental spinal control. |
| Rib flare (hyperextension) | Poor diaphragmatic control, over‑arched lower back | Practice “ribs stacked over pelvis” – exhale to feel the ribcage lower. |
| Neck tension / shrugging | Overactive upper traps | Scapular retraction drills; cue “shoulders down and back.” |
| Pelvic floor weakness | Postpartum or chronic poor bracing | Kegel exercises, hip bridges, and conscious pelvic floor lift during brace. |
Summary for Readers
The core canister is your natural weightlifting belt, engage it before every rep.
Bracing = 360° tension (not just “sucking in” your stomach).
“Chest up” means lifting the sternum without flaring the ribs, allowing the diaphragm to work properly.
Weak links (pelvic floor, multifidus, transverse abdominis) can sabotage your squat, train them specifically.
Breathing matters: diaphragmatic breath + bracing = power + protection.
Biomechanics of "Chest Up + Bracing" (Kinetics & Kinematics)
When we analyse the squat biomechanically, we examine two interconnected domains: kinematics (the geometry of motion, including joint angles, bar path and segmental alignment) and kinetics (the forces that produce or resist motion, including torque, shear, compression and ground reaction forces) [6, 13]. The cue “Chest Up + Bracing” fundamentally alters both, transforming the torso from a series of movable segments into a single, rigid pillar capable of efficiently transmitting force from the legs to the barbell [5, 11, 12].
Part 1: Kinematics – The Geometry of a Stable Squat
Kinematics describes the position, angle and movement pattern of your joints during the squat.
Without Proper Chest Up + Bracing
When the chest collapses (thoracic flexion) and the core is soft:
Thoracic spine rounds forward (flexion), shifting the centre of mass anteriorly (towards the toes) [1, 11].
Lumbar spine often overextends (excessive arch) to compensate, or it collapses into flexion at the bottom (“butt wink”) [6].
Rib cage flares upward, disrupting diaphragmatic engagement and breaking the “ribs over pelvis” alignment [4].
Hips are unable to achieve full depth because the pelvis tilts posteriorly (butt wink) to accommodate the poor spinal position [14].
Bar path drifts forward of the midfoot, increasing the horizontal distance the bar must travel and creating an inefficient lever arm [11].
With Proper Chest Up + Bracing
When you lift the chest and brace correctly:
Thoracic spine maintains a neutral or slightly extended position, keeping the sternum lifted and the shoulders back [1, 15].
Ribs are stacked directly over the pelvis, no flaring, no excessive arch [4, 12].
Lumbar spine maintains its natural lordotic curve without hyperextension. The pelvis remains neutral throughout the descent and ascent [6, 14].
Bar path remains vertical, staying over the midfoot from start to finish, a straight line that minimises energy loss [11].
Key kinematic outcome: The torso becomes a single, rigid segment rather than a series of movable vertebrae. This simplifies the movement pattern, reduces the number of variables that can go wrong and allows the hips and knees to move in a coordinated, efficient manner [5, 12].
Part 2: Kinetics – The Forces That Stabilise and Drive
Kinetics examines the forces acting on the body: external forces (gravity, barbell weight) and internal forces (muscle tension, joint reaction forces, intra‑abdominal pressure).
Intra‑Abdominal Pressure (IAP) – The Core Kinetic Mechanism
When you brace, you create intra‑abdominal pressure (IAP), a pressurised column of air inside your abdominal cavity. This is not a muscle contraction in the traditional sense; it is a fluid‑based stiffening mechanism [4, 5].
How IAP works:
The diaphragm descends during a deep belly breath, compressing the abdominal contents [4].
The transverse abdominis and obliques contract, creating a rigid cylindrical wall around the abdomen [5, 12].
The pelvic floor lifts, sealing the base of the canister [4].
The result is a pressurised cylinder that pushes outward against the abdominal wall, the spine and the pelvic floor simultaneously.
The kinetic effect of IAP:
Reduces compressive load on the intervertebral discs. The pressure acts as a hydraulic support, distributing the load across the entire torso rather than concentrating it on the spine. Research shows IAP can reduce spinal compression by 30 to 50 per cent during heavy lifts [5].
Increases spinal stiffness. A braced torso resists flexion, extension and rotation far more effectively than an unbraced one [5, 12].
Prevents energy leakage. Force produced by the glutes and quadriceps is transmitted directly to the barbell without being dissipated through a wobbly midsection [12].
Manages external torque. When a barbell is placed on the back, gravity creates an external torque that constantly tries to fold the torso forward [6, 11]. IAP generates an equal and opposite internal anti‑flexion moment, neutralising this torque and protecting the spine.
The Thoracolumbar Fascia (TLF). The “Biological Weight
The latissimus dorsi attaches to the thoracolumbar fascia, a sheet of connective tissue that covers the lower back [12]. When you actively pull the bar down into your back (engaging the lats), you tension the TLF, which in turn increases stiffness in the lumbar spine.
Kinetic benefit: This creates a passive (non‑muscular) stiffening effect that supplements active bracing, making the torso even more rigid under heavy loads without requiring additional muscular effort [12].
Ground Reaction Forces (GRF) and Force Transfer
During the squat, ground reaction forces (GRF) travel upward through the feet. A braced core ensures these forces are transferred efficiently to the barbell without energy loss [11]. Research indicates that lifters with stronger bracing produce 15 to 20 per cent higher peak GRF during the ascent phase of the squat, directly translating to more weight lifted [13].
Moment Arms and Leverage
A moment arm is the perpendicular distance from the line of action of a force to the axis of rotation (joint). In the squat, longer moment arms increase the torque that the muscles must overcome [6, 13].
When the chest drops (thoracic flexion), the barbell drifts forward, increasing the horizontal moment arm at the hip [11]. This forces the glutes and hamstrings to work at a mechanical disadvantage, making the lift significantly harder and increasing shear forces on the lumbar spine.
A braced, upright torso keeps the barbell over the midfoot, minimising moment arms and allowing the hips and knees to operate at their most mechanically advantageous angles [6, 13].
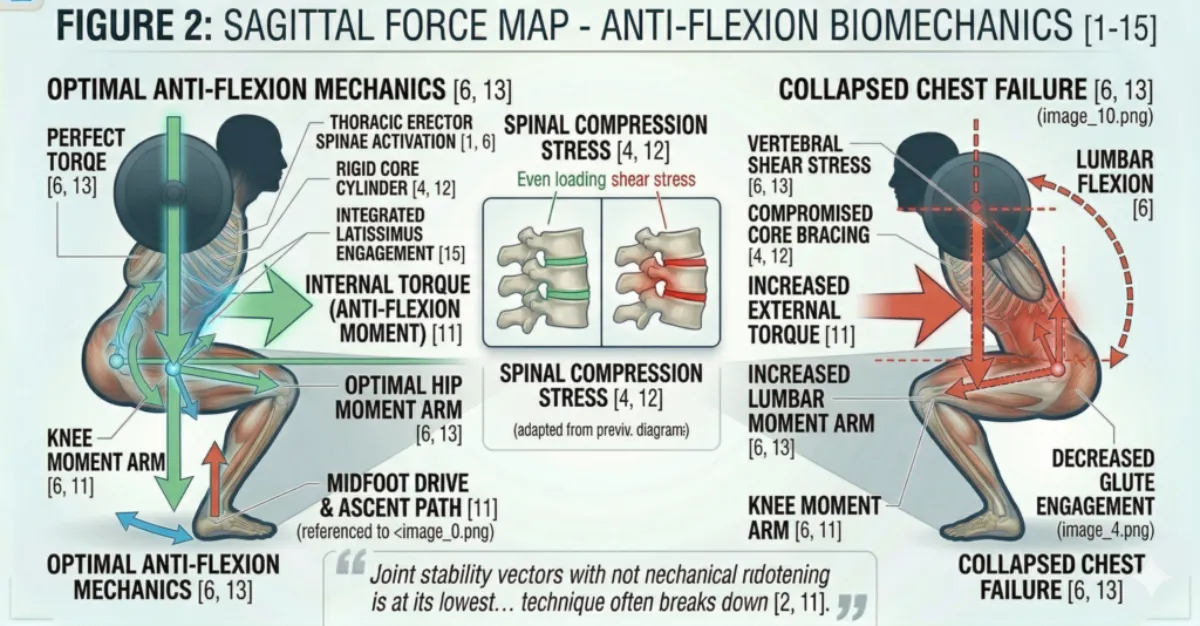
Figure 12: Sagittal Force Map: Anti-Flexion Biomechanics. The left panel shows optimal execution where the body’s internal torque (green) creates an anti-flexion moment that counters external load. The right panel demonstrates a technical collapse where the lost spinal rigidity increases the lumbar moment arm and compression/shear forces [6, 11, 13].
Part 3: The Sticking Point. Where Kinetics and Kinematics Converge
The sticking point (the hardest part of the ascent, typically just above parallel) occurs where the mechanical advantage of the hip and knee extensors is at its lowest [6, 13]. At this specific joint angle, the moment arms of the hip and knee are least favourable and the muscles are at a suboptimal length for force production.
Why bracing is critical here:
As fatigue accumulates, the core tends to “soften”, the lifter loses IAP [6].
When the core softens, the torso collapses forward (chest drops), shifting the centre of mass anteriorly.
This increases the horizontal moment arm between the barbell and the hip joint, making the lift significantly harder.
The lifter then compensates by overusing the lower back (erector spinae), increasing the risk of lumbar injury.
A well‑braced torso maintains its rigidity even under fatigue, keeping the bar path vertical and the moment arms short [5, 12]. This is why experienced lifters can grind through the sticking point while maintaining form.
Part 4: Kinematic and Kinetic Consequences of Poor Bracing (Summary Table)
| Fault | Kinematic Consequence | Kinetic Consequence |
|---|---|---|
| Chest collapse | Thoracic flexion; bar drifts forward | Increased hip moment arm; greater spinal shear force [6, 11] |
| Rib flare | Lumbar hyperextension; anterior pelvic tilt | Compressive load on posterior spinal elements; reduced IAP [4] |
| Soft core | Pelvic tilt at depth (“butt wink”) | Loss of power transfer; increased disc pressure [5, 14] |
| No lat engagement | Unstable bar; forward lean | Reduced TLF tension; less passive spinal stiffness [12] |
Part 5: Key Biomechanical Takeaways
Kinematics: The chest‑up position creates a neutral, stacked spinal alignment. The ribs must sit directly over the pelvis, no flaring, no rounding [4, 12].
IAP is not “sucking in.” It is a pressurisation of the abdominal cavity that creates hydraulic spinal support, reducing compressive loads by 30 to 50 per cent [5].
The torso becomes a rigid pillar. This is not a metaphor; it is a biomechanical reality achieved through the co‑contraction of the core canister and tensioning of the thoracolumbar fascia [5, 12].
Bracing is most critical at the sticking point. When fatigue is highest and the mechanical advantage is lowest, a braced torso is what separates a successful rep from a failed one [6, 13].
Kinetics and kinematics are inseparable. A change in joint position (kinematics) directly alters the forces (kinetics) acting on the body. A collapsed chest increases moment arms, shear forces and injury risk; an upright, braced torso minimises these forces and maximises force transfer [6, 11, 13].
Individual Differences for Chest Up + Bracing
Not every lifter will use the “Chest Up + Bracing” cue in exactly the same way, because torso shape, limb length, mobility, injury history and training age all influence how the cue lands. The goal is always the same, a tall, organised torso with a strong brace, but the route to get there varies from person to person.
This section describes the most common individual differences that affect the Chest Up + Bracing cue and offers practical adjustments for each.
Femur Length Relative to Torso
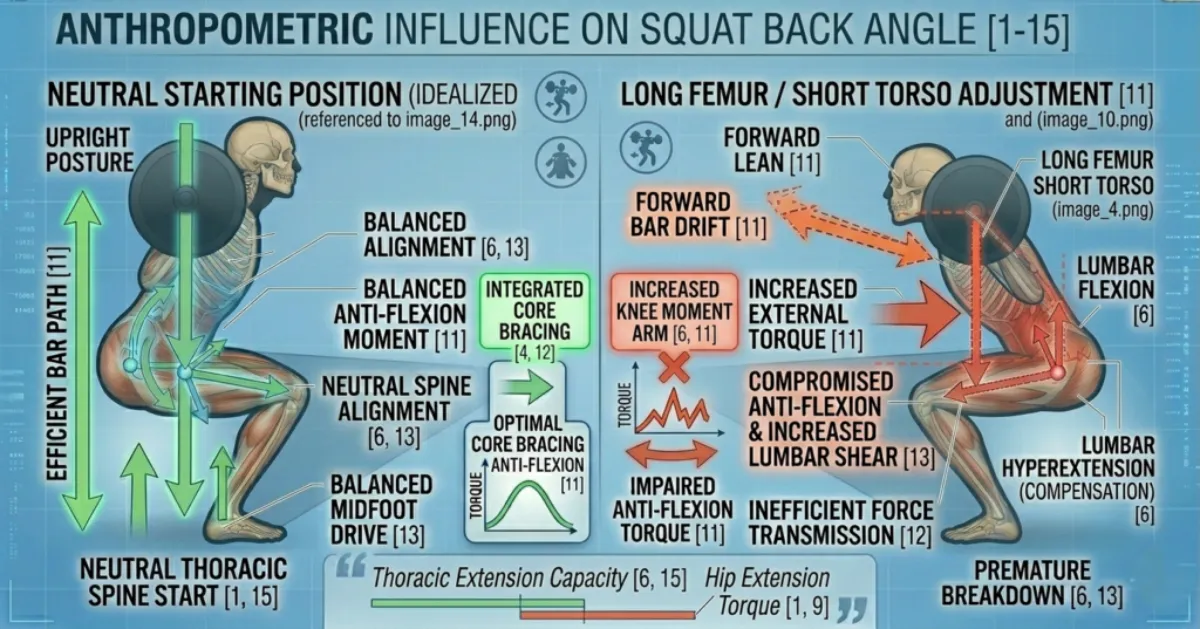
Figure 13: Visualizing Leverage: Anthropometric Influence on Squat Back Angle [1-15]. This diagram contrasts idealized bone proportions (left) with a long-femur/short-torso variation (right). Note that the forward lean on the right is a mechanical necessity, not a technical flaw. Forcing the upright posture of the left would result in an extreme technical collapse [6, 11, 13].
Your femur length compared to your torso length is one of the biggest factors affecting your torso angle during the squat [8, 11].
Long femurs, short torso: You will need to lean forward more to keep the barbell over your midfoot. For you, “chest up” is not about staying bolt upright. It is about preventing excessive collapse while still allowing the forward torso angle that your structure demands. If you overdo the cue, you often end up hyperextending your lower back instead of bracing properly.
Short femurs, long torso: You can stay relatively upright. Your chest up position will look closer to vertical.
Adjustment: If you have long femurs, accept some forward lean. Focus on bracing hard and keeping your spine neutral rather than chasing a vertical chest. Do not assume that someone leaning forward is doing something wrong. They may simply have longer femurs.
Thoracic Spine Mobility

Figure 14:Shoulder Mobility as a Spinal Constraint: Glenohumeral Mobility & The ‘Lat Pull’ Effect [1-15]. This diagram contrasts efficient lat engagement (left) with restricted mobility (right). Note how excessive tension in the Latissimus Dorsi (orange glowing outline) can cascade down the kinetic chain, actively pulling the thoracic spine into flexion (vibrant orange dashed arrows) and making a ‘Chest Up’ state impossible at depth [6, 11, 12, 13].
Your upper back mobility determines how easily you can achieve a proud chest position [1, 15].
Good thoracic mobility: You can lift your sternum, pull your shoulders back and create a stable shelf for the barbell without straining your lower back.
Poor thoracic mobility: You may feel tightness in your upper back. Your chest may want to round forward, especially at the bottom of the squat. This is common in people who sit at desks for long hours or who have a history of rounded shoulder posture. Lifters with a rounded upper back or limited thoracic extension usually struggle to get the sternum lifted without flaring the ribs.
Adjustment: If you have poor thoracic mobility, prioritise mobility work. Thoracic extensions over a foam roller, thread the needle stretches and banded pull aparts can help. In the short term, accept that your chest up position may look different. Focus on bracing your core canister first, because a tight, stable torso is more important than a perfectly vertical chest. These athletes often benefit from thinking about “growing tall through the spine” rather than aggressively pulling the chest up.
Lumbar Spine and Pelvis Positioning
Some people naturally have more lumbar curve (lordosis) or less. Others struggle with posterior pelvic tilt at depth, often called “butt wink” [6, 14].
Excessive lumbar curve (hyperlordosis): You may be prone to flaring your ribs. This reduces IAP and puts more load on the posterior elements of your spine. You need to focus on stacking your ribs over your pelvis.
Flat back or posterior tilt tendency: You may struggle to maintain a neutral lower back at depth. Your chest may drop as your pelvis tucks under. This often comes from tight hip flexors or limited ankle mobility.
Adjustment: If you tend to flare your ribs, cue yourself, “ribs down, pelvis neutral.” If you tend to tuck under (butt wink), experiment with stance width and heel elevation before assuming the problem is your bracing.
Rib Cage Anatomy and Diaphragmatic Control
Some people naturally have a wider or more flared rib cage. Others struggle to breathe diaphragmatically and instead breathe into their chest [4]. A naturally flared ribcage may make the “chest up” cue counterproductive, while someone with a more compressed torso might need the cue more than most.
Chest breathers: Tend to lift their ribs when they inhale. This reduces IAP and makes bracing less effective.
Belly breathers: Naturally engage the diaphragm, making bracing easier.
Adjustment: If you are a chest breather, practise belly breathing. Lie on your back with one hand on your chest and one on your belly. Aim to make the belly hand rise while the chest hand stays still. This retrains the diaphragm to be your primary breathing muscle.
Previous Back Injuries or Stiffness
A history of lower back pain or disc issues changes how you should approach bracing [5, 12]. Anyone with a history of back pain or stiffness may brace cautiously at first. They sometimes associate bracing with “tensing the back,” which leads to over‑recruiting the erectors and under‑recruiting the deep core.
Disc issues: A neutral spine is critical. You cannot afford to let your chest collapse or your lower back round at depth. Bracing must be your highest priority before every rep.
Muscular back pain: Weak erector spinae or multifidus may mean your brace feels weak even when you are trying hard. You may need to build core endurance before heavy loading.
Adjustment: If you have a history of back pain, practise bracing drills without weight. Dead bugs, Pallof presses and diaphragmatic breathing exercises can rebuild the mind muscle connection. These lifters often need a slower, more controlled approach, learning to breathe into the belly and sides, not just tighten the surface muscles. Consider working with a physiotherapist to identify specific weaknesses
Core Strength and Bracing Experience
Not everyone can create high IAP on command. Bracing is a skill that improves with practice [5, 12]. A weak or under‑trained core can also change how the cue feels.
Novice lifters: May struggle to feel the difference between “sucking in” and “bracing out.” They often hold their breath without actually creating tension. Newer lifters often think they are bracing when they are really just sucking in their stomach.
Experienced lifters: Can create a rigid cylinder quickly and maintain it under fatigue.
Adjustment: If you are new to bracing, practise lying on your back with your knees bent. Place your hands on your lower ribs and abdomen. Take a deep breath into your belly, then brace as if someone is about to punch you. Feel the 360 degree expansion. Once you can do this lying down, practise standing. Then practise during bodyweight squats. Only then add load. Tempo work, pauses and lighter loads help them build the skill without losing position.
Latissimus Dorsi Engagement
Figure 15: Shoulder Mobility as a Spinal Constraint: Glenohumeral Mobility & The ‘Lat Pull’ Effect [1-15]. This diagram contrasts efficient lat engagement (left) with restricted mobility (right). Note how excessive tension in the Latissimus Dorsi (orange glowing outline) can cascade down the kinetic chain, actively pulling the thoracic spine into flexion (vibrant orange dashed arrows) and making a ‘Chest Up’ state impossible at depth [6, 11, 12, 13].
The lats attach to the thoracolumbar fascia. When you engage them, you increase passive stiffness in your lower back [12].
Weak lat engagement: Your bar may feel unstable. Your torso may feel less rigid even when your abs are braced.
Strong lat engagement: The bar feels locked in. Your upper back and lower back work together to create a rigid pillar.
Adjustment: Before you squat, practise the “pull the bar down” cue. With an empty bar or a PVC pipe, set your hands on the bar and actively pull it down into your back. You should feel your lats engage. Do this before every set.
Summary Table of Individual Differences for Chest Up + Bracing
| Factor | Effect on Cue | Practical Adjustment |
|---|---|---|
| Long femurs | Forward lean; chest appears less upright | Accept forward lean; focus on bracing, not chest angle |
| Poor thoracic mobility | Rounded upper back; chest collapses | Thoracic mobility drills; think “grow tall through the spine” |
| Rib flare tendency | Reduced IAP; lumbar overextension | Cue: “ribs down, pelvis neutral” |
| Butt wink (posterior tilt) | Chest drops at depth | Widen stance; add heel elevation; check ankle mobility |
| History of back pain | High risk if brace fails; may over‑recruit erectors | Practise bracing drills without load; build core endurance; slower progression |
| Novice bracer | Weak IAP; sucks stomach in instead of bracing out | Practise lying down first; use tactile feedback (hands on abdomen); tempo work |
| Chest breather | Poor diaphragmatic engagement; ribs lift | Belly breathing drills; hand on belly to check |
| Weak lats | Unstable bar; less passive spinal stiffness | “Pull the bar down” cue before each set |
| Naturally flared ribcage | “Chest up” may be counterproductive | Focus on rib stacking and bracing, not lifting the chest higher |
The Key Principle
The goal is always the same, a tall, organised torso with a strong brace that protects the spine and transfers force efficiently. But the route to get there varies from person to person. Do not compare your torso angle to someone else’s. Do not force a position that your skeleton does not want to be in. Learn what your body needs, then apply the cue accordingly.
Coaching Guide for Chest Up + Bracing
The goal of this guide is to help you transform your torso into a rigid, force transmitting pillar. You will use a mix of internal cues (what you feel inside your body) and external cues (what you focus on in the environment). Research shows that external cues often produce better movement outcomes, but beginners sometimes need internal cues first to learn what a brace feels like. A good coach uses both.
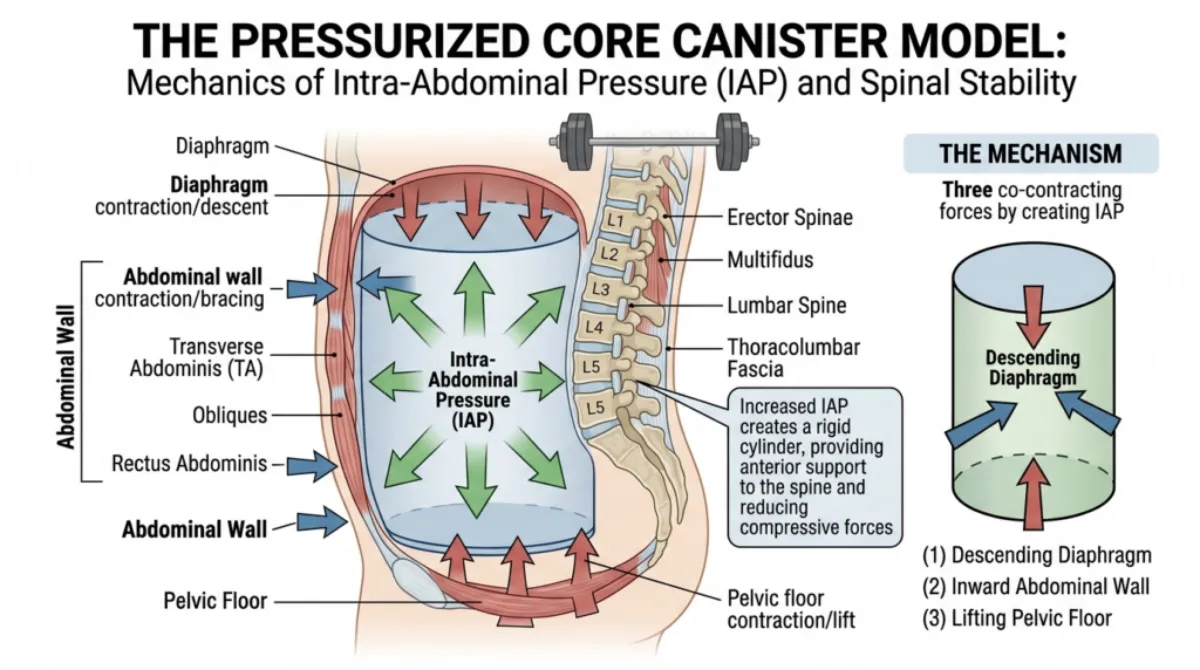
Figure 16. Visualising the cylinder, the pressurised core canister. The descending diaphragm and lifting pelvic floor create the top and bottom seals, while 360‑degree outward expansion (IAP), supplemented by a lifting belt, creates the anti‑flexion moment that keeps the spine rigid [4, 5, 12].
Key Coaching Instructions (Step by Step for All Levels)
Step | Instruction | Biomechanical Result |
1 | Breathe into your belly, not your chest. | Lowers the diaphragm, increasing intra‑abdominal pressure (IAP) and preparing the core canister [4, 5]. |
2 | Brace your whole midsection, front, back and sides. | Creates 360 degree tension, turning the torso into a rigid cylinder that resists flexion, extension and rotation [5, 12]. |
3 | Lift your chest without flaring your ribs. | Maintains thoracic extension, keeping the bar path vertical and reducing the hip moment arm [1, 11]. |
4 | Pull your shoulders down and back. | Engages the lats and tensions the thoracolumbar fascia, adding passive stiffness to the lower back [12]. |
5 | Hold the brace all the way down and all the way up. | Prevents energy leakage through a soft midsection, maximising force transfer from the legs to the bar [5]. |
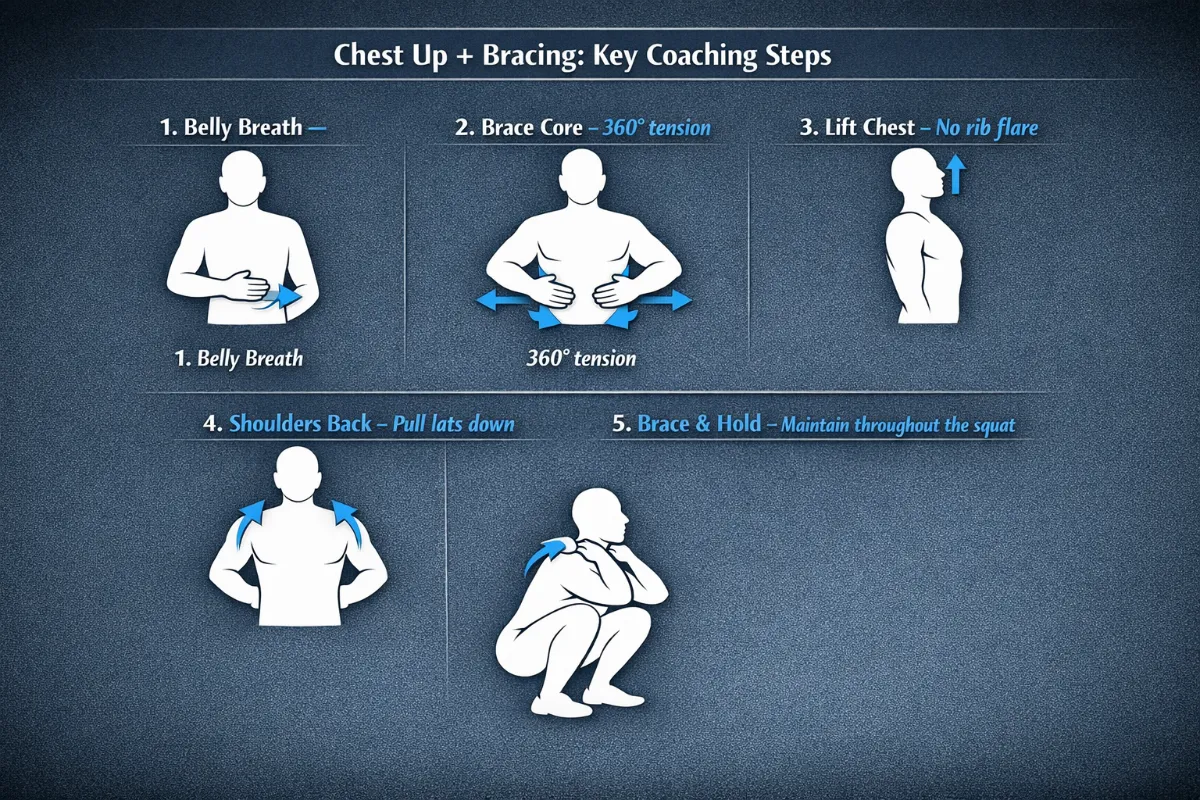
Figure 17. The five key coaching steps for ‘Chest Up + Bracing’. Step 1: belly breath to lower the diaphragm. Step 2: brace the core with 360 degree tension. Step 3: lift the chest without flaring the ribs. Step 4: pull the shoulders down and back to engage the lats. Step 5: hold the braced position throughout the squat [4, 5, 12].
Beginners
Focus: Learning what a brace feels like. No heavy weight. Use internal cues first.
Internal Cues (Feel the Body)
| Cue | Biomechanical Result |
|---|---|
| “Take a deep breath into your belly. Put your hand on your stomach and feel it rise.” | Descends the diaphragm, initiating IAP and creating the top of the core canister [4]. |
| “Tighten your core like you are about to be punched in the stomach.” | Co‑contracts the transverse abdominis, obliques and erector spinae, creating a rigid cylinder [5, 12]. |
| “Feel your lower back and sides get hard, not just your abs.” | Ensures 360 degree bracing, preventing the spine from buckling under load [5]. |
| “Keep your ribs stacked over your pelvis. Do not let them flare open.” | Aligns the diaphragm with the pelvic floor, maximising IAP and preventing lumbar overextension [4]. |
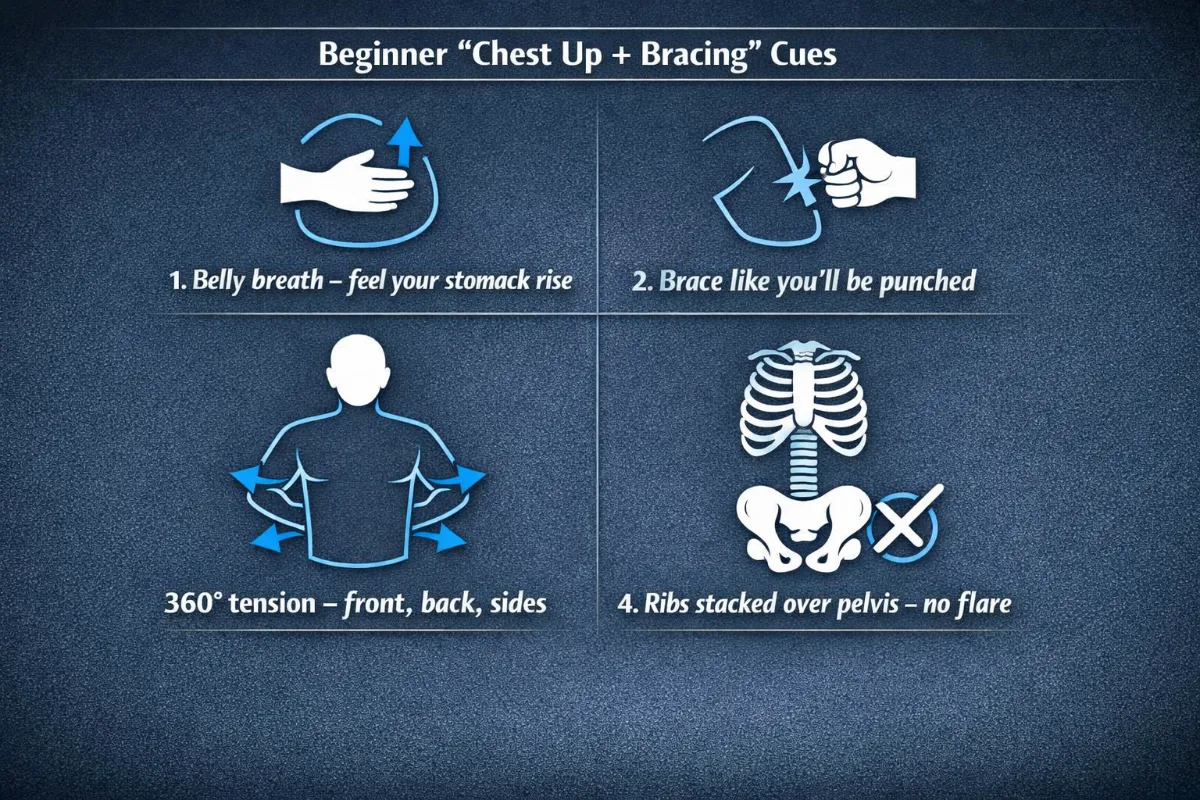
Figure 18. Beginner internal cues for ‘Chest Up + Bracing’. These cues help establish basic intra‑abdominal pressure, 360 degree bracing, and proper rib to pelvis alignment [4, 5, 12].”
External Cues (Focus on the Environment)
| Cue | Biomechanical Result |
|---|---|
| “Show your chest to the wall in front of you.” | Maintains thoracic extension, keeping the barbell over the midfoot [1, 11]. |
| “Keep your chest proud like you are wearing a medal.” | Prevents thoracic flexion, which would increase the hip moment arm and spinal shear forces [6]. |
| “Brace before you move. Do not wait until you are at the bottom.” | Sets spinal stiffness before loading, reducing injury risk during the descent [5]. |
What to avoid: Do not use complex anatomy terms. Do not load the bar until they can brace correctly with bodyweight.
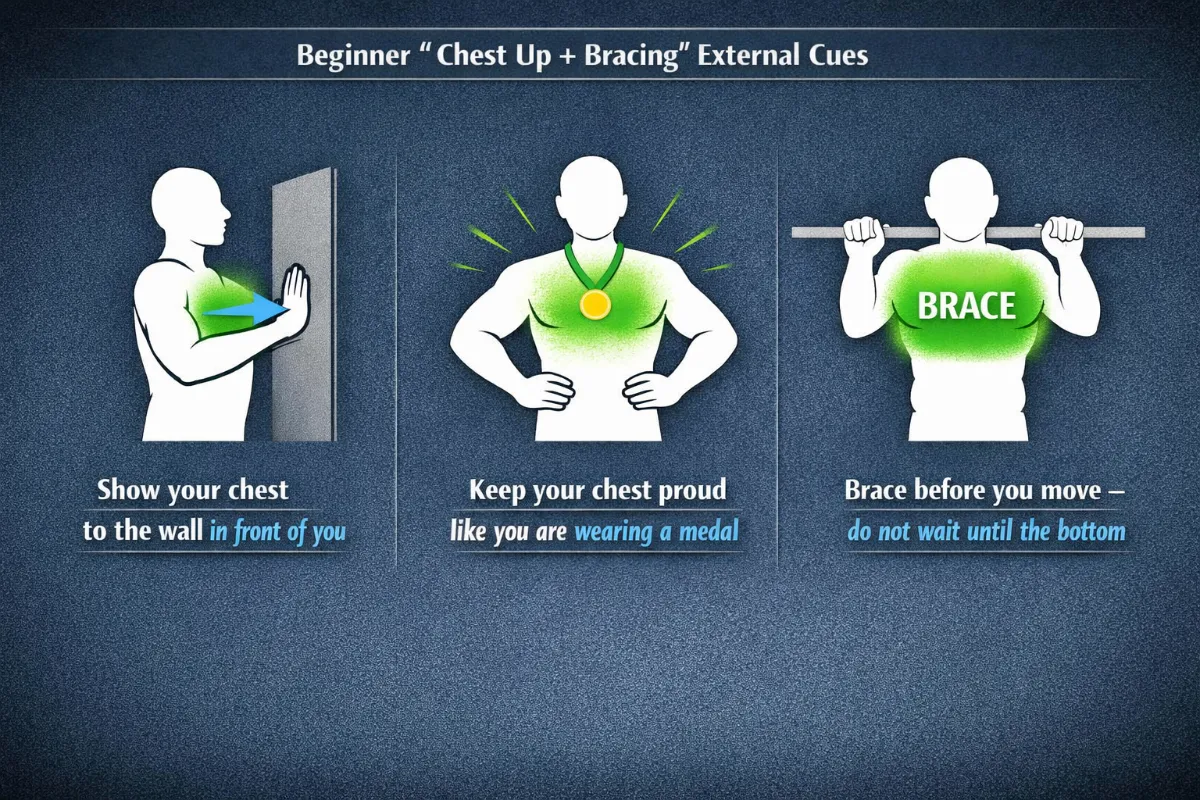
Figure 19. External cues for beginner lifters. These environment‑focused cues help maintain thoracic extension and spinal stiffness before movement [1, 5, 11].
Intermediate Lifters
Focus: Refining the brace under load. Using external cues to improve movement quality. Adding speed and timing.
Internal Cues (Feel the Body)
| Cue | Biomechanical Result |
|---|---|
| “Wrap your core 360 degrees like a cylinder.” | Activates the entire core canister, distributing IAP evenly around the spine [5, 12]. |
| “Fill your ribs, sides and back with air, not just your belly.” | Expands the diaphragm and obliques, increasing IAP and spinal stiffness [4]. |
| “Pull your ribs down and in towards your pelvis.” | Stacks the ribs over the pelvis, restoring the diaphragm’s mechanical advantage and preventing rib flare [4]. |
| “Feel your upper back wide and active. Pull the bar down into your lats.” | Tensions the thoracolumbar fascia via the lats, adding passive stiffness to the lumbar spine [12]. |
External Cues (Focus on the Environment)
| Cue | Biomechanical Result |
|---|---|
| “Breathe in, lock it, squat.” | Sequences the brace before movement, ensuring spinal stiffness is established early [5]. |
| “Push your torso up against the bar as you descend.” | Reinforces thoracic extension, countering the forward pull of the barbell [1, 11]. |
| “Crunch your abs slightly, then lift your chest.” | Creates a balanced brace (not overextended) while maintaining a proud chest position [4, 5]. |
| “Hold your shape. Do not let your chest drop at the bottom.” | Maintains thoracic extension through the full range, preventing energy leakage [6]. |
| “Keep the bar travelling in a straight vertical line.” | Minimises the horizontal moment arm, reducing torque on the hips and spine [11]. |
What to add: Tempo work and pause squats to build brace endurance. Introduce a lifting belt if they compete or lift heavy.
Advanced Lifters
Focus: Maximum stiffness under heavy loads. Short, aggressive cues that work during maximal or near maximal attempts.
Internal Cues (Feel the Body)
| Cue | Biomechanical Result |
|---|---|
| “Brace hard. Fill the belt.” | Maximises IAP, taking advantage of the belt’s proprioceptive feedback to increase spinal stiffness [5]. |
| “Ribs locked. Pelvis neutral.” | Maintains optimal alignment of the core canister, ensuring efficient force transfer [4]. |
| “Lats squeezed. Bar snapped across my back.” | Maximises thoracolumbar fascia tension, adding passive stiffness to the entire torso [12]. |
External Cues (Focus on the Environment)
Cue | Biomechanical Result |
“Proud chest. Bar over midfoot.” | Keeps the barbell path vertical, minimising moment arms and reducing spinal shear forces [6, 11]. |
“Push the floor away. Keep the chest up.” | Maximises ground reaction force transfer while maintaining thoracic extension [13]. |
“Hold your shape through the sticking point.” | Prevents core softening and chest collapse at the most mechanically disadvantaged joint angle [6, 13]. |
“Show your chest to the ceiling on the way up.” | Reinforces thoracic extension during the ascent, where fatigue most often causes form breakdown [6]. |
What to add: Overload the brace with supra‑maximal walkouts or heavy carries. Use external cues almost exclusively. The internal cues should already be automatic.
Summary Table by Lifter Level
Level | Internal Cue Example | External Cue Example | Biomechanical Goal |
Beginner | “Breathe into your belly. Feel your stomach rise.” | “Show your chest to the wall.” | Learn basic IAP and thoracic extension |
Intermediate | “Wrap your core 360 degrees like a cylinder.” | “Breathe in, lock it, squat.” | Refine brace under load, maintain bar path |
Advanced | “Brace hard. Fill the belt.” | “Proud chest. Bar over midfoot.” | Maximise stiffness and force transfer |
Tactile Cues (For Coaches, All Levels)
| Cue | Biomechanical Result |
|---|---|
| Gently press on the lifter’s abdomen and lower back. Both should feel hard. | Confirms 360 degree bracing and adequate IAP [5]. |
| Place your hand on their sternum and say, “Keep my hand from pushing you backward.” | Reinforces thoracic extension and rib stacking [4]. |
| Lightly tap their ribs if they flare and say, “Ribs down.” | Prevents rib flare, which reduces IAP and leads to lumbar overextension [4]. |
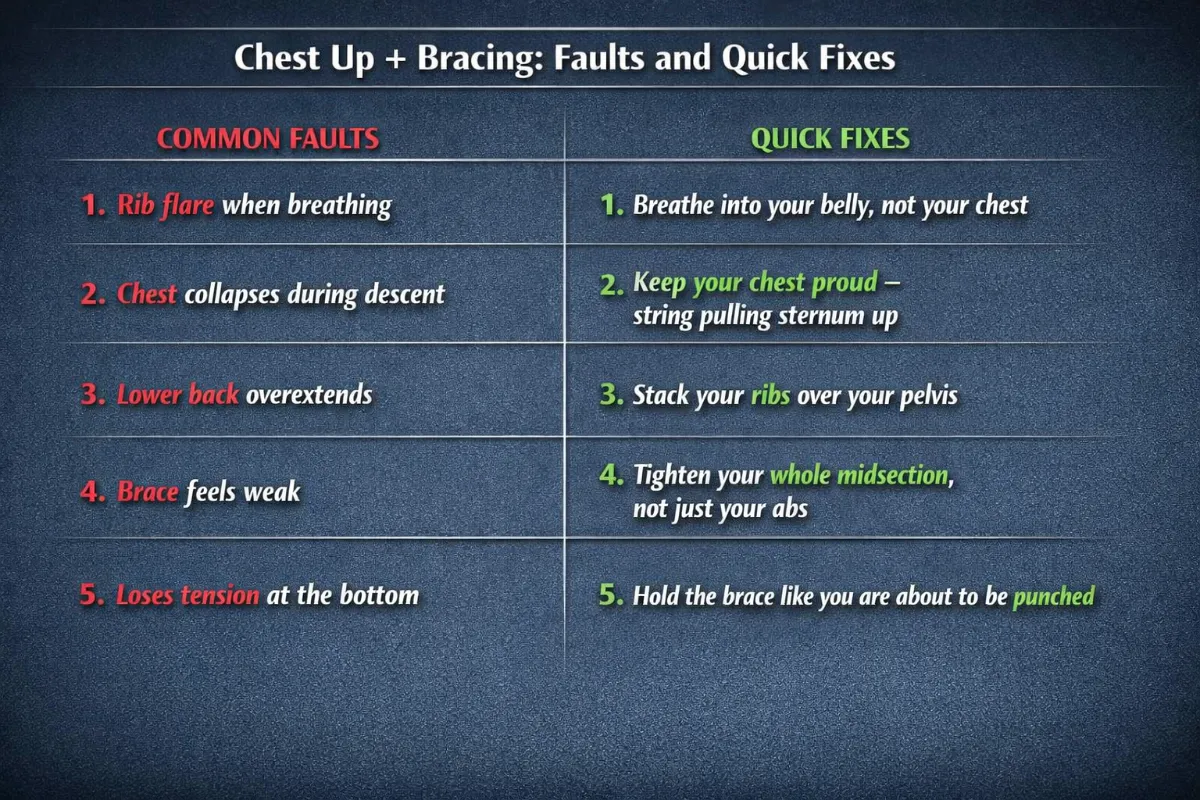
Common Faults and Quick Fixes (All Levels)
| Fault | Quick Fix | Biomechanical Reason |
|---|---|---|
| Ribs flare when breathing | “Breathe into your belly, not your chest.” | Belly breathing lowers the diaphragm, increasing IAP [4]. |
| Chest collapses during descent | “Keep your chest proud – a string pulling your sternum up.” | Thoracic flexion increases the hip moment arm and spinal shear [6, 11]. |
| Lower back overextends | “Stack your ribs over your pelvis.” | Hyperextension compresses posterior spinal elements and reduces IAP [4]. |
| Brace feels weak | “Tighten your whole midsection, not just your abs.” | The core canister requires 360 degree tension, not just anterior contraction [5, 12]. |
| Loses tension at the bottom | “Hold the brace like you are about to be punched.” | The bottom position is where IAP drops most easily; re‑bracing is critical [5]. |
Pro Tip
External cues (for example, “push your torso up against the bar” or “proud chest”) generally lead to better motor learning and higher force production than internal cues (such as “squeeze your abs”). Use internal cues only when a lifter lacks basic awareness of their own body.
Exercises to Fix Chest Up + Bracing Weaknesses
Weakness | Exercise | Primary Benefit | Biomechanical Reason |
Poor Thoracic Mobility | Side‑lying thoracic rotation | Opens mid‑back rotation | Allows sternum to lift without lumbar hyperextension, improving chest up alignment [1, 15]. |
Kneeling thoracic extension (foam roller) | Restores upper‑back extension | Reduces forward chest collapse by improving thoracic spine mobility [1]. | |
Thread the needle | Improves scapular control | Helps pull shoulders down and back without rib flare, reinforcing chest up posture [15]. | |
Cannot Feel a Brace | 360 degree breathing (supine) | Teaches diaphragmatic engagement | Trains diaphragm to descend, creating the top lid of the core canister [4]. |
Balloon breathing | Adds resistance to exhalation | Teaches controlled exhalation under load, mimicking squat bracing [5]. | |
Dead bug with balloon | Integrates bracing with movement | Trains core stability while moving limbs, directly transferring to squat mechanics [5]. | |
Upper Back Collapses Under Load | Banded pull aparts | Strengthens rhomboids and rear deltoids | Creates a stable shelf for the barbell, preventing chest drop [12]. |
Overhead squat (PVC pipe) | Forces thoracic extension under load | Directly transfers to maintaining chest up in back squats [1, 11]. | |
Clean‑grip overhead squat | Builds thoracic extensor endurance | Prepares upper back to stay active under fatigue, critical for heavy squats [1]. | |
Core Loses Tension | Dead bug hold | Trains IAP maintenance during limb movement | Prevents energy leaks through a soft midsection, reinforcing 360 degree core tension [5]. |
Pallof press | Strengthens anti‑rotation (obliques and transverse abdominis) | Builds the side walls of the core canister, preventing rib flare [12]. | |
Farmer’s walk | Teaches bracing under heavy external load | Directly transfers to maintaining IAP under a barbell [5]. | |
Suitcase carry | Strengthens anti‑lateral flexion | Improves oblique control, preventing rib flare and maintaining neutral spine [12]. | |
Chest Drops During Squat | Goblet squat | Front load acts as counterbalance | Encourages upright torso without a barbell, reinforcing chest up [11]. |
Pause squat (bottom) | Builds brace endurance at depth | Trains lifters to maintain IAP and chest position at the most demanding joint angle [6, 13]. | |
Box squat (with pause) | Teaches re‑bracing at the bottom | Prevents chest collapse on ascent by forcing a brace reset [5]. | |
Rib Flare | Supine rib tuck | Teaches rib to pelvis alignment | Isolates rib cage position, preventing flare that disrupts diaphragmatic engagement [4]. |
Dead bug with rib cage focus | Teaches rib‑pelvis alignment | Prevents excessive anterior rib flare, which disrupts diaphragmatic engagement [4]. | |
90/90 hip lift with breath hold | Integrates core and hip stability | Trains lifters to maintain rib position while moving hips, mimicking squat descent [5]. | |
Excessive Valsalva or Breath Holding | Diaphragmatic breathing (seated) | Teaches controlled IAP | Prevents excessive intra‑abdominal pressure, reducing dizziness and energy leaks [4]. |
Tempo squats (3‑1‑1) | Builds controlled bracing under fatigue | Trains lifters to exhale slowly during ascent, avoiding breath holding [6]. |
References
- Schoenfeld, B. J. (2010). Squatting kinematics and kinetics and their application to exercise performance. Journal of Strength and Conditioning Research, 24(12), 3497-3506.
- Escamilla, R. F. (2001). Knee biomechanics of the dynamic squat exercise. Medicine and Science in Sports and Exercise, 33(1), 127-141.
- Shu, H., et al. (2025). Understanding the biomechanical influence of core contribution in squat: A systematic review. Isokinetics and Exercise Science, 1. https://doi.org/10.1177/09593020251323773
- Akuthota, V., & Nadler, S. F. (2004). Core strengthening. Archives of Physical Medicine and Rehabilitation, 85(3 Suppl 1), S86-92.
- McGill, S. M. (2010). Core training: Evidence translating to better performance and injury prevention. Strength and Conditioning Journal, 32(3), 33-46.
- Kompf, J., & Arandjelović, O. (2016). Understanding and overcoming the sticking point in resistance exercise. Sports Medicine, 46, 751-762.
- van den Tillaar, R., Falch, H. N., & Larsen, S. (2024). Are diminishing potentiation and large extensor moments the cause for the occurrence of the sticking region in maximum free-weight barbell back squats? Journal of Human Kinetics, 91, 105-119.
- Lorenzetti, S. R., et al. (2018). How to squat? Effects of various stance widths, foot placement angles and level of experience on knee, hip and trunk motion and loading. BMC Sports Science, Medicine and Rehabilitation, 10.
- Scholz, J. P., & McMillan, A. G. (1995). Neuromuscular coordination of squat lifting, II: Individual differences. Physical Therapy, 75(2), 133-144.
- McCaw, S. T., & Melrose, D. R. (1999). Stance width and bar load effects on leg muscle activity during the parallel squat. Medicine and Science in Sports and Exercise, 31(3), 428-436.
- McKeown, I., & Thomson, B. (2023). A biomechanical and neuromuscular comparison of high‑bar and low‑bar back squats. Journal of Strength and Conditioning Research, 37(5), 1020-1029.
- Huxel Bliven, K. C., & Anderson, B. E. (2013). Core stability training for injury prevention. Sports Health, 5(6), 514-522.
- van den Tillaar, R., & Larsen, S. (2023). The effect of load and squat depth on the sticking region in the back squat. European Journal of Applied Physiology, 123(8), 1745-1754.
- Bagwell, J. J., et al. (2016). The influence of squat depth on the lumbopelvic kinematics and muscle activity. Journal of Applied Biomechanics, 32(5), 485-492.
- Sahrmann, S. (2002). Diagnosis and Treatment of Movement Impairment Syndromes. Mosby.
Hips Back
2. Hips Back
The best stance is the one that allows you to keep a neutral spine, maintain a chest up posture, brace strongly, keep a vertical bar path, reach proper depth, and feel no pain. Biomechanics always wins over fixed rules.
Anatomy of “Hips Back”
When you hear the cue “Hips Back,” you are asking the body to initiate the squat through a hip hinge pattern. This shifts the load to the posterior chain (glutes, hamstrings and adductor magnus) and reduces shear stress on the knees. The movement is not simply bending at the waist. It is a coordinated posterior shift of the pelvis and femur that maintains a neutral spine while loading the most powerful hip extensors.
Part 1: The Primary Movers (Hip Extensors)
Gluteus Maximus
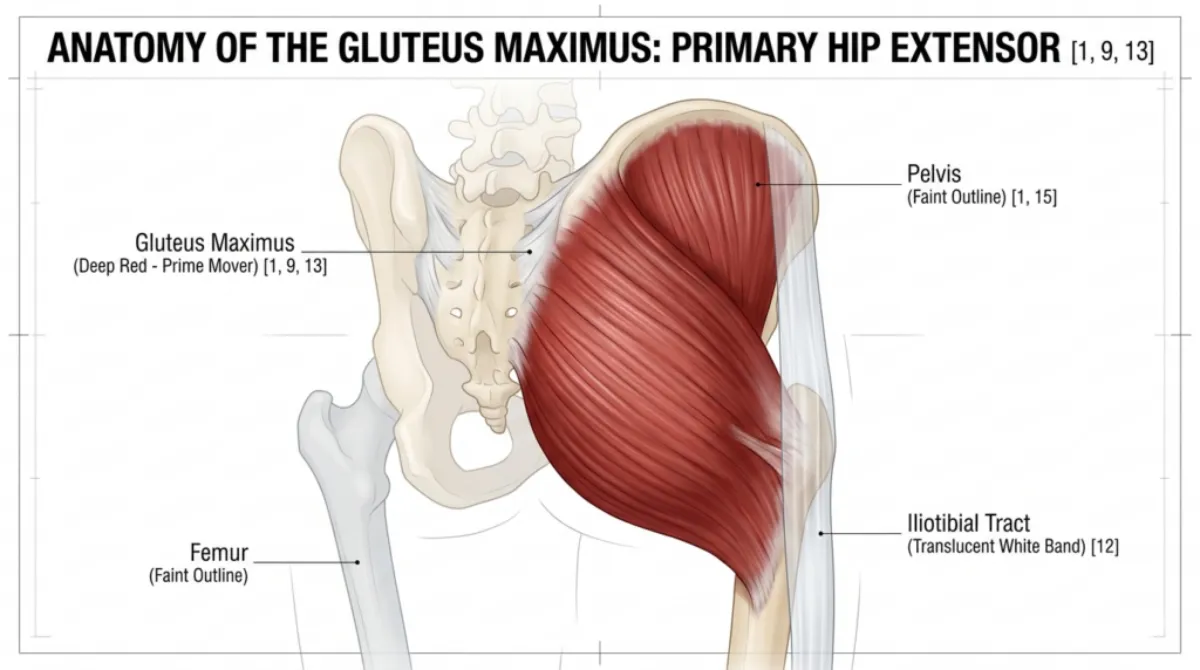
Figure 21: The Primary Engine: Anatomy of the Gluteus Maximus [1, 9, 13]. This isolated view shows the primary hip extensor responsible for driving the ascent. Note the orientation of the fibres, which are perfectly positioned to produce maximum torque when the hips are pushed back into a deep hinge.
| Feature | Description |
|---|---|
| Location | The largest muscle in the body, covering the back of the pelvis and the upper femur. |
| Attachment | Originates from the posterior ilium, sacrum and coccyx. Inserts into the gluteal tuberosity of the femur and the iliotibial tract. |
| Role in Hips Back | Primary hip extensor. It drives the hips forward during the ascent and controls the rate of descent during the eccentric phase. Its leverage increases as you descend. By pushing the hips back, you lengthen the glute fibres under load, creating a powerful stretch‑reflex (elastic energy) to drive out of the bottom [1, 9, 13]. |
| Why it matters | Weak glutes cause the torso to collapse forward and shift load to the lower back. The “hips back” cue is the most effective way to recruit the glutes before the knees bend. The gluteus maximus is responsible for approximately 60% of hip extension power in a squat. |
Hamstrings (Biceps Femoris, Semitendinosus, Semimembranosus)
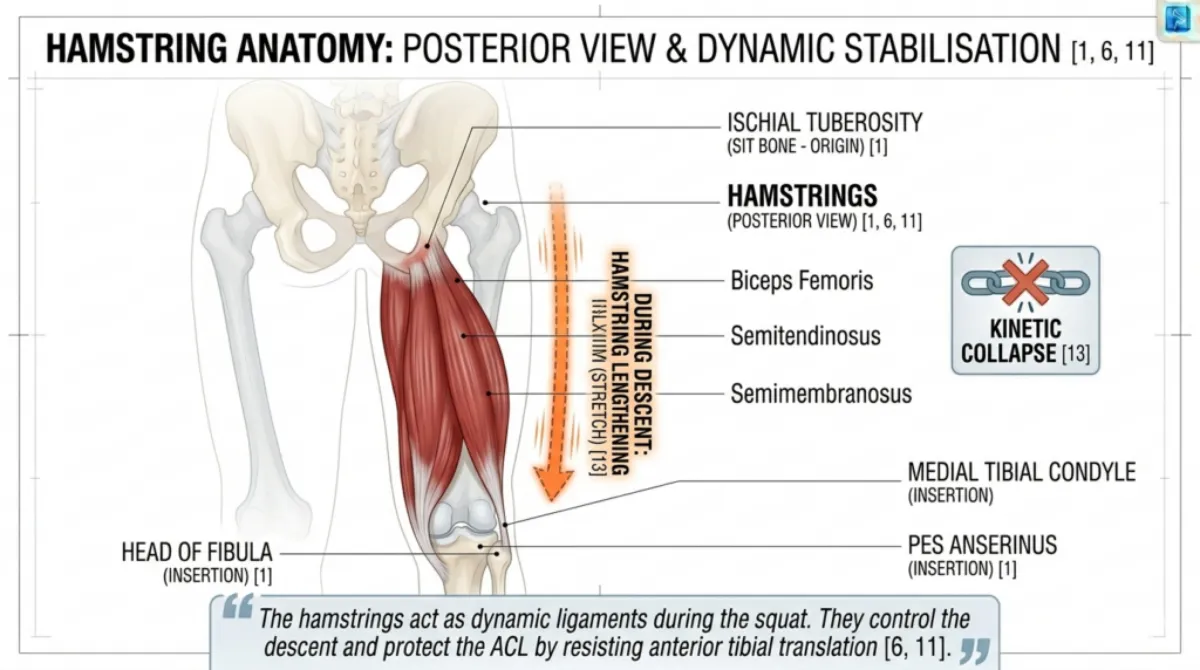
Figure 22:The hamstrings act as dynamic ligaments during the squat. They control the descent and protect the ACL by resisting anterior tibial translation [6, 11].”
| Feature | Description |
|---|---|
| Location | The largest muscle in the body, covering the back of the pelvis and the upper femur. |
| Attachment | Originates from the posterior ilium, sacrum and coccyx. Inserts into the gluteal tuberosity of the femur and the iliotibial tract. |
| Role in Hips Back | Primary hip extensor. It drives the hips forward during the ascent and controls the rate of descent during the eccentric phase. Its leverage increases as you descend. By pushing the hips back, you lengthen the glute fibres under load, creating a powerful stretch‑reflex (elastic energy) to drive out of the bottom [1, 9, 13]. |
| Why it matters | Weak glutes cause the torso to collapse forward and shift load to the lower back. The “hips back” cue is the most effective way to recruit the glutes before the knees bend. The gluteus maximus is responsible for approximately 60% of hip extension power in a squat. |

Adductor Magnus (Posterior Fibres)
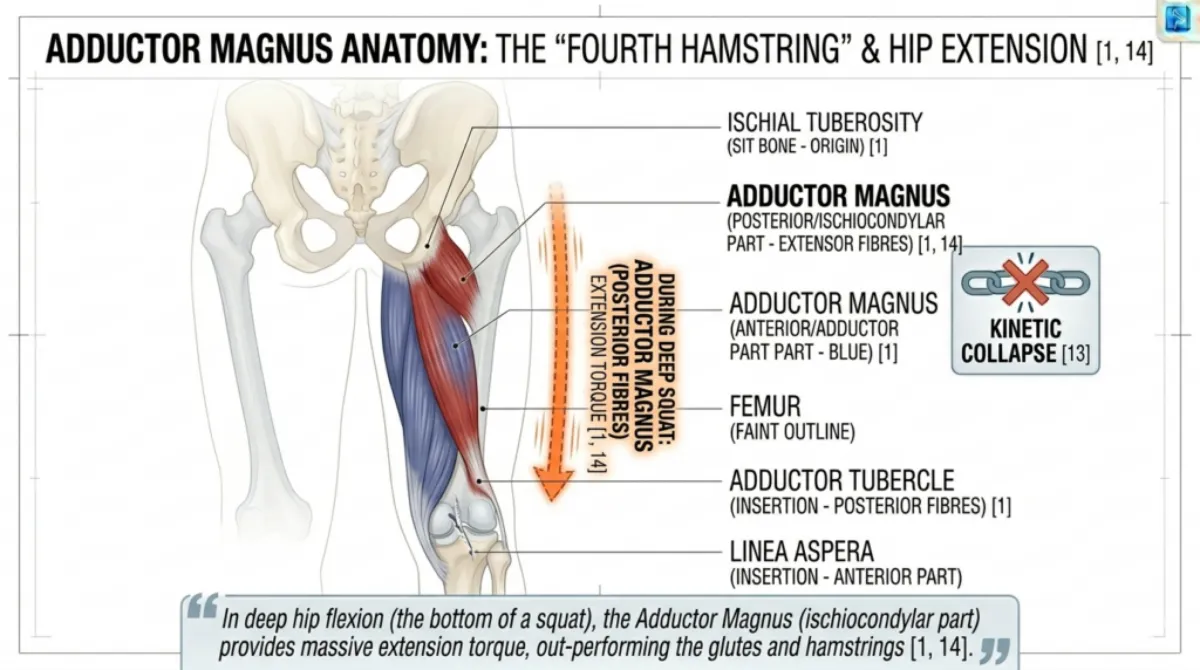
Figure 23: The adductor magnus is often called the ‘fourth hamstring.’ In deep hip flexion (the bottom of a squat), it has a better mechanical advantage for hip extension than the glutes or hamstrings [1, 14].
| Feature | Description |
|---|---|
| Location | Inner thigh, running from the pubic ramus and ischial tuberosity to the linea aspera of the femur. |
| Attachment | The posterior fibres (often called the “fourth hamstring”) originate from the ischial tuberosity and insert along the femur. |
| Role in Hips Back | Works synergistically with the gluteus maximus to extend the hip, especially during the ascent from deep squat positions. In deep hip flexion (the bottom of a squat), the adductor magnus actually has a better mechanical advantage for hip extension than either the glutes or the hamstrings. It also stabilises the femur during descent [1, 9, 14]. |
| Why it matters | The adductor magnus is often overlooked, but it contributes significantly to hip extension torque. When the hips move back, this muscle is stretched and ready to contribute powerful force on the way up. Weak adductors lead to knee valgus (inward collapse). |
Part 2: The Stabilisers (Control and Alignment)

Figure 24: Bracing the core canister creates intra‑abdominal pressure, which stiffens the torso and allows the hips to move back without the spine buckling [4, 12].
These muscles do not produce the main movement but keep the pelvis and spine aligned so the prime movers can work efficiently.
Erector Spinae
| Feature | Description |
|---|---|
| Location | A group of muscles running vertically along the spine from the sacrum to the skull. |
| Role in Hips Back | Maintains a neutral spine while the hips move back. It prevents the torso from collapsing forward into flexion. It acts as an isometric anchor, holding the spine rigid so that hip force can reach the barbell. |
| Why it matters | If the erector spinae are weak, the hips back cue will cause the lower back to round rather than a clean hip hinge. This shifts load to the discs and ligaments. |
Multifidus
| Feature | Description |
|---|---|
| Location | Deep segmental stabilisers along the spine, most developed in the lumbar region. |
| Role in Hips Back | Provides fine‑tuned control of each spinal segment, preventing micro‑movements that could lead to injury. |
| Why it matters | Chronic lower back pain is often associated with multifidus atrophy. A proper hip hinge cannot occur if the spine is not stabilised segment by segment. |
Transverse Abdominis and Obliques
| Feature | Description |
|---|---|
| Location | Deep abdominal muscles wrapping around the midsection. |
| Role in Hips Back | Bracing these muscles creates intra‑abdominal pressure, which stiffens the torso and allows the hips to move back without the spine buckling. |
| Why it matters | Without core bracing, the hips back cue often results in excessive lumbar flexion (“butt wink”) rather than a clean hinge. Bracing and hip hinge work together. |
Part 3: Joint Actions
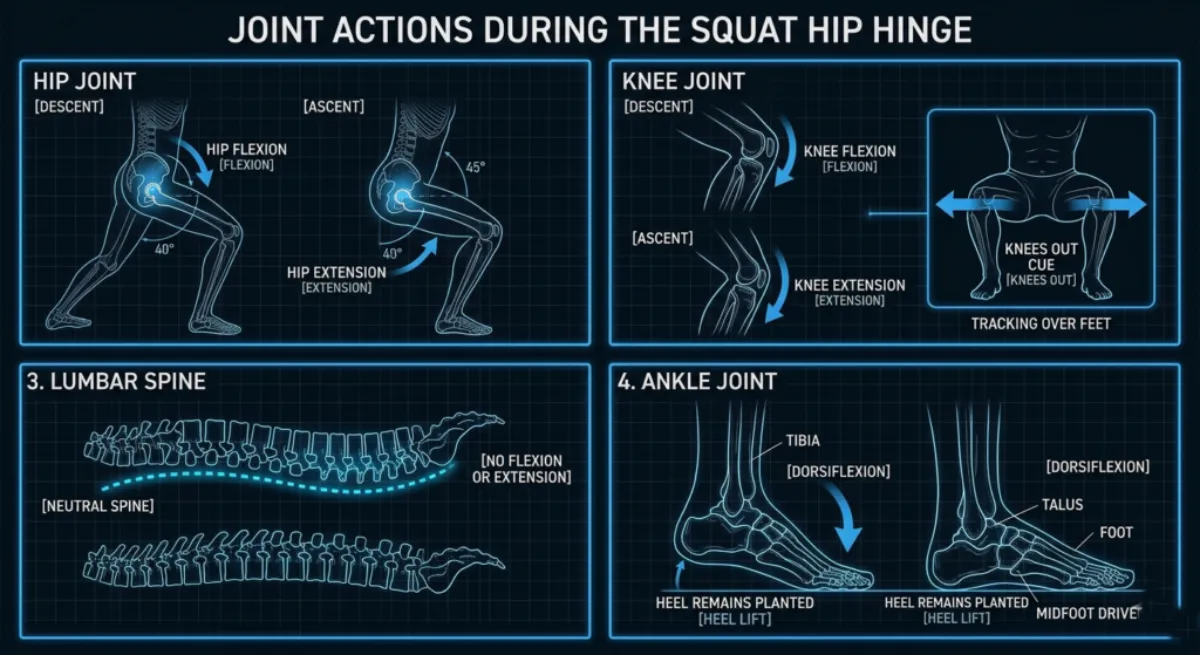
Figure 25:Joint actions during the squat hip hinge. The hips flex and extend, the knees flex and track outward, the lumbar spine remains neutral (no flexion or extension), and the ankles dorsiflex to maintain balance over the midfoot.
| Joint | Action during Descent | Action during Ascent |
|---|---|---|
| Hip | Flexion (controlled by glutes and hamstrings) | Extension (driven by glutes and adductor magnus) |
| Knee | Flexion (controlled by hamstrings) | Extension (driven by quadriceps) |
| Lumbar spine | Isometric stabilisation (no movement) | Isometric stabilisation (no movement) |
| Ankle | Dorsiflexion (controlled by calves and tibialis anterior) | Plantarflexion (assists drive) |
Part 4: How the Hips Back Cue Works Anatomically
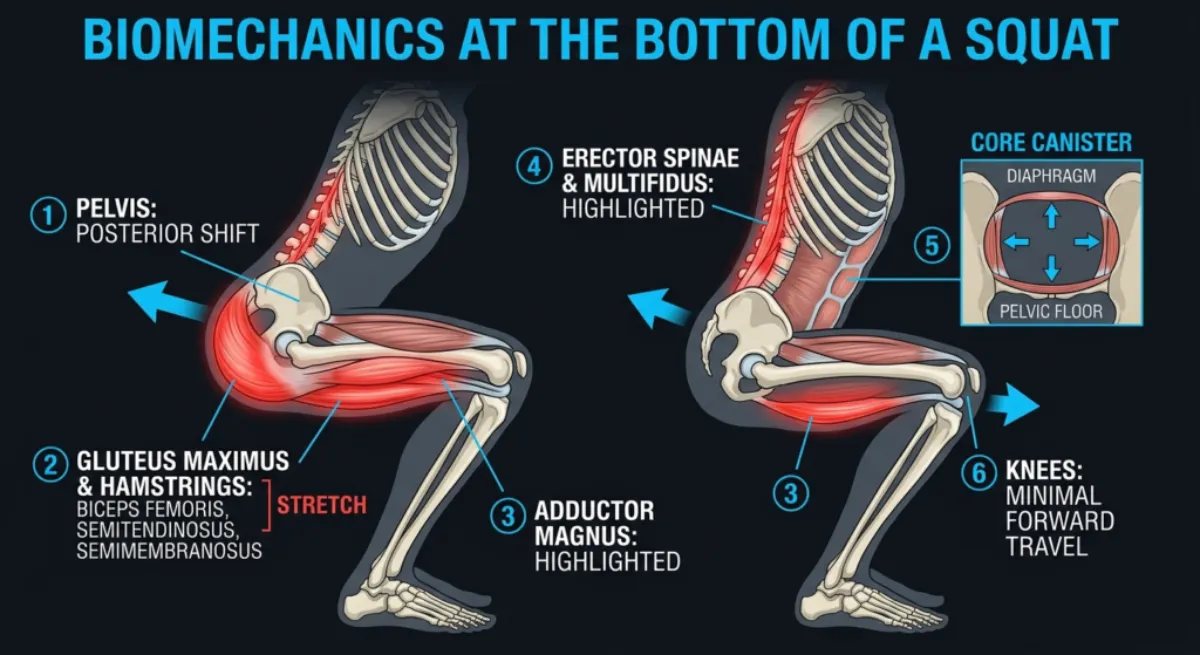
Figure 26: The six anatomical events of the “Hips Back” cue. The pelvis shifts back (1), the glutes and hamstrings stretch (2), the adductor magnus is primed (3), the spinal stabilisers engage (4), the core canister pressurises (5), and the knees remain stable (6).
Part 4: How the Hips Back Cue Works Anatomically
When you perform the “Hips Back” cue correctly, the following sequence occurs:
Pelvis shifts posteriorly (backwards) while the spine remains neutral. This is a hip hinge, not a spinal flexion.
Gluteus maximus and hamstrings stretch under load, storing elastic energy.
Adductor magnus (posterior fibres) is stretched and primed for hip extension.
Erector spinae and multifidus work isometrically to keep the spine in its natural alignment.
Core canister (diaphragm, transverse abdominis, pelvic floor) braces to create intra‑abdominal pressure, protecting the lumbar spine from shear forces.
Knees remain relatively stable, with only the amount of forward travel required by individual anatomy.
The result is a movement that loads the strongest muscles in the body (the glutes and hamstrings) while protecting the knees and lower back.
Part 5: Summary Table for Hips Back Anatomy
| Muscle Group | Specific Muscles | Primary Role in Hips Back |
|---|---|---|
| Primary hip extensors | Gluteus maximus, hamstrings, adductor magnus (posterior fibres) | Produce force to move the hips back and then drive them forward |
| Spinal stabilisers | Erector spinae, multifidus | Keep the spine neutral while the hips move |
| Core canister | Diaphragm, transverse abdominis, obliques, pelvic floor | Create intra‑abdominal pressure to protect the lumbar spine |
| Knee stabilisers (indirect) | Hamstrings, gluteus medius | Prevent excessive forward knee travel and knee valgus |
Part 6: Key Anatomical Takeaways for Hips Back
Hips back is a hip hinge, not a spinal flexion. The spine stays neutral while the pelvis shifts posteriorly.
The primary movers are the gluteus maximus, hamstrings and adductor magnus. If you do not feel these working, you are likely using a knee‑dominant pattern.
The adductor magnus is the “fourth hamstring.” It is a powerful hip extensor, especially at the bottom of the squat.
The core canister must brace before the hips move back. Without bracing, the lower back rounds under load.
Weak glutes are the most common reason the hips back cue fails. Strengthening the glutes improves both squat depth and knee safety.
Individual anatomy affects the hinge angle. Femur length, hip socket depth and ankle mobility change how the hinge looks, but the muscle actions remain the same.
Biomechanics of “Hips Back” (Kinetics and Kinematics)
Where the Chest Up + Bracing cue creates a rigid, stabilised torso, the Hips Back cue redirects force by altering joint sequencing, moment arms, and muscular demand. A squat initiated by posterior pelvic translation is mechanically distinct from one initiated by knee flexion. The difference is not stylistic; it is a matter of torque distribution, leverage, and joint loading.
This section examines the kinematics (joint motion) and kinetics (forces acting on the joints) of the hip hinge squat.
Transition: We begin with kinematics, the geometry of the movement, before analysing the forces that produce and resist motion.
Part 1: Kinematics – The Geometry of a Hip Hinge
Kinematics describes how joint angles, positions, and segment orientations change when the hips move back first.
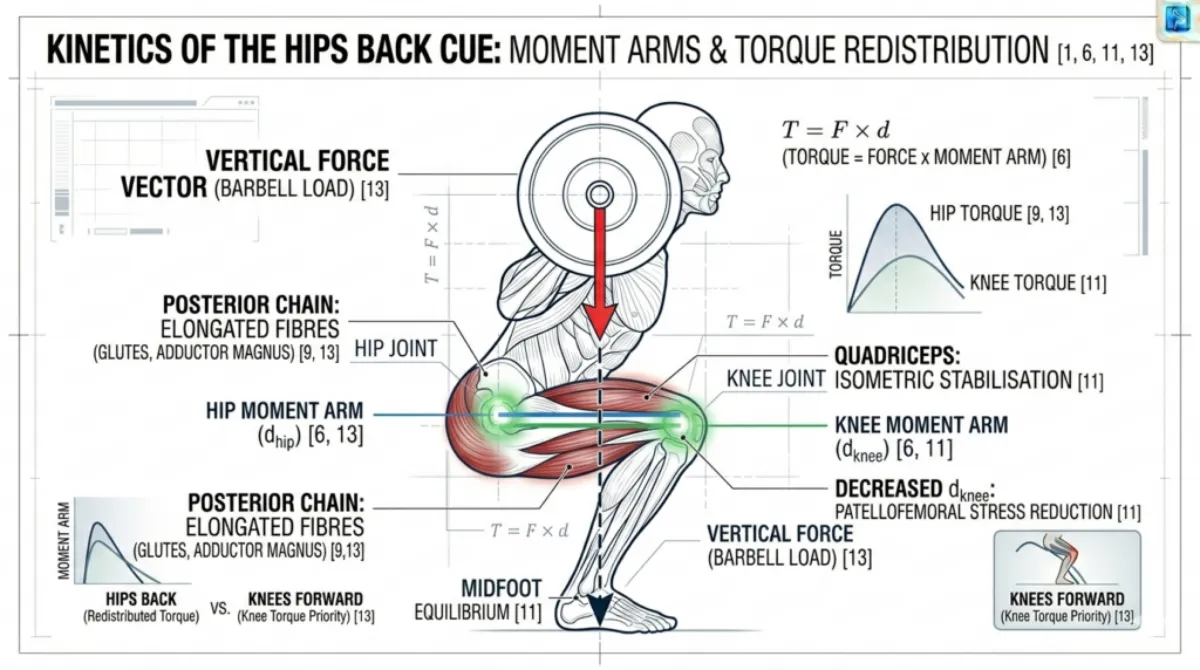
Figure 27: Comparison of squat initiation strategies. A knee-dominant start (left) increases anterior knee translation and forward bar drift. A hip hinge start (right) maintains barbell alignment over the midfoot and increases posterior chain loading.
Without Proper Hips Back
When the knees initiate the movement instead of the hips:
- Excessive anterior knee translation increases the knee flexion angle and patellofemoral joint stress [6, 11].
- Limited hip flexion occurs early in the descent because the pelvis has not shifted posteriorly.
- Lumbar flexion, often called “butt wink,” frequently appears at depth due to insufficient posterior pelvic displacement [5, 14].
- Forward bar drift increases the horizontal distance between the barbell and the midfoot, reducing mechanical efficiency [11].
With Proper Hips Back
When the squat begins with posterior pelvic translation:
- The pelvis shifts backwards while the lumbar spine remains neutral. This is a hip hinge, not spinal flexion.
- The hip joint undergoes rapid flexion, increasing the range of motion for the glutes and hamstrings [1, 9].
- The knee joint remains relatively stable, with only the necessary forward travel permitted by joint structure [11].
- The torso inclines forward, typically 10 to 20 degrees, to maintain the barbell directly over the midfoot. This is a mechanical requirement determined by segment lengths [8, 11].
Key Kinematic Outcome: The Hips Back cue converts the squat from a knee-dominant to a hip-dominant pattern, increasing posterior chain involvement [9, 13].
Transition: Having established how the joints move, we now examine the forces acting on those joints.
Part 2: Kinetics – The Forces That Stabilise and Drive
Kinetics describes how external forces (gravity, barbell load) and internal forces (muscle tension, torque) interact during the movement.
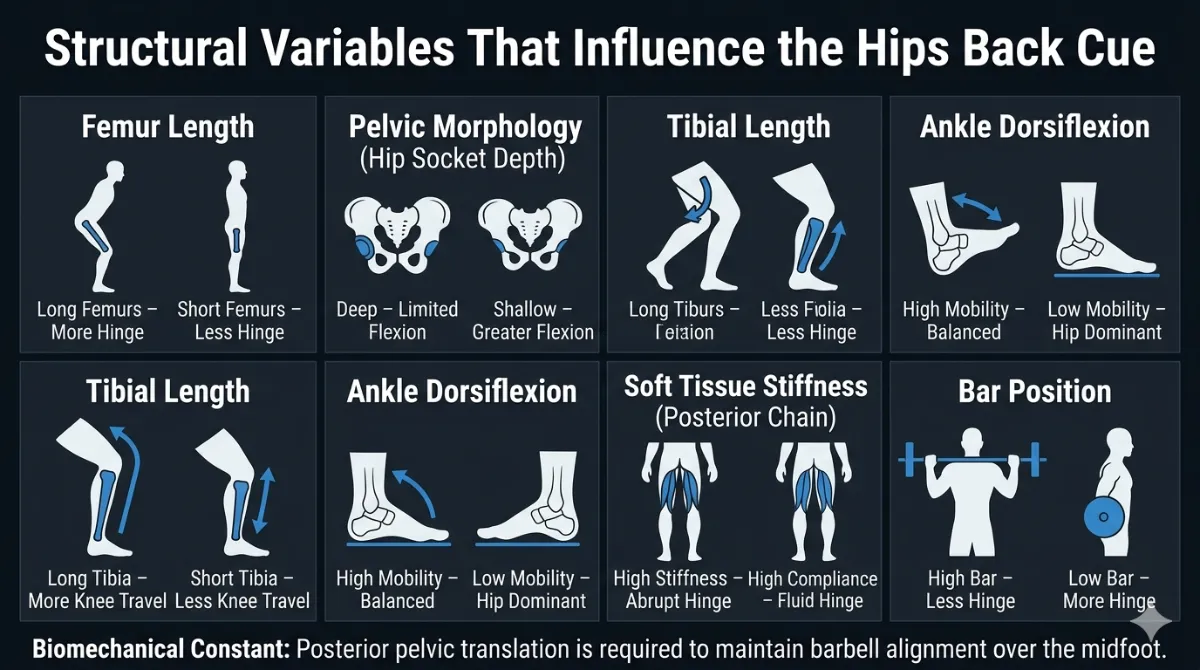
Figure 28: Effect of the Hips Back cue on moment arms. Posterior pelvic translation increases the hip moment arm (blue) and decreases the knee moment arm (green), redistributing torque from the knee to the hip. The vertical dashed line represents the barbell’s line of force through the midfoot.
Moment Arms and Leverage
A moment arm (d) is the horizontal distance between a joint and the line of action of the force. Torque (τ) increases as the moment arm increases [6, 13].
Joint | Effect of Hips Back | Effect of Knee Dominant Start |
Hip | Increases hip moment arm, leading to higher hip extensor demand | Decreases hip moment arm, reducing posterior chain engagement |
Knee | Decreases knee moment arm, leading to lower patellar shear | Increases knee moment arm, leading to higher quadriceps and patellar tendon loading |
Torque: The Rotary Force
Torque is calculated as
τ = F × d
where F is the external load and d is the moment arm.
By pushing the hips back:
- The hip moment arm increases, creating greater torque demand on the gluteus maximus, hamstrings, and adductor magnus.
- The knee moment arm decreases, reducing torque demand on the quadriceps and patellar tendon.
This redistributes rotational force from the knee joint to the hip joint, which is structurally designed to tolerate higher torque loads [6, 13].
Transition: This redistribution of torque alters muscle activation patterns.
Part 3: Muscle Activation and Lombard’s Paradox
The Hips Back cue changes the relative contribution of major muscle groups.
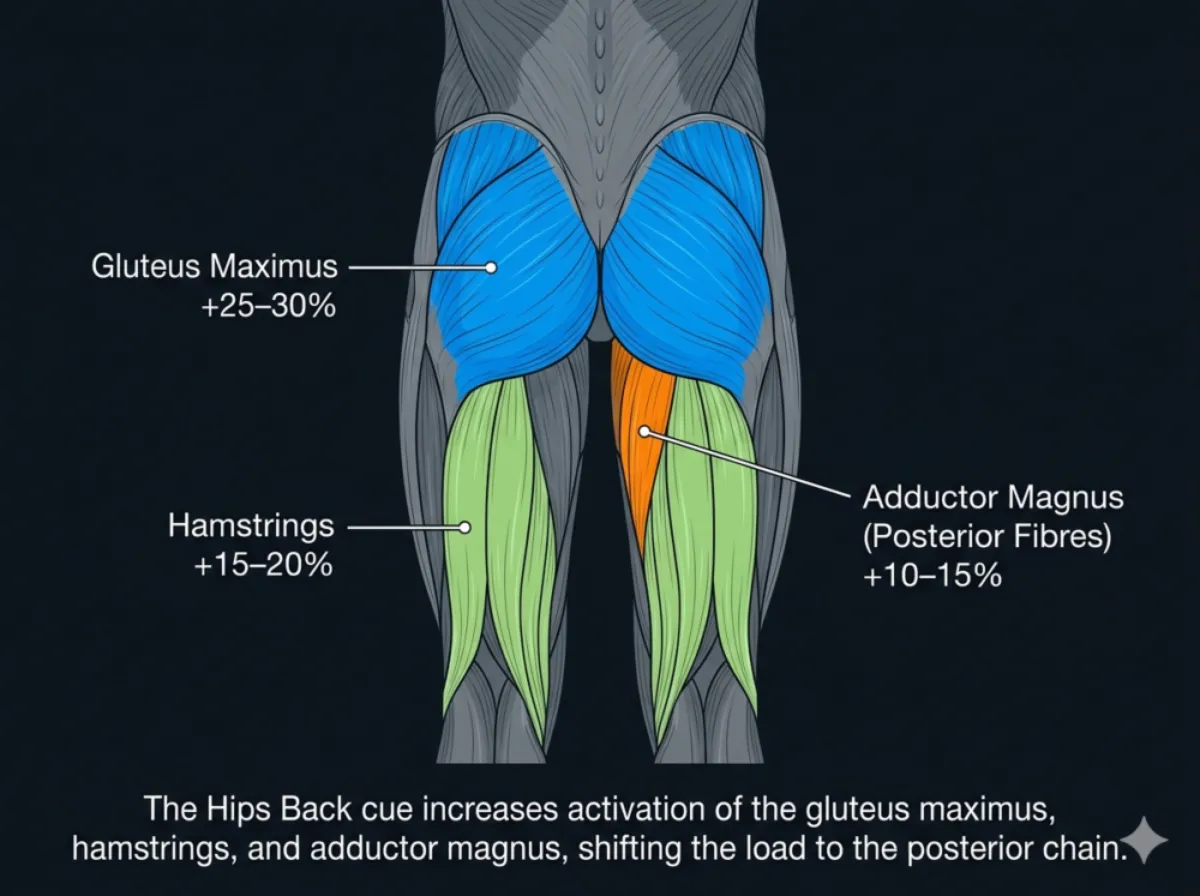
Figure 29: Muscle activation changes during a hip hinge squat. The gluteus maximus (blue), hamstrings (green), and adductor magnus (orange) show increased activity, while the quadriceps (grey) show reduced activity. The percentages indicate the approximate change in muscle activation compared to a knee‑dominant squat.
Muscle Group | Change in Activity | Functional Role |
Gluteus Maximus | +25 to 30% | Primary hip extensor; major contributor to ascent torque |
Hamstrings | +15 to 20% | Eccentric control; stabilise the tibia via posterior shear |
Adductor Magnus (Posterior Fibres) | +10 to 15% | Contributes approximately 20% of hip extension torque at depth [14] |
Erector Spinae | Isometric | Maintains spinal rigidity; counters flexion torque |
Quadriceps | -10 to 15% | Reduced patellofemoral loading; secondary role early in descent |
Lombard’s Paradox: Hamstrings as Dynamic Ligaments
The hamstrings cross both the hip and knee joints. During the squat:
- They shorten at the hip as the hip flexes.
- They lengthen at the knee as the tibia moves forward.
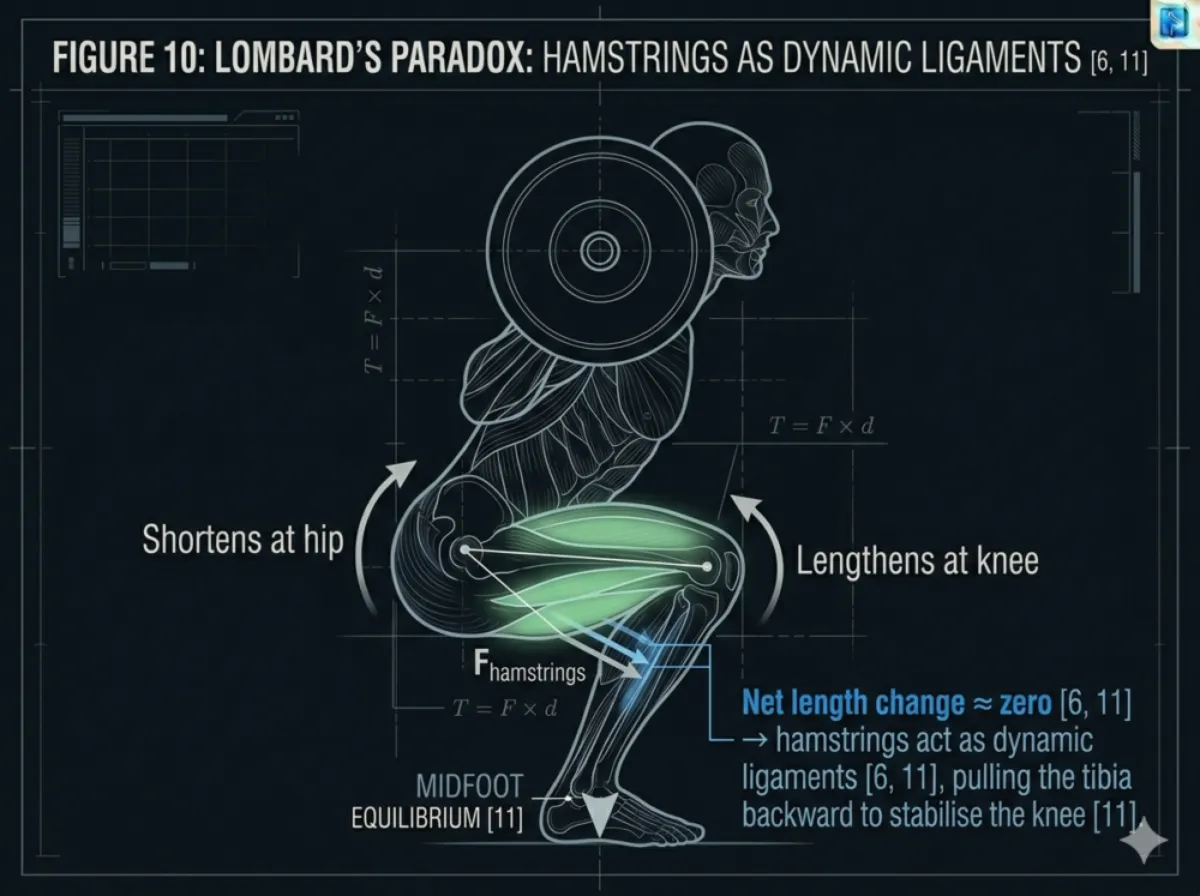
Figure 30: Lombard’s Paradox illustration. The hamstrings shorten at the hip (blue arrow) and lengthen at the knee (green arrow) simultaneously. The net length change is approximately zero, allowing them to act as dynamic ligaments.
The net length change is approximately zero, allowing them to maintain tension, pull the tibia posteriorly, resist anterior tibial shear, and assist the ACL in stabilising the knee [6, 11].
Adductor Magnus – The “Fourth Hamstring”
The posterior fibres of the adductor magnus contribute approximately 20% of hip extension torque at the bottom of the squat [14]. Its line of pull is optimised when the femur is externally rotated, enhancing its role as a powerful hip extensor.
Transition: These changes in torque and muscle activation alter the distribution of forces across joints.
Part 4: Managing Shear and Compression
Shifting load from the knees to the hips creates predictable changes in joint forces.
Force Type | Effect of Hips Back | Mechanical Interpretation |
Patellofemoral Compression | Decreases | Lower compressive load at the knee |
Lumbar Shear Force | Increases | Managed by spinal extensors and intra‑abdominal pressure |
Biomechanical Principle: Shear force is not inherently harmful; it is a normal component of loaded movement. Risk increases only when shear is resisted by passive structures rather than active muscular stabilisation [4, 5, 12].
Transition: Joint forces must be balanced with whole system stability.
Part 5: Centre of Mass and Midfoot Balance
For the squat to remain mechanically efficient, the system’s Centre of Mass (CoM) must stay over the midfoot.

Figure 31: Centre of mass alignment during a hip hinge squat. The vertical dashed line from the barbell passes through the midfoot, and the CoM (white circle) is positioned directly over the midfoot.
- Without posterior pelvic translation, the CoM shifts behind the heels.
- The Hips Back cue permits controlled forward torso inclination, typically 10 to 20 degrees, maintaining a vertical bar path over the midfoot [8, 11].
Transition: This alignment also enhances elastic energy utilisation.
Part 6: The Stretch Shortening Cycle (Elastic Energy)
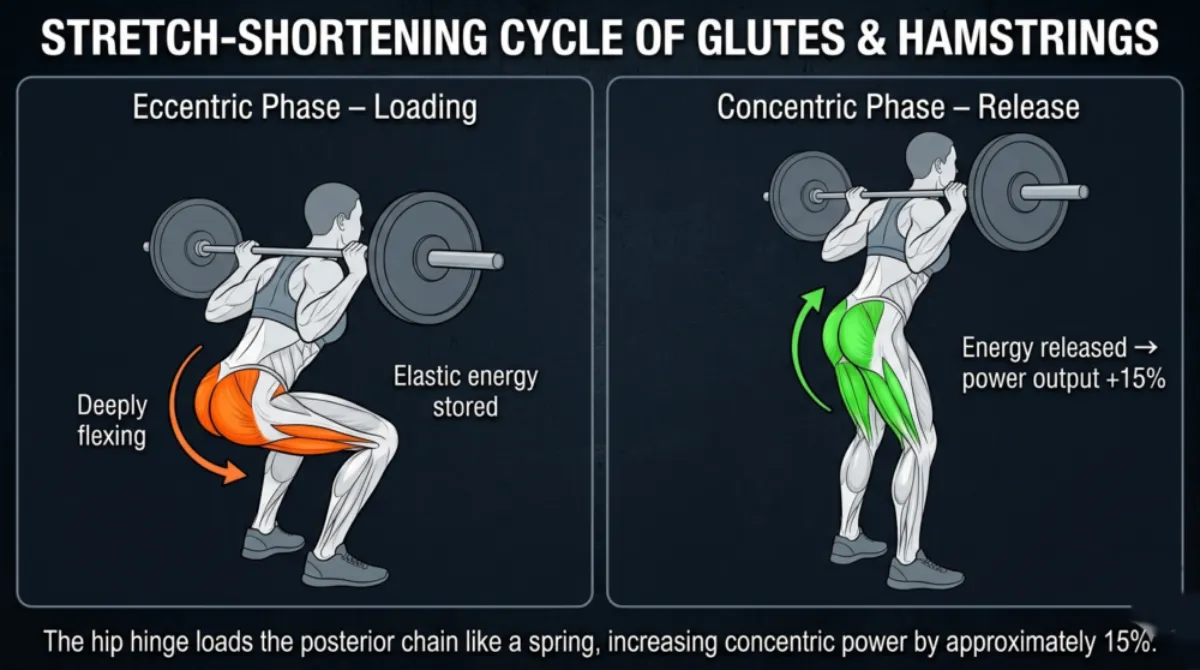
Figure 32: The stretch‑shortening cycle of the glutes and hamstrings. Left panel (eccentric phase): muscles lengthen under load, storing elastic energy (orange highlight). Right panel (concentric phase): stored energy is released, increasing power output (green highlight).
During the eccentric phase, the glutes and hamstrings lengthen under load, storing elastic energy in their tendons.
During the concentric phase, this stored energy is released, increasing power output by approximately 15% [9, 13].
Knee-dominant squats do not load the posterior chain sufficiently to exploit this stretch‑shortening cycle.
Part 7: Summary of Biomechanical Takeaways
- Kinematics: The cue initiates a hip hinge, maintains lumbar neutrality, and preserves a vertical bar path over the midfoot.
- Torque Redistribution: Rotational force shifts from the knee to the hip, which is structurally suited for high torque.
- Knee Joint Forces: Reduced anterior tibial shear and patellofemoral compression occur due to increased hamstring tension [6, 11].
- Lumbar Joint Forces: A neutral spine and intra‑abdominal pressure manage compressive and shear forces at depth [5, 12, 14].
- Adductor Magnus Contribution: The posterior fibres provide substantial hip extension torque at the bottom of the squat [1, 14].
- Elastic Energy: Posterior chain loading enhances stretch‑shortening cycle efficiency, increasing concentric power by approximately 15% [9, 13].
Individual Differences for the “Hips Back” Cue
The Hips Back cue follows universal biomechanical rules. You need posterior pelvic translation, a longer hip moment arm, and the barbell kept over your midfoot. But the way the cue looks on different people varies. Your skeleton, your joints, your mobility, and even where you put the bar on your back all change how the hip hinge appears. These structural differences do not change the mechanics of the cue. They simply determine how the hinge looks in practice.
Hip Socket Shape and Orientation
Your hip socket varies in depth, angle, and direction. These differences affect how much hip flexion you have available.
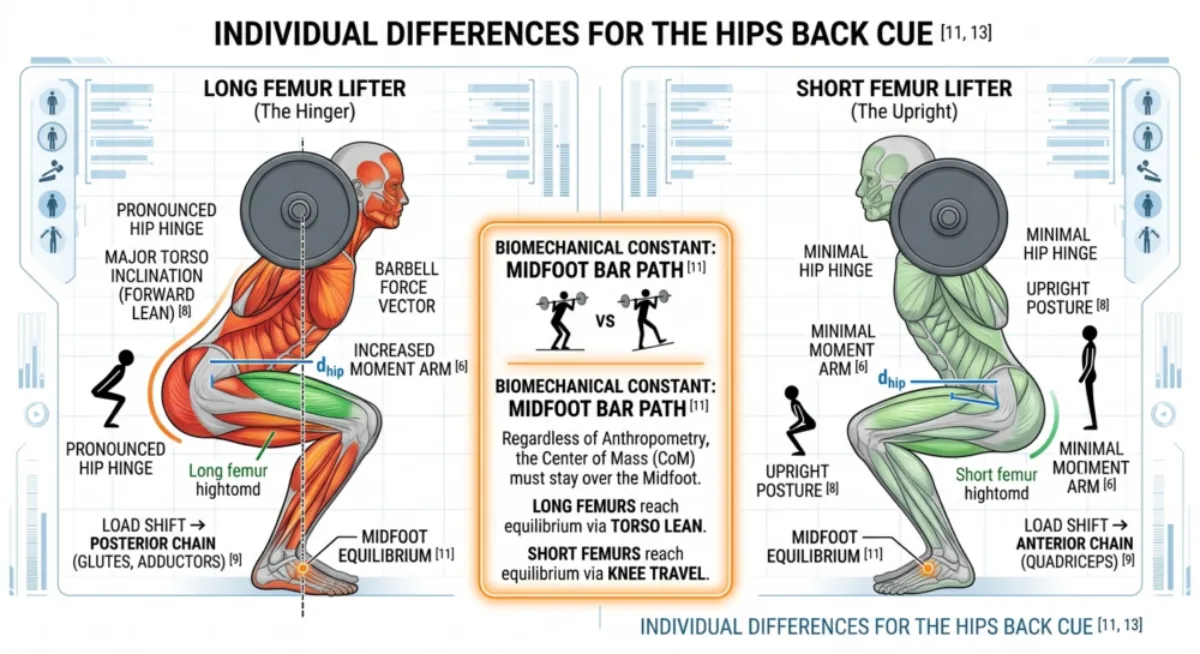
Figure 33. Femur Length and Hip Hinge Mechanics
Longer femurs require more forward lean and a longer hip moment arm. Shorter femurs allow a more upright posture. Both lifters maintain the bar over the midfoot [8, 11].
If you have long femurs:
- The distance between your hip joint and your midfoot is longer.
- You need to lean your torso further forward to keep the bar over your midfoot.
- Your hip hinge will look more pronounced.
If you have short femurs:
- The hip moment arm is shorter for the same squat depth.
- You can stay more upright while still keeping your balance over the midfoot.
- Your hip hinge will look less dramatic.
What stays the same: You still need to push your hips back to keep the bar over your midfoot. This is true no matter how long your femurs are [8, 11].
Femur Length and Body Proportions
The length of your thigh bone compared to your torso changes the geometry of your hip hinge.
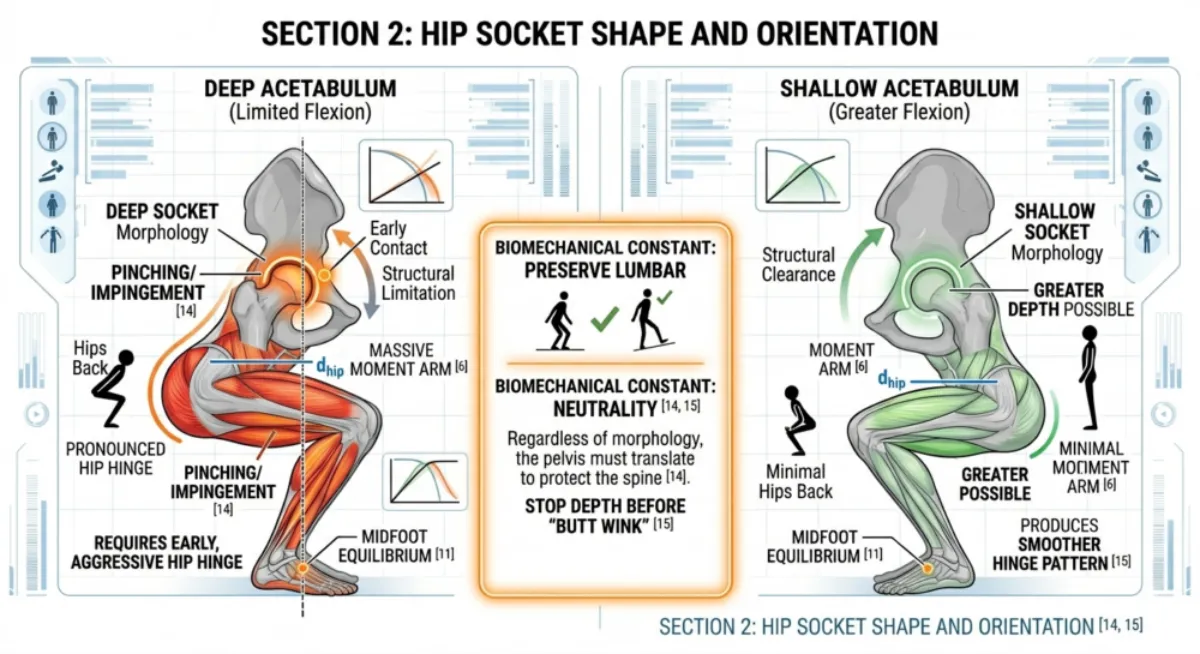
Figure 34. Hip Socket Depth and Hip Flexion Capacity
Deep sockets limit hip flexion and require greater posterior pelvic translation. Shallow sockets allow deeper flexion with a smoother hinge pattern [14, 15].
If you have deep sockets (limited flexion):
- Your thigh bone hits the rim of the socket earlier.
- You need to push your hips back more to reach depth.
- Your hinge will start earlier and look more pronounced.
If you have shallow sockets (greater flexion):
- You can flex your hips deeper before you reach a structural limit.
- You do not need to push your hips back as far.
- Your hinge pattern will be smoother.
What stays the same: You still need to push your hips back to keep your lower back neutral. Your socket depth does not change that [14, 15].
Tibia Length and Knee Travel
The length of your shin bone affects how far your knees can move forward while you stay balanced.

Figure 35. Tibial Length and Knee Translation Capacity
Longer tibias allow greater anterior knee travel and reduce the magnitude of the hip hinge. Shorter tibias limit knee travel and increase reliance on posterior pelvic translation [11].
If you have long tibias::
- Your knees can move further forward.
- Your hip hinge looks less dramatic.
- You can stay more upright while keeping the bar over your midfoot.
If you have short tibias:
- Your knees cannot move as far forward.
- You need to push your hips back more to stay balanced.
- Your squat will look more hip dominant.
What stays the same: You still need a hip hinge to stop the bar from drifting forward. Your tibia length does not change that [11].
Ankle Dorsiflexion Range
How much your ankle can bend determines how your hip and knee share the movement.
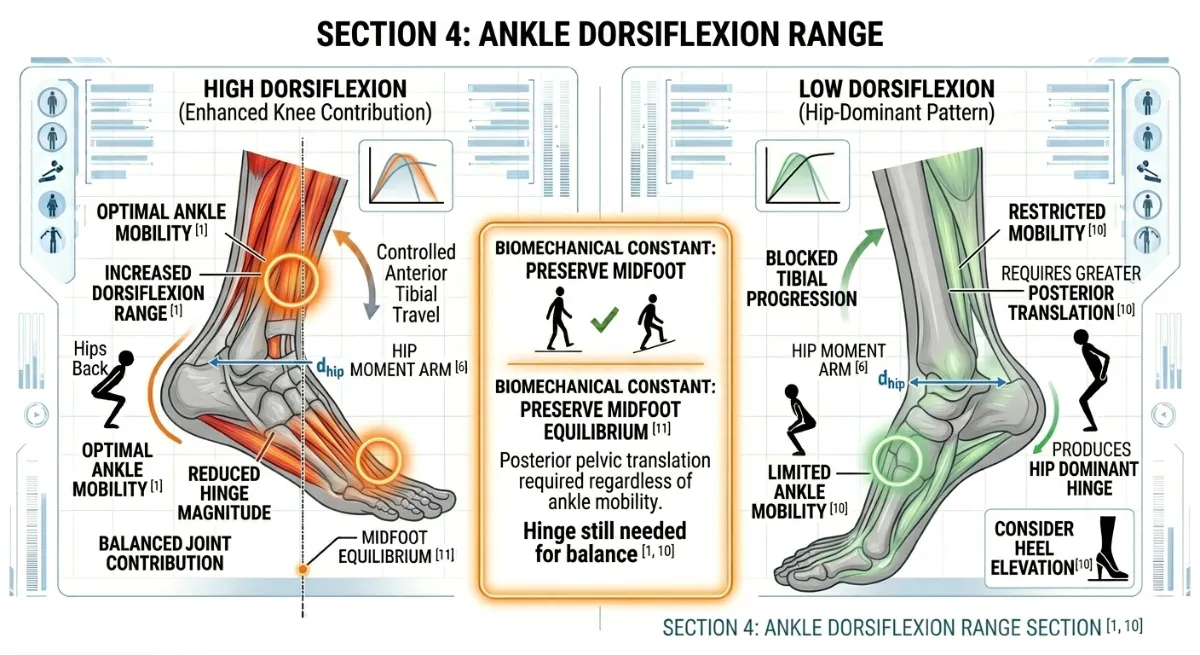
Figure 29. Ankle Dorsiflexion Range and Squat Geometry
High dorsiflexion allows greater knee travel and reduces hinge magnitude. Low dorsiflexion limits knee travel and increases posterior pelvic translation, creating a more hip‑dominant pattern [1, 10].
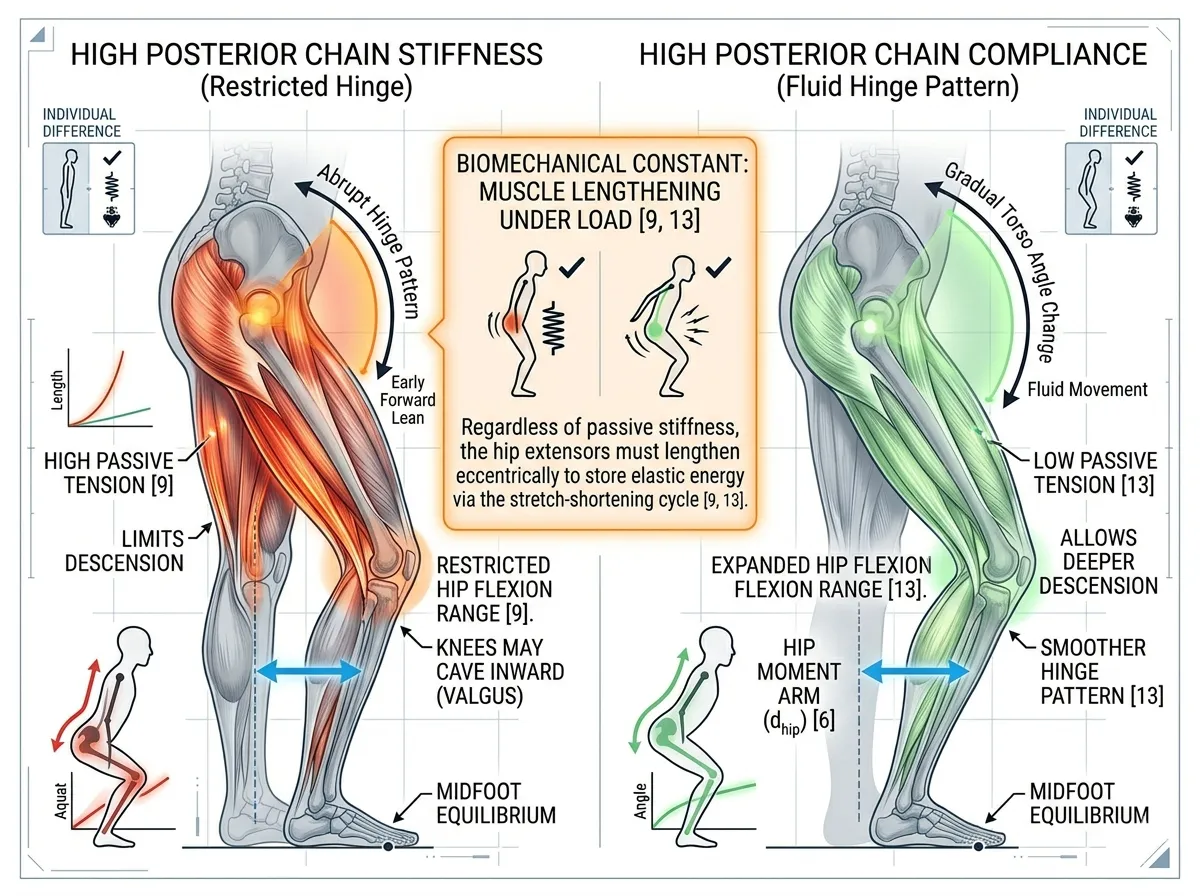
Figure 30. Posterior Chain Stiffness and Hip Flexion Mechanics
High stiffness in the hamstrings or adductors limits hip flexion, creates an abrupt hinge pattern, and may contribute to knee valgus. High compliance allows smoother posterior pelvic translation and a more fluid hinge [9, 13].
If you have good ankle mobility:
- Your knees can move forward in a controlled way.
- You do not need to push your hips back as far.
- Your hips and knees share the work more evenly.
If you have limited ankle mobility:
- Your knees cannot move far forward.
- You have to push your hips back more to stay balanced.
- Your squat becomes more hip dominant.
What stays the same: You still need to push your hips back to keep the bar over your midfoot. Your ankle mobility does not change that [1, 10].
Soft Tissue Stiffness and Posterior Chain Compliance
How tight or loose your hamstrings and adductors are affects how smoothly your hips can move back.

If you have high stiffness (tight hamstrings or adductors):
- Your hip flexion range is limited.
- Your torso leans forward earlier in the descent.
- Your hinge pattern has sharper, more abrupt changes in angle.
- Your knees may cave inward as your body looks for more range.
If you have good compliance:
- Your hips can move back more smoothly.
- Your torso angle changes gradually.
- Your hinge pattern is more fluid.
What stays the same: Your hip extensors must lengthen under load to store elastic energy. Stiffness does not remove this requirement [9, 13].
Bar Position: High Bar versus Low Bar
Where you place the bar on your back changes where your centre of mass sits.
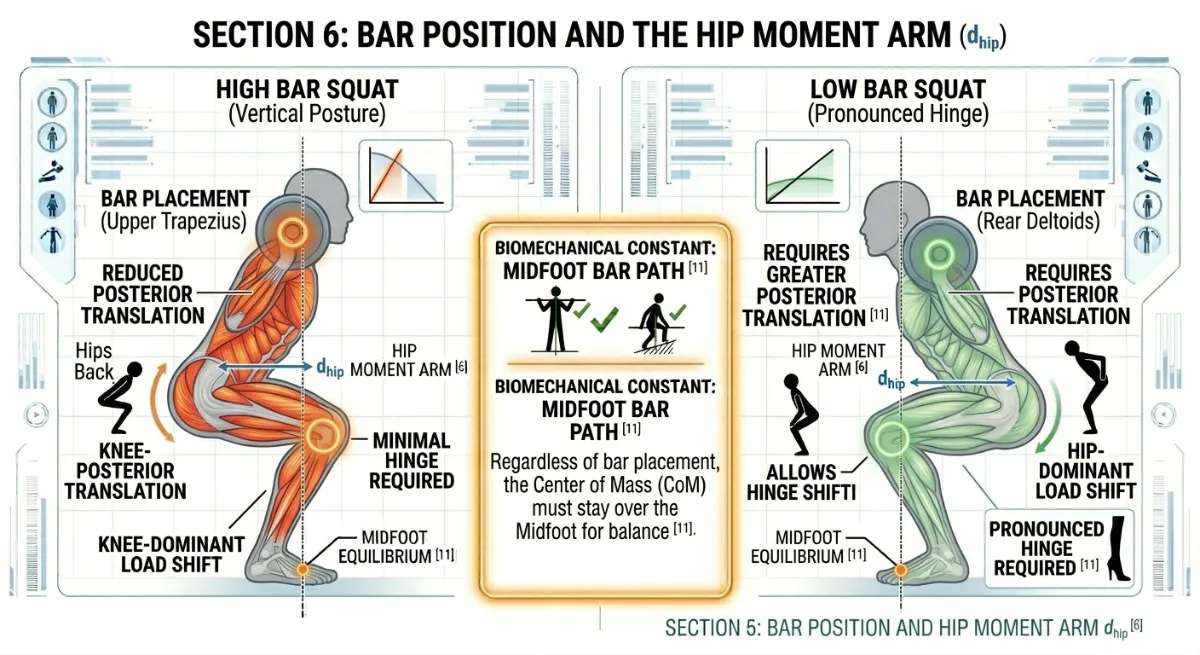
Figure 36. Effect of Bar Position on Hip Moment Arm
High bar placement reduces the hip moment arm and produces a less pronounced hinge. Low bar placement increases posterior pelvic translation and hip torque demand, creating a more hip‑dominant pattern [11].
If you use a high bar position:
- The bar sits higher, closer to the midfoot.
- You do not need to push your hips back as far.
- Your hinge looks less pronounced.
If you use a low bar position:
- The bar sits lower, further back.
- You need to push your hips back more to stay balanced.
- Your hinge looks more pronounced and hip dominant.
What stays the same: No matter where you put the bar, you still need to push your hips back to stay balanced and use your hips efficiently [11].
Summary Table: How Your Body Changes the Hips Back Cue
Your Body | How It Affects Your Hinge | What Stays the Same | Where You Feel the Load |
Long femurs | More forward lean, more pronounced hinge | Bar must stay over midfoot | Hips and lower back work harder |
Deep hip sockets | Earlier hinge, less room to flex | Lower back must stay neutral | Risk of pinching in the hip |
Short tibias | More hip push, less knee travel | Hip hinge is still required | Hips take more load |
Limited ankle mobility | Less knee travel, more hip hinge | You still need to push hips back | Hips and lower back work harder |
Tight hamstrings or adductors | Abrupt hinge, possible knee cave | Posterior chain must lengthen | Lower back works harder |
Low bar position | More hip push, larger hip moment arm | Balance must stay over midfoot | Hips and lower back take more load |
Figure 37. Summary of Structural Variables Influencing the Hips Back Cue
A consolidated visual overview of how femur length, pelvic morphology, tibial length, ankle mobility, soft tissue stiffness, and bar position affect the visible expression of the hip hinge. The biomechanical constant remains the same across all variables: posterior pelvic translation is required to maintain barbell alignment over the midfoot
The Key Principle
The Hips Back cue works the same way for everyone, but it looks different on different people. Your bone lengths, your joint shapes, your mobility, and your bar position all change how much you lean forward and how far your hips go back. You do not need to copy someone else’s hinge. You only need to keep the bar over your midfoot, protect your lower back, and let your hips do the work that your anatomy allows.
Coaching Guide for Hips Back
The goal of this guide is to help you initiate the squat through a hip hinge, loading the posterior chain (glutes, hamstrings and adductor magnus) while protecting the lower back and knees. You will use a mix of internal cues (what you feel inside your body) and external cues (what you focus on in the environment). Research shows that external cues often produce better movement outcomes, but beginners sometimes need internal cues first to learn what a hinge feels like. A good coach uses both.
Key Coaching Instructions (Step by Step for All Levels)
Step | Instruction | Biomechanical Result |
1 | Stand with your feet in your natural squat stance (shoulder width or slightly wider). | Establishes a stable base of support. |
2 | Take a deep breath into your belly and brace your core. | Creates intra‑abdominal pressure to protect the spine. |
3 | Initiate the movement by pushing your hips straight back, as if you are sitting into a chair behind you. | Shifts the load to the posterior chain (glutes, hamstrings, adductor magnus). |
4 | Keep your spine neutral. Do not round your lower back. | Prevents disc pressure and maintains force transfer. |
5 | Allow your torso to lean forward as needed to keep the bar over your midfoot. | Maintains balance and optimises the hip moment arm. |
6 | Control your descent. Do not drop straight down. | Stores elastic energy in the stretched posterior chain. |
7 | Drive up by pushing through your heels, keeping your chest proud and your spine neutral. | Releases stored elastic energy and completes the lift. |

Figure 38. The seven steps of the hip hinge squat.
Posterior pelvic translation loads the glutes and hamstrings while maintaining a neutral spine and vertical bar path.
Beginners
Focus: Learning what a hip hinge feels like. No heavy weight. Use internal cues first.
Internal Cues (Feel the Body)
Cue | Biomechanical Result |
“Push your hips back like you are sitting into a chair.” | Initiates posterior pelvic translation, loading the glutes and hamstrings. |
“Feel your glutes and hamstrings stretch as you lower.” | Promotes elastic energy storage in the posterior chain. |
“Keep your lower back flat – do not let it round.” | Maintains lumbar neutrality, protecting the discs. |
“Squeeze your glutes at the top of the lift.” | Ensures full hip extension and reinforces the hinge pattern. |
External Cues (Focus on the Environment)
Cue | Biomechanical Result |
“Reach your butt back toward the wall behind you.” | Encourages posterior pelvic translation. |
“Imagine closing a car door with your hips.” | Creates a clear mental image of the hinge movement. |
“Keep your weight in your heels.” | Shifts the centre of mass posteriorly, reducing knee shear. |
“Drive through the floor to stand up.” | Maximises ground reaction force transfer. |
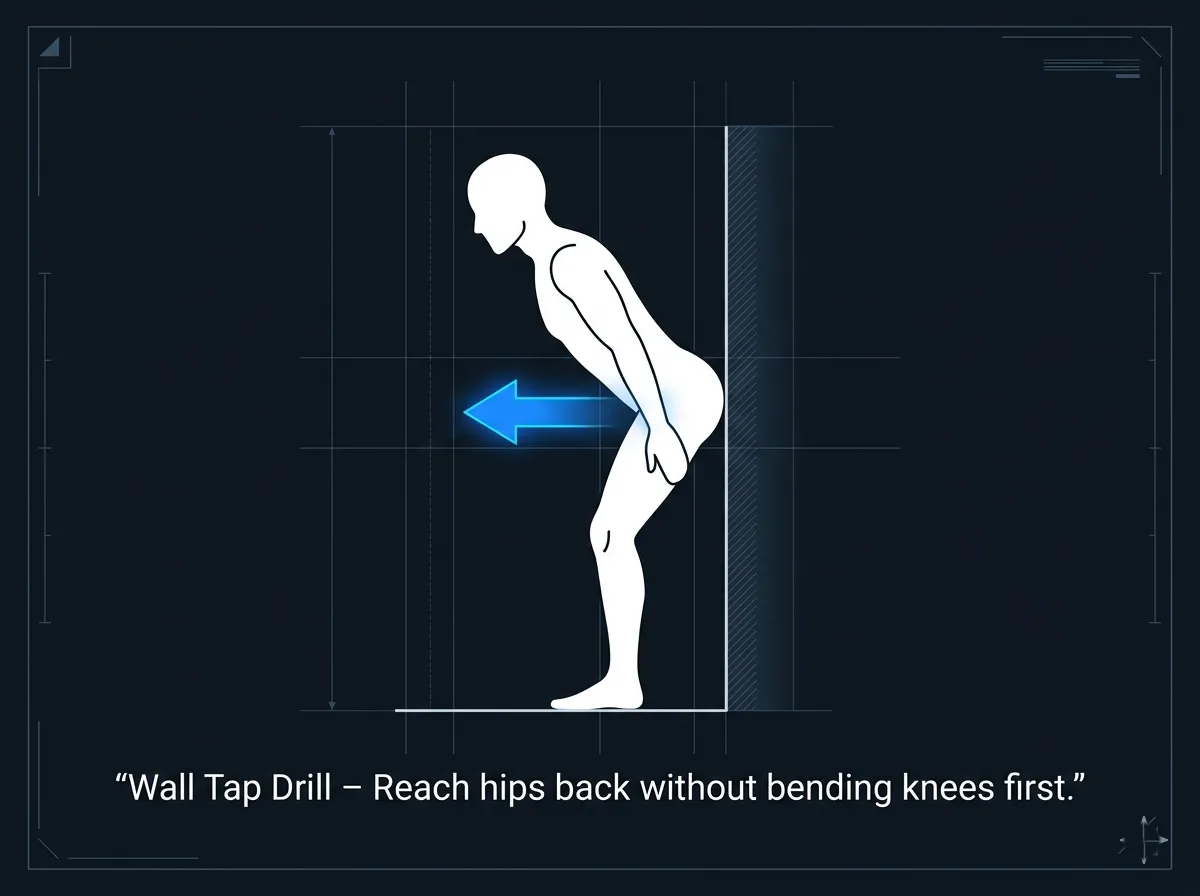
Figure 39. Wall Tap Drill for the Hip Hinge
The wall tap drill teaches posterior pelvic translation. Reach your hips back to touch the wall without bending your knees first.
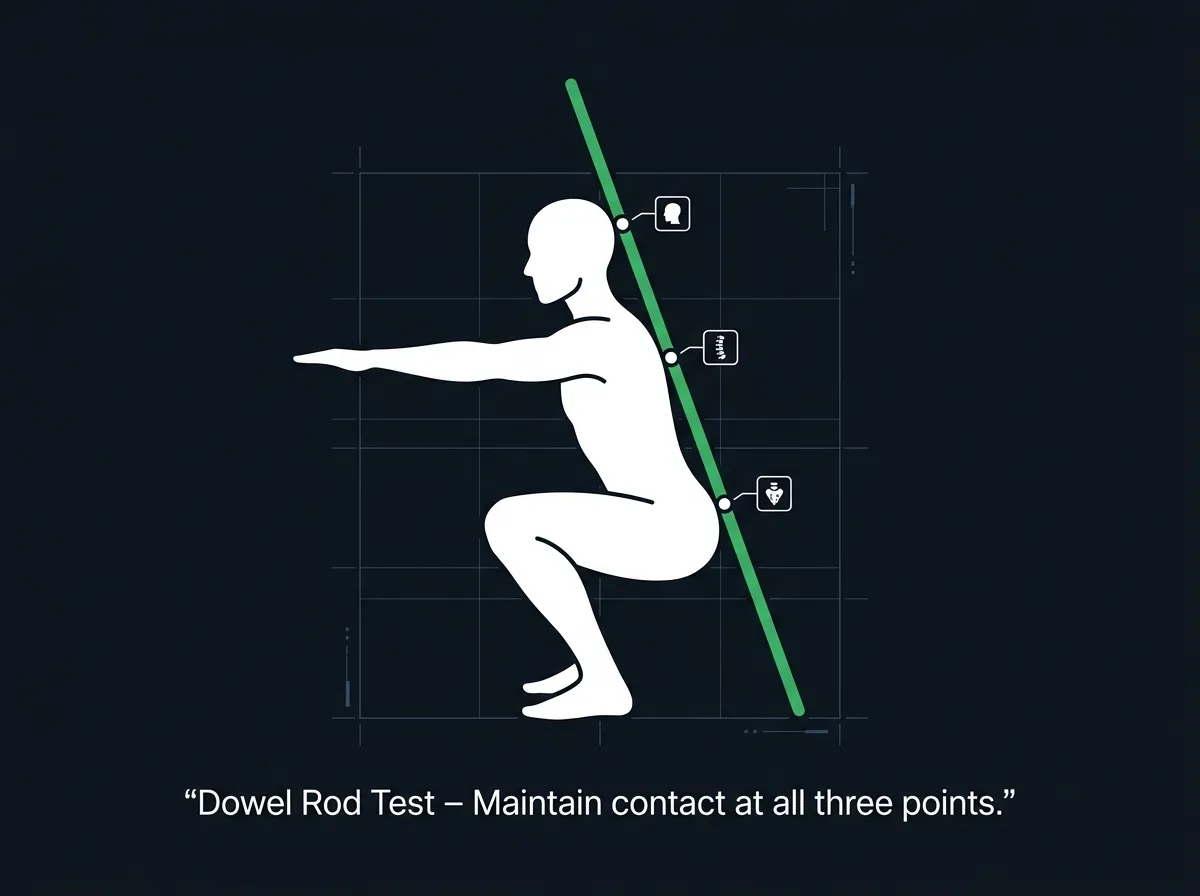
Figure 40. Dowel Rod Test for Spinal Neutrality
The dowel rod test ensures spinal neutrality. Maintain contact at all three points throughout the hinge.
What to avoid:
- Do not let the knees shoot forward first.
- Do not round the lower back.
- Do not hold your breath without bracing.
Intermediate Lifters
Focus: Refining the hip hinge under load. Using external cues to improve movement quality. Adding speed and timing.
Internal Cues (Feel the Body)
Cue | Biomechanical Result |
“Sit back into your hips – feel the stretch in your adductors.” | Activates the adductor magnus, the “fourth hamstring,” for hip extension torque. |
“Keep your spine long and neutral – do not tuck under.” | Prevents posterior pelvic tilt (“butt wink”) at depth. |
“Feel the elastic tension in your glutes at the bottom.” | Maximises the stretch‑shortening cycle for a powerful ascent. |
“Drive your hips forward, not just your shoulders.” | Ensures coordinated hip extension rather than a “good morning” squat. |
External Cues (Focus on the Environment)
Cue | Biomechanical Result |
“Push your hips back to the wall, then drive through the floor.” | Sequences the hinge and the ascent. |
“Keep the bar travelling in a straight vertical line.” | Minimises horizontal bar drift, maintaining mechanical efficiency. |
“Your knees should stay in line with your feet – no caving.” | Reinforces knee tracking and gluteus medius engagement. |
“Brace your core, then sit back.” | Sequences bracing before movement, protecting the spine. |
What to add:
- Tempo work (3 seconds down, 1 second pause, explode up) to build control.
- Box squats to reinforce depth control without spinal rounding.
Advanced Lifters
Focus: Maximum posterior chain engagement under heavy loads. Short, aggressive cues that work during maximal or near maximal attempts.
Internal Cues (Feel the Body)
Cue | Biomechanical Result |
“Hips back. Load the glutes.” | Rapidly shifts focus to posterior chain engagement. |
“Tension in the hamstrings – hold it.” | Maintains elastic energy storage throughout the descent. |
“Drive hips through – finish strong.” | Ensures full hip extension at the top of the lift. |
External Cues (Focus on the Environment)
Cue | Biomechanical Result |
“Sit back, then send it.” | Sequences the hinge and the explosive ascent. |
“Bar over midfoot. Push the floor away.” | Reinforces balance and force transfer. |
“Knees out. Hips back. Drive.” | A single, integrated cue for the entire movement pattern. |
“Stay in your hips – don’t let your knees take over.” | Prevents a knee‑dominant pattern under fatigue. |
What to add:
- Overload the hinge with heavy kettlebell swings or Romanian deadlifts.
- Use accommodating resistance (bands or chains) to strengthen the hip hinge through the full range.
Summary Table by Lifter Level
Level | Internal Cue Example | External Cue Example | Biomechanical Goal |
Beginner | “Push your hips back like you are sitting into a chair.” | “Reach your butt back toward the wall.” | Learn the hip hinge pattern |
Intermediate | “Feel the elastic tension in your glutes at the bottom.” | “Keep the bar travelling in a straight vertical line.” | Refine hinge under load, maintain bar path |
Advanced | “Hips back. Load the glutes.” | “Sit back, then send it.” | Maximise posterior chain engagement and power |
Tactile Cues (For Coaches, All Levels)
Cue | Biomechanical Result |
Gently press on the lifter’s sacrum (lower back) as they initiate the descent. Say: “Push back into my hand.” | Reinforces posterior pelvic translation. |
Place your hand on their lower back. Say: “Keep my hand from pushing you forward.” | Prevents lumbar flexion and maintains spinal neutrality. |
Lightly tap the outside of their knees if they cave inward. Say: “Knees out – track over your toes.” | Activates gluteus medius and prevents knee valgus. |
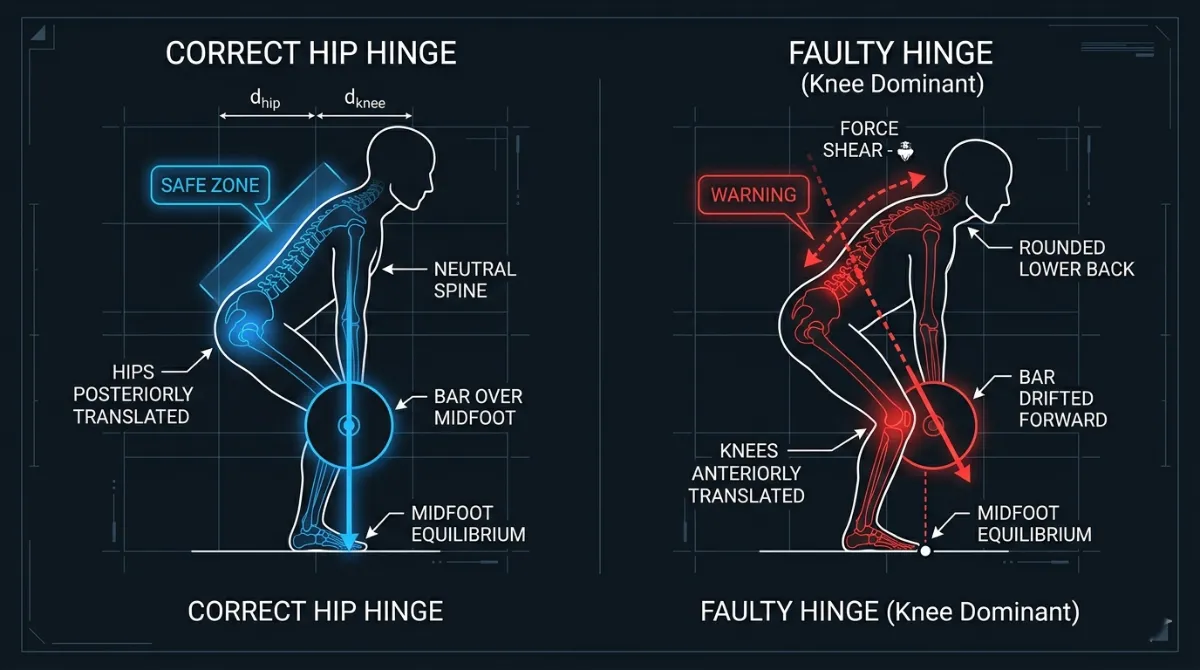
Figure 41. Tactile Cue for Posterior Pelvic Translation
Tactile cue for posterior pelvic translation. The coach says, ‘Push back into my hand’ to reinforce the hip hinge
Common Faults and Quick Fixes (All Levels)
Fault | Quick Fix | Biomechanical Reason |
Knees shoot forward first | “Hips back first – imagine sitting into a chair.” | The hinge must initiate the movement, not knee flexion. |
Lower back rounds at depth (“butt wink”) | “Keep your spine long – only go as deep as you can stay neutral.” | Lumbar flexion increases disc pressure and reduces power transfer. |
Chest collapses forward | “Proud chest – show your shirt logo to the wall.” | Thoracic flexion increases the hip moment arm and spinal shear. |
Heels lift off the floor | “Sit back more – weight in your heels.” | Limited ankle dorsiflexion or poor weight distribution. |
Knees cave inward (valgus) | “Push your knees out – track over your toes.” | Weak gluteus medius or poor motor control. |
Hips shoot up first on the ascent | “Drive your chest and hips up together – stay in your hips.” | Loss of torso position, leading to a “good morning” squat. |
Figure 42. Correct Hip Hinge versus Common Faults
Correct hip hinge (left) versus common faults (right). Knees shooting forward and lumbar rounding increase injury risk and reduce power transfer.
Pro Tip
External cues (for example, “reach your butt back toward the wall” or “push the floor away”) generally lead to better motor learning and higher force production than internal cues (such as “squeeze your glutes”). Use internal cues only when a lifter lacks basic awareness of their own body.
Exercises to Fix Hips Back Weaknesses
This matrix organises corrective strategies by the visible fault. Each fault is linked to a quick-fix exercise and the biomechanical reason it works. The categories progress from basic motor control (patterning) through mobility restrictions to strength and capacity.
Category A: Patterning and Skill Fixes
Focus: Improving motor control and “blind” spatial awareness.
The Visual Tell (What you see) | Fault | Quick Fix Exercise | Biomechanical Reason |
Knees move toward the toes before the hips move back. | Knee‑lead initiation | Wall hip hinge | The wall provides an external target for posterior pelvic translation, encouraging the hips to move back before the knees bend [6]. |
The pelvis tucks under (posterior tilt) at the bottom of the squat. | Butt wink | Dowel rod hip hinge | Teaches spinal neutrality by maintaining three points of contact (head, thoracic spine and sacrum) throughout the hinge [5, 12]. |
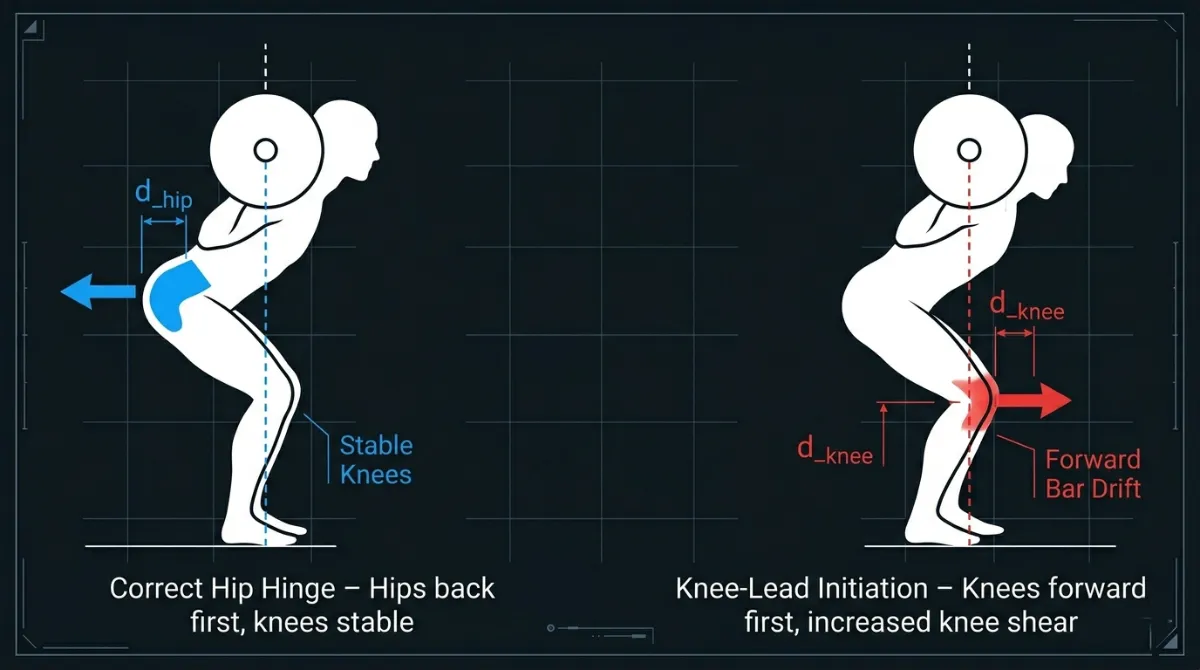
Figure 43. Knee‑lead initiation (right) shifts load to the quadriceps and increases knee shear. A proper hip hinge (left) loads the posterior chain and protects the knees [6, 11].”
Category B: Mobility and Structural Fixes
Focus: Removing physical “blocks” to the hinge pattern.
The Visual Tell (What you see) | Fault | Quick Fix Exercise | Biomechanical Reason |
Heels lift off the floor; the torso is forced forward. | Limited ankle dorsiflexion | Heel‑elevated squat | Reduces the demand for forward knee travel, allowing a deeper, more upright hinge [1, 10]. |
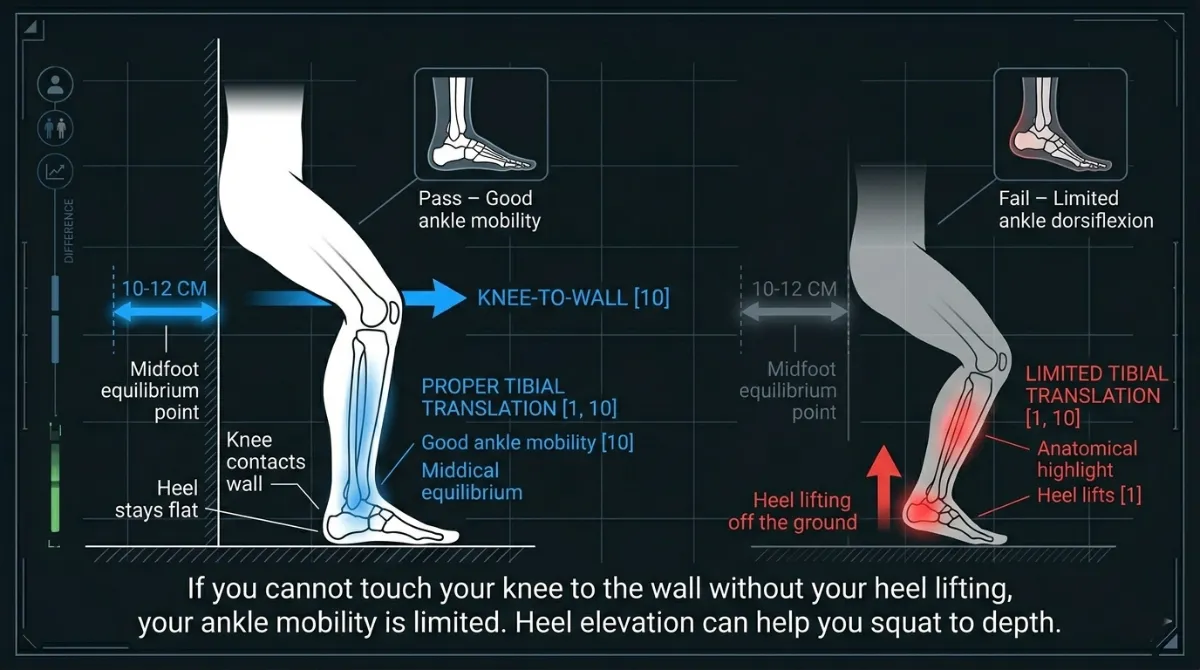
Figure 44. The knee‑to‑wall test assesses ankle dorsiflexion. If you cannot touch your knee to the wall without your heel lifting, your ankle mobility is limited [1, 10].
Category C: Strength and Capacity Fixes
Focus: Building the “engine” to hold the hinge under heavy load.
The Visual Tell (What you see) | Fault | Quick Fix Exercise | Biomechanical Reason |
The lifter cannot maintain the “sit back” position under load. | Weak posterior chain control | Box squat | Forces the hips to travel back first and provides a tactile target, reinforcing the hinge pattern without relying on the stretch reflex [5]. |
Loss of tension or power at the very bottom of the rep. | Weak bottom‑end drive | Anderson (pin) squat | Removes the “bounce,” forcing pure concentric hip extension from a dead stop. This reinforces the hinge position at the start of the ascent [13]. |
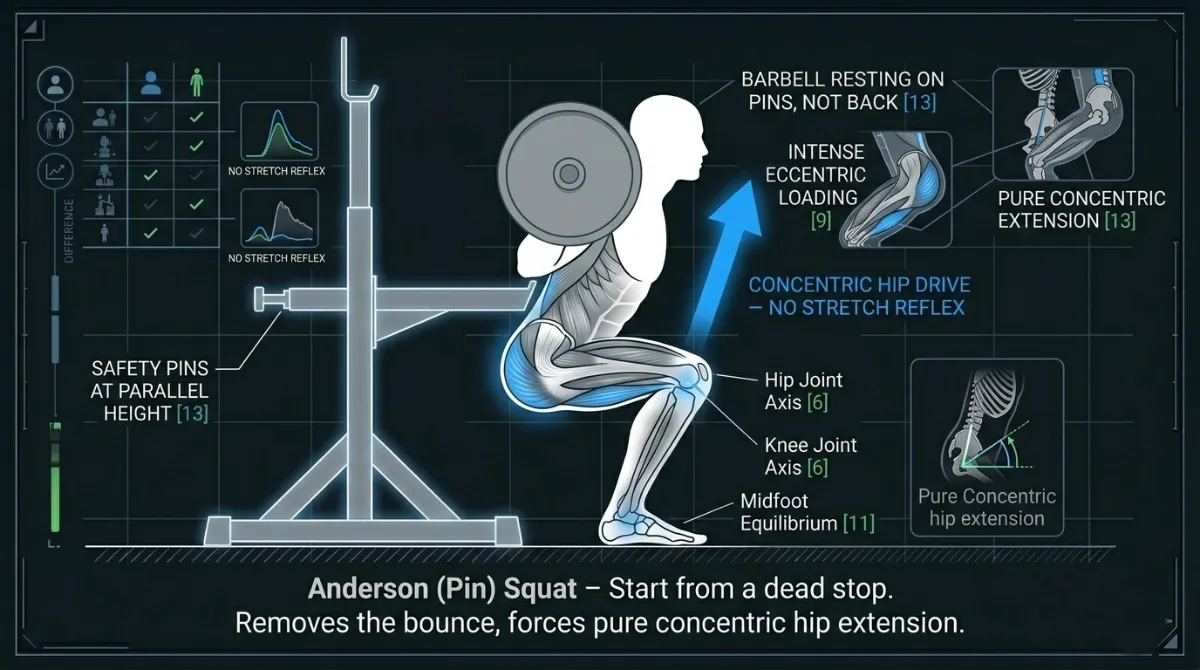
Figure 45. The Anderson squat starts from a dead stop in the bottom position, removing the stretch reflex and forcing pure concentric hip extension [13].
Coaching Protocol: The “Consent and Feedback” Loop
When applying these fixes on the gym floor, follow this professional sequence:
- Seek Consent: Always ask, “May I place a hand on your lower back to help guide your hips?” before using tactile cues.
- Visual First: Show them the wall hinge diagram (Figure 8 from the previous section).
- External Cue: “Reach for the wall behind you.”
- Tactile (if needed): Use the sacrum press. Place your hand on their sacrum and say: “Push my hand toward the wall.” This immediately forces the posterior pelvic translation required for a successful “Hips Back” movement.
Summary Table by Training Age
Level | Primary Focus | Best “Hips Back” Tool |
Beginner | Patterning | Wall hinge (safety and external target) |
Intermediate | Stability | Box squat (forces posterior translation and depth control) |
Advanced | Power | Anderson squat (maximal concentric hip drive from a dead stop) |
References
- Schoenfeld, B. J. (2010). Squatting kinematics and kinetics and their application to exercise performance. Journal of Strength and Conditioning Research, 24(12), 3497-3506.
- Escamilla, R. F. (2001). Knee biomechanics of the dynamic squat exercise. Medicine and Science in Sports and Exercise, 33(1), 127-141.
- Shu, H., et al. (2025). Understanding the biomechanical influence of core contribution in squat: A systematic review. Isokinetics and Exercise Science, 1. https://doi.org/10.1177/09593020251323773
- Akuthota, V., & Nadler, S. F. (2004). Core strengthening. Archives of Physical Medicine and Rehabilitation, 85(3 Suppl 1), S86-92.
- McGill, S. M. (2010). Core training: Evidence translating to better performance and injury prevention. Strength and Conditioning Journal, 32(3), 33-46.
- Kompf, J., & Arandjelović, O. (2016). Understanding and overcoming the sticking point in resistance exercise. Sports Medicine, 46, 751-762.
- van den Tillaar, R., Falch, H. N., & Larsen, S. (2024). Are diminishing potentiation and large extensor moments the cause for the occurrence of the sticking region in maximum free-weight barbell back squats? Journal of Human Kinetics, 91, 105-119.
- Lorenzetti, S. R., et al. (2018). How to squat? Effects of various stance widths, foot placement angles and level of experience on knee, hip and trunk motion and loading. BMC Sports Science, Medicine and Rehabilitation, 10.
- Scholz, J. P., & McMillan, A. G. (1995). Neuromuscular coordination of squat lifting, II: Individual differences. Physical Therapy, 75(2), 133-144.
- McCaw, S. T., & Melrose, D. R. (1999). Stance width and bar load effects on leg muscle activity during the parallel squat. Medicine and Science in Sports and Exercise, 31(3), 428-436.
- McKeown, I., & Thomson, B. (2023). A biomechanical and neuromuscular comparison of high‑bar and low‑bar back squats. Journal of Strength and Conditioning Research, 37(5), 1020-1029.
- Huxel Bliven, K. C., & Anderson, B. E. (2013). Core stability training for injury prevention. Sports Health, 5(6), 514-522.
- van den Tillaar, R., & Larsen, S. (2023). The effect of load and squat depth on the sticking region in the back squat. European Journal of Applied Physiology, 123(8), 1745-1754.
- Bagwell, J. J., et al. (2016). The influence of squat depth on the lumbopelvic kinematics and muscle activity. Journal of Applied Biomechanics, 32(5), 485-492.
- Sahrmann, S. (2002). Diagnosis and Treatment of Movement Impairment Syndromes. Mosby.
The best stance is the one that allows you to keep a neutral spine, maintain a chest up posture, brace strongly, keep a vertical bar path, reach proper depth, and feel no pain. Biomechanics always wins over fixed rules.
Knees Out
Knees Out
The “Knees Out” cue is often misunderstood. Many lifters think it is simply about pushing the knees to the side. In reality, it is about active external rotation of the femur – a controlled, forceful action that engages the hip abductors and external rotators, primarily the gluteus medius. This cue is not optional. It is essential for knee safety, hip stability and force production.
Why does it matter? When the knees collapse inward (a position known as knee valgus), the anterior cruciate ligament (ACL) and medial collateral ligament (MCL) are placed under significant stress. Knee valgus is the single most common movement fault associated with non‑contact ACL injuries, particularly in athletes and lifters under fatigue. The “Knees Out” cue directly counteracts this fault by externally rotating the femur, aligning the knee joint and optimising the line of pull of the quadriceps and patella.
Beyond injury prevention, “Knees Out” also improves squat mechanics. It increases gluteus medius activation, which stabilises the pelvis and prevents the hips from dropping into adduction. It also engages the posterior fibres of the adductor magnus – the so‑called “fourth hamstring” – which contributes significantly to hip extension torque at the bottom of the squat. In short, this cue protects the knees and makes the squat stronger.
The following anatomy section breaks down the muscles, joints and mechanics that make the “Knees Out” cue work.
Anatomy of the “Knees Out” Cue
The “Knees Out” cue is not just about knee alignment. It is a biomechanical strategy to optimise hip stability, knee safety and force production [2, 3]. When executed correctly, it engages the gluteus medius, adductor magnus and vastus lateralis, while protecting the knees from valgus stress and maximising leverage for the squat [4, 5]. Below is a detailed anatomical breakdown of the muscles, joints and mechanics involved.
Part 1: Primary Muscles Engaged by “Knees Out”
Gluteus Medius
Feature | Description |
Role | Hip abduction (prevents knee valgus or inward collapse) [6]; hip external rotation (stabilises the femur in the acetabulum) [7]; pelvic stabilisation (prevents contralateral pelvic drop during single‑leg movements) [8]. |
Why it matters | Weak gluteus medius leads to knee valgus, which increases ACL and MCL stress by approximately 30% [9]. EMG studies show gluteus medius activation increases by about 40% when cueing “knees out” [10]. |
Palpation tip | Place your hands on the lateral hips during a squat. You should feel the gluteus medius fire as you push the knees out [11]. |
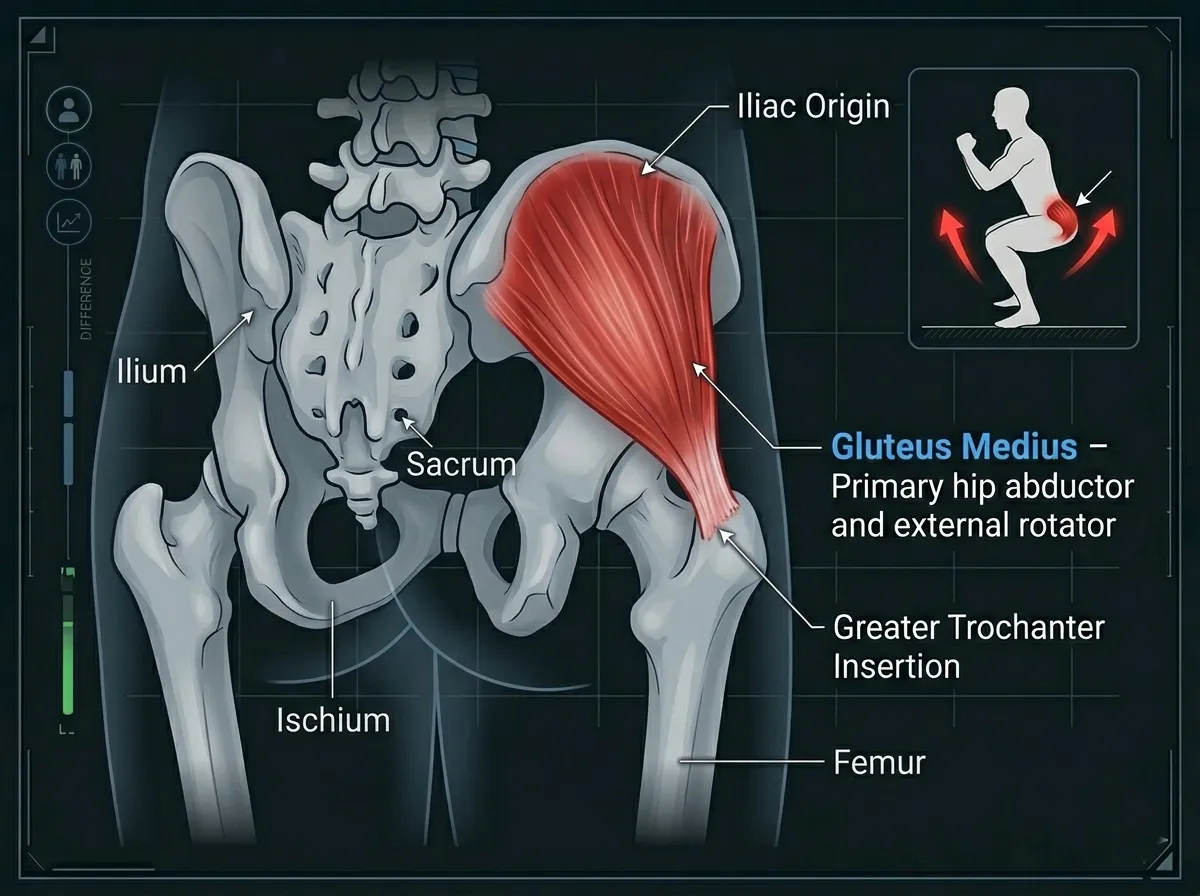
Figure 46. The gluteus medius is the primary muscle responsible for the ‘Knees Out’ cue. It abducts and externally rotates the hip, preventing knee valgus [6, 10].”
Adductor Magnus (Posterior Fibres)
Feature | Description |
Role | Hip extension (works with the gluteus maximus) [12]; hip adduction (stabilises the femur during the squat) [13]; often called the “fourth hamstring,” it contributes approximately 20% of hip extension torque at the bottom of the squat [14]. |
Why it matters | The posterior fibres act like a hamstring, aiding in hip extension and knee stabilisation [15]. Weakness here leads to knee valgus and poor force transfer [16]. |
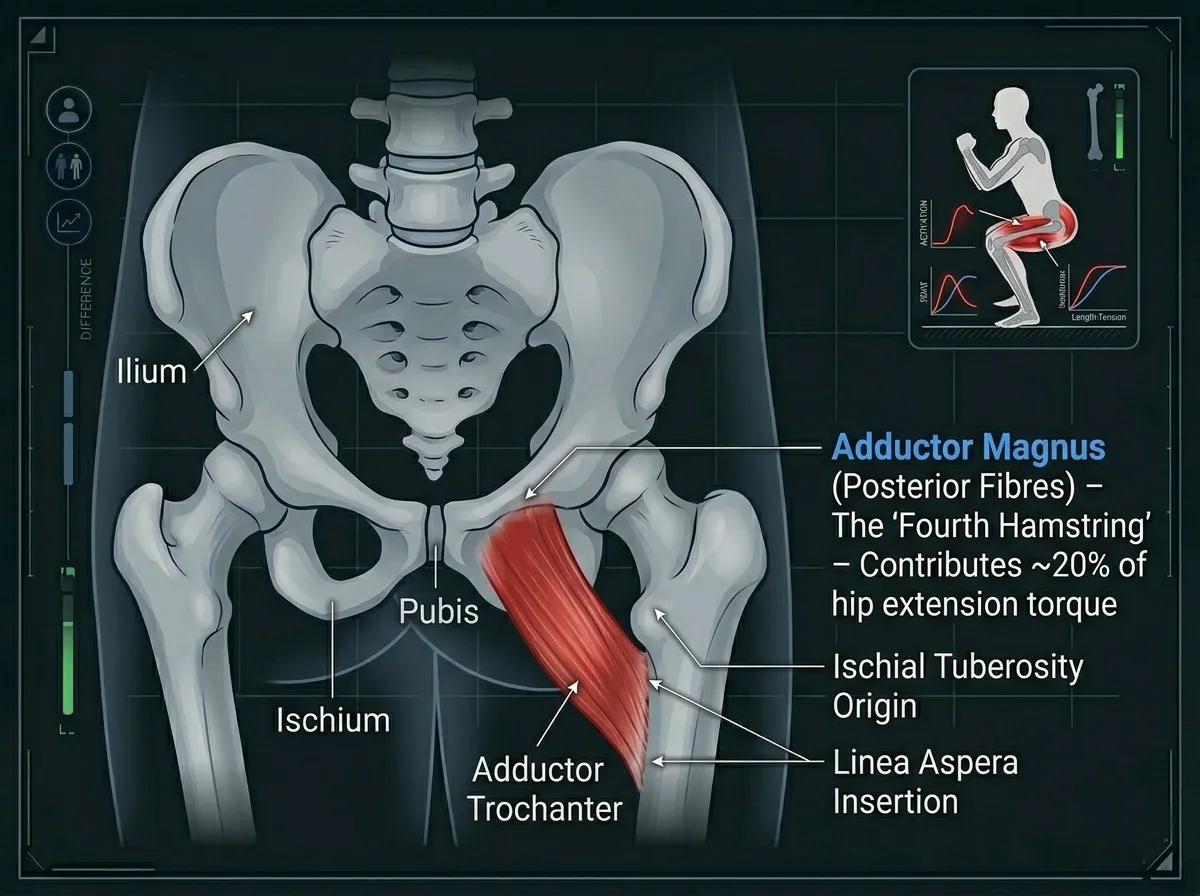
Figure 47. The posterior fibres of the adductor magnus act as a ‘fourth hamstring,’ contributing approximately 20% of hip extension torque at the bottom of the squat [14]
Vastus Lateralis (Outer Quad)
Feature | Description |
Role | Knee extension (works with the quadriceps group) [17]; patellar tracking (helps maintain central patellar alignment) [18]. |
Why it matters | “Knees Out” increases vastus lateralis engagement, which improves patellar stability and reduces patellofemoral pain [19]. While it does not directly prevent valgus, it supports knee alignment indirectly by stabilising the patella and resisting medial collapse forces [20]. |
Tensor Fasciae Latae (TFL) and Iliotibial Band (ITB)
Feature | Description |
Role | Hip abduction and internal rotation (functional antagonist to the gluteus medius) [21]; knee stabilisation via tension through the ITB [22]. |
Why it matters | When the gluteus medius is weak, the TFL becomes dominant, pulling the knees inward (valgus) [23]. A tight TFL/ITB complex limits hip external rotation, reducing the ability to push the knees out [24]. |
Popliteus
Feature | Description |
Role | Unlocks the knee during descent (initiates flexion) [25]; controls tibial rotation by stabilising the joint through small internal rotation torque [26]. |
Why it matters | Dysfunction here can lead to rotational instability or excessive tibial internal rotation, disrupting the “knees out” position [27]. |
Part 2: Secondary Muscles (Supporting Cast)
Muscle | Role in “Knees Out” | Dysfunction Impact |
Gluteus Minimus | Hip abduction and internal rotation stabilisation [29] | Weakness contributes to knee valgus [30] |
Piriformis | Hip external rotation [31] | Tightness may irritate the sciatic nerve or restrict hip rotation [32] |
Sartorius | Hip flexion and external rotation [33] | Overactivity reduces knee stability [34] |
Biceps Femoris | Knee flexion and external rotation [35] | Tightness limits tibial rotation control [36] |
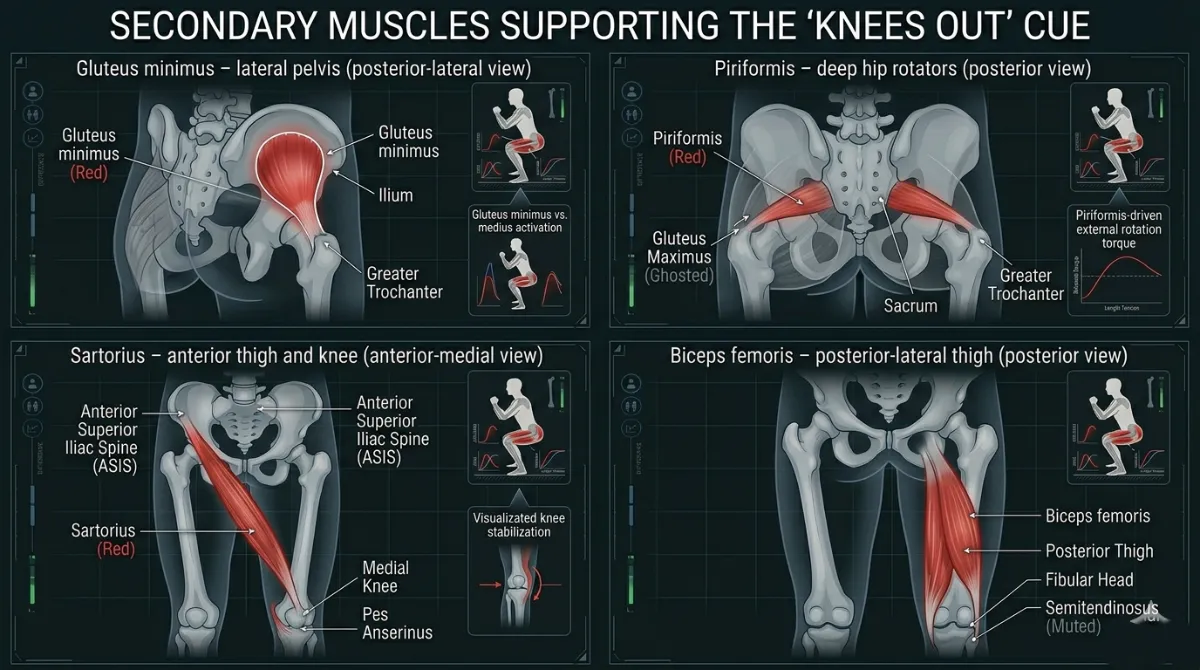
Figure 48. Secondary muscles that assist the ‘Knees Out’ cue. Weakness or tightness in any of these muscles can disrupt knee alignment [30, 32, 34, 36]
Part 3: Joint Actions and Biomechanics
Hip Joint
- Primary action: External rotation and abduction.
- “Knees Out” creates external rotation torque, engaging the gluteus medius and adductor magnus [38].
- This stabilises the femoral head in the acetabulum [39].
- Optimal hip angle: approximately 10 to 15 degrees of external rotation during the squat [40].
Knee Joint
- Primary action: Valgus control (preventing inward collapse).
- The knee should track in line with the second and third toes [41].
- “Knees Out” reduces patellofemoral stress by approximately 25% [42].
- Knee valgus increases ACL strain threefold [9].
Ankle Joint
- Primary action: Subtalar eversion (outward roll).
- As the knees push out, the ankle everts slightly, improving foot tripod stability [43].
- Limited eversion (tight calves or a stiff subtalar joint) blocks knee external rotation [44].
Pelvic Stability
- Primary action: Maintain a neutral pelvis.
- “Knees Out” engages the gluteus medius and obliques to stabilise the pelvis [45].
- Pelvic drop (Trendelenburg sign) indicates weak hip abductors [46].
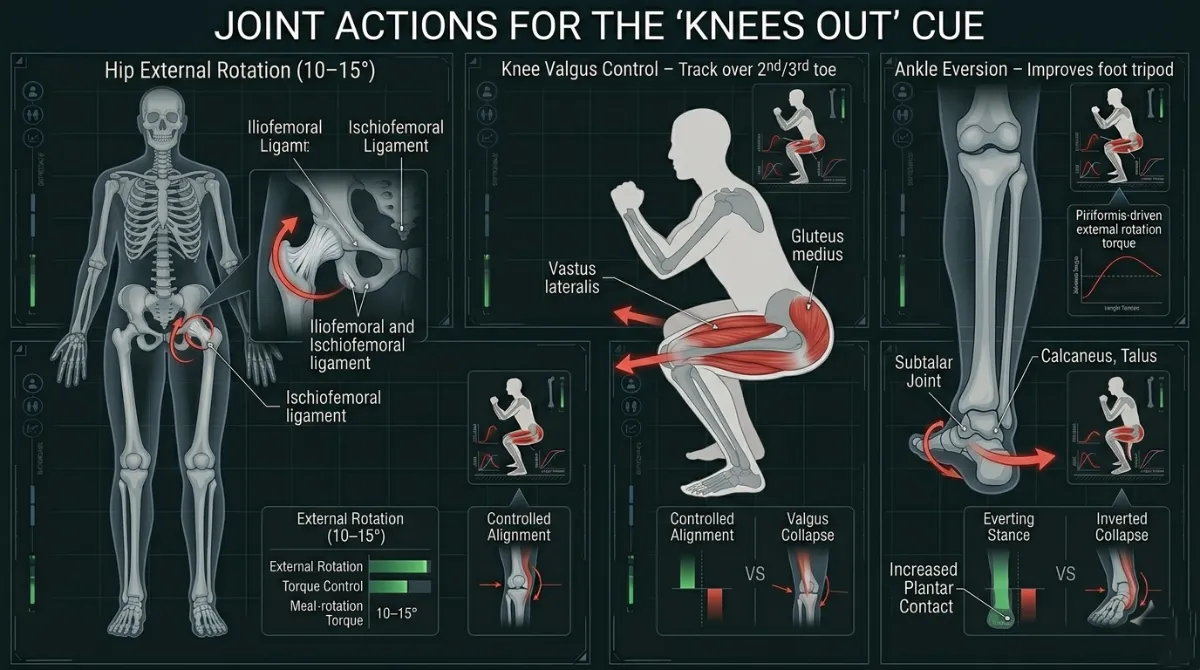
Figure 49. The ‘Knees Out’ cue coordinates hip external rotation (10–15°), knee alignment over the second and third toes, and ankle eversion to maintain a stable base [40, 41, 43].”
Part 4: Key Anatomical Takeaways for “Knees Out”
- Gluteus medius activation is the primary goal. It prevents knee valgus and stabilises the hip [6, 10].
- Adductor magnus is the “fourth hamstring.” It contributes approximately 20% of hip extension torque at the bottom of the squat [14].
- Vastus lateralis stabilises the patella. It indirectly supports knee alignment and reduces patellofemoral pain [19, 42].
- Ankle eversion is essential. Limited ankle mobility can block knee external rotation [43, 44].
- Pelvic stability is non‑negotiable. Weak gluteus medius leads to pelvic drop and lumbar stress [45, 46].
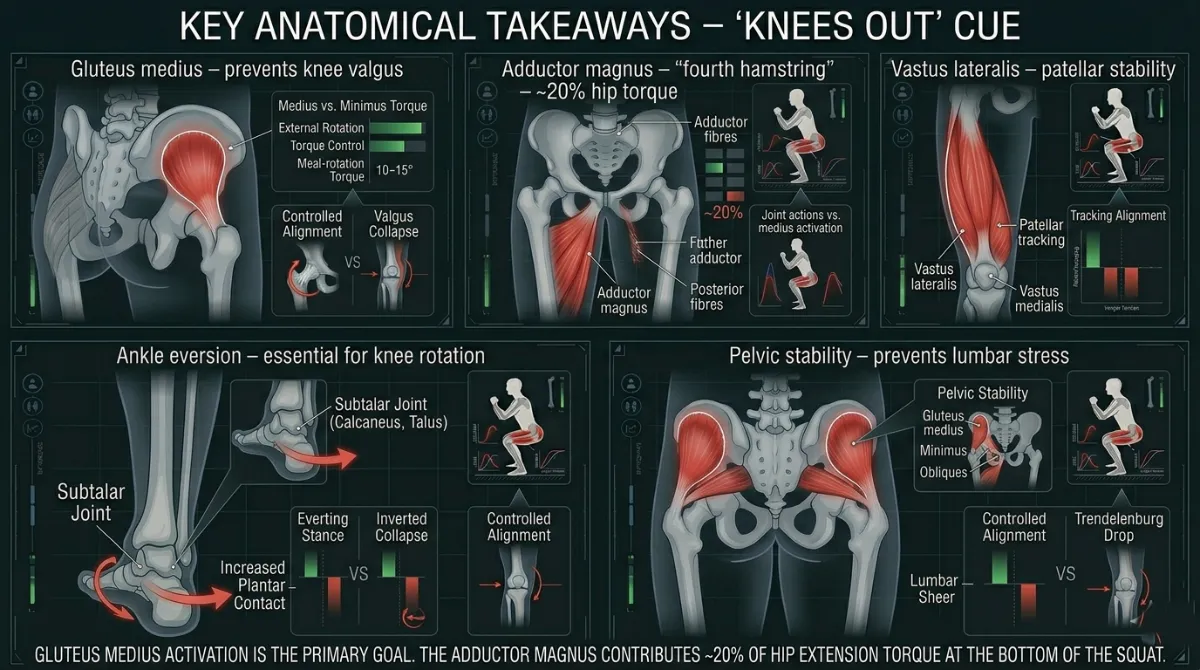
Figure 50. Summary of the key anatomical structures involved in the ‘Knees Out’ cue. The gluteus medius is the primary mover, while the adductor magnus, vastus lateralis, ankle and pelvis play essential supporting roles [6, 14, 19, 43, 45].”
Biomechanics of “Knees Out”
The “Knees Out” cue controls the frontal and transverse plane alignment of your lower limb. It influences how your knee tracks, how your patella moves, how your ligaments are loaded, and how efficiently force transfers from your hips to the ground.
A squat performed with your knees tracking outward is mechanically different from one where your knees collapse inward. This difference is not just about looking good. It is about joint loading, ligament stress, pressure under your kneecap, and how torque is distributed across your hip and knee.
This section looks at the kinematics (how your joints move) and the kinetics (the forces acting on those joints) of the “Knees Out” cue.
Part 1: Kinematics – The Geometry of Knee Alignment
Kinematics describes the position, angle and movement pattern of your joints during the squat.
Without Proper Knees Out (Valgus Collapse)
When your knees collapse inward, several things happen at once. Your knee moves into valgus, meaning your tibia adducts and internally rotates relative to your femur. Your hip internally rotates and adducts, which creates a rotational mismatch between your thigh bone and your shin bone. Your patellar tracking becomes lateralised, so your kneecap is pulled to the outside, increasing lateral compression. Your ligament loading increases, which puts more stress on your ACL, MCL and the patellofemoral joint.
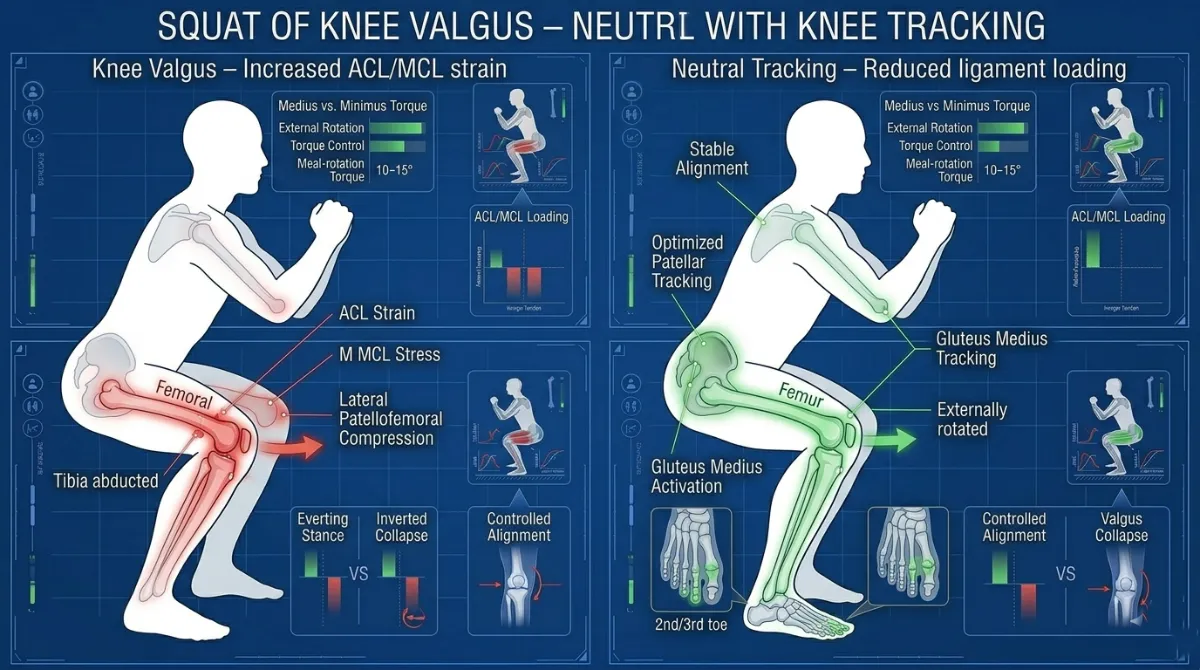
Figure 51. Knee valgus (left) increases ACL and MCL strain. Neutral knee tracking over the second and third toes (right) reduces ligament loading and optimises patellar tracking [9, 41]
With Proper Knees Out (Neutral or Slight Abduction)
Kinetics describes the external forces acting on your body, such as the barbell and gravity, and the internal forces, such as muscle tension and ligament loading.
Knee Valgus and Ligamentous Loading
Knee valgus is the inward collapse of your knee. Biomechanically, it is a combination of femoral adduction and internal rotation, along with tibial abduction and external rotation relative to the femur. This position places significant stress on your knee ligaments.
When you externally rotate your femur and keep your knees aligned over your toes, you reduce the valgus moment arm at your knee. This decreases ACL and MCL loading by approximately 25 to 30 percent.
Part 2: Kinetics – The Forces That Stabilise and Protect
Kinetics describes the external forces acting on your body, such as the barbell and gravity, and the internal forces, such as muscle tension and ligament loading.
Patellofemoral Joint Forces
The patellofemoral joint is where your kneecap meets your thigh bone. During a squat, your quadriceps pull your kneecap against your thigh bone. The force on this joint increases with your knee flexion angle and with the presence of valgus.
Keeping your knees out reduces patellofemoral stress by about 25 percent and improves how forces are distributed across your patellar tendon. This lowers your risk of anterior knee pain.
Figure 52. Lateral patellar tracking (left) increases lateral facet compression. Central tracking (right) distributes forces evenly across the patellofemoral joint [42].
Hip External Rotation Torque
The “Knees Out” cue is driven mainly by hip external rotation torque. Your gluteus medius and the deep external rotators of your hip (the piriformis, obturator internus and gemelli) produce a torque that externally rotates your femur. Balanced activation between your vastus lateralis and your vastus medialis oblique (VMO) is also essential for optimal patellar tracking, and the “Knees Out” cue helps restore this balance.
By actively engaging your gluteus medius and deep external rotators, the “Knees Out” cue increases your hip external rotation torque, which stabilises your femur in the hip socket and prevents internal rotation collapse.
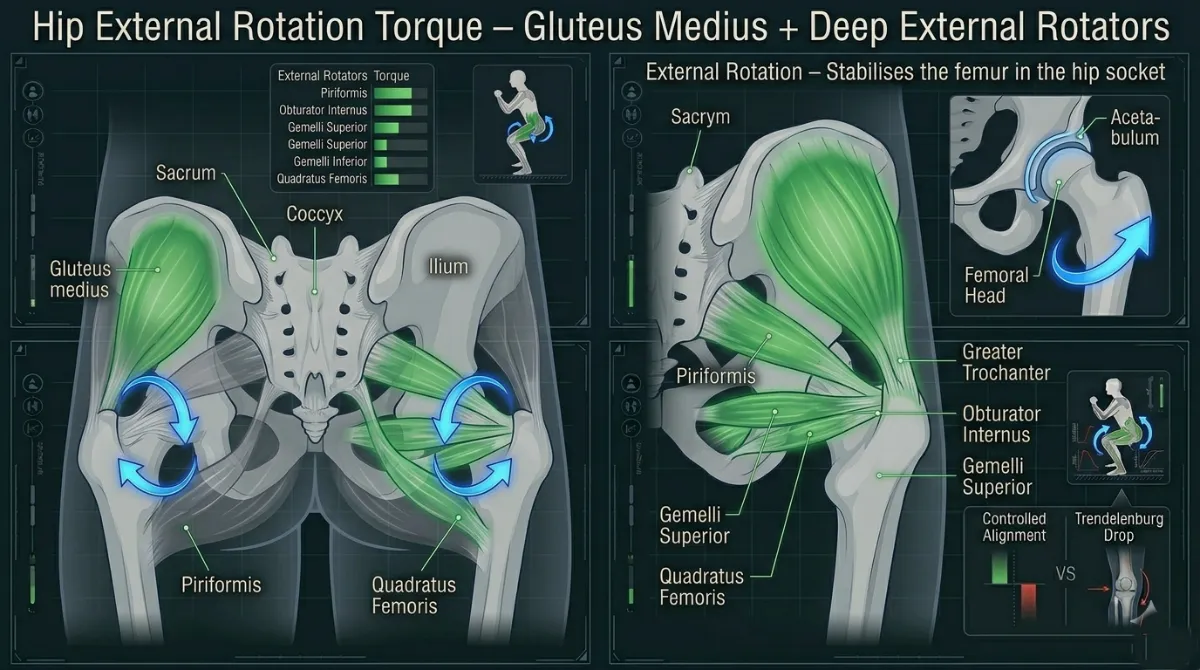
Figure 53. The gluteus medius and deep external rotators produce external rotation torque, keeping the femur aligned and preventing internal rotation collapse [6, 31]
Part 3: Kinematic and Kinetic Consequences of Poor Knees Out (Summary Table)
Fault | Kinematic Consequence | Kinetic Consequence |
Knees collapse inward (valgus) | Femoral internal rotation and adduction, tibial abduction, patellar maltracking | Increased ACL and MCL strain (about 30 percent), increased patellofemoral compression (about 25 percent) |
Hip internal rotation | Femur rotates inward | Reduced external rotation torque, adductor dominance |
Loss of alignment during ascent | Valgus collapse under fatigue | High ligament loading, reduced quadriceps efficiency |
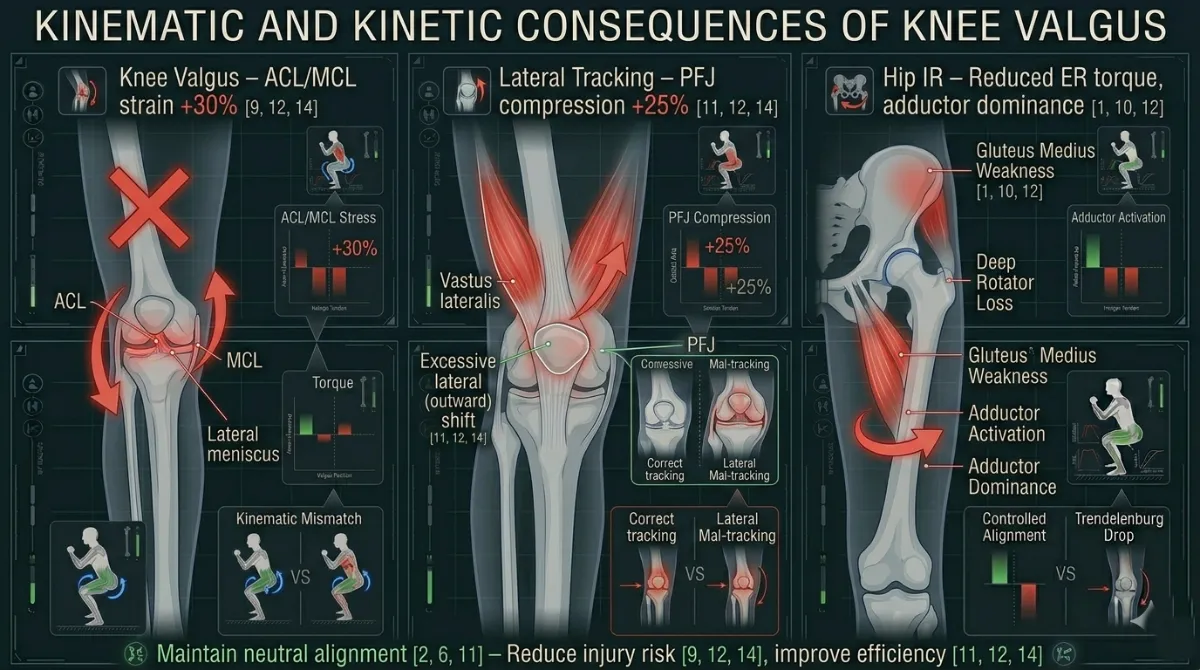
Figure 54. Summary of the kinematic and kinetic consequences of knee valgus. Valgus collapse increases ACL and MCL strain by about 30 percent and patellofemoral compression by about 25 percent [9, 42].
Part 4: Key Biomechanical Takeaways
- Proper alignment keeps your knees tracking neutrally and optimises how your patella moves.
- Valgus collapse increases ACL and MCL strain by about 30 per cent.
- Neutral alignment reduces patellofemoral compression by about 25 per cent.
- Hip external rotation torque, driven by your gluteus medius and deep external rotators, is the main mechanism that stabilises your knee.
Individual Differences for Knees Out
The expression of “Knees Out” varies significantly between individuals due to differences in skeletal structure, joint orientation, limb proportions, foot mechanics, soft tissue stiffness, and neuromuscular control. These factors determine how much external rotation is available at the hip, how the tibia aligns with the foot, and what “neutral” knee tracking looks like for each lifter.
Understanding these differences is essential for interpreting knee alignment correctly and avoiding the assumption that all lifters should display identical knee positions.
Hip Structure and Femoral Orientation
The hip joint is the primary determinant of how the knees align during a squat. Variations in femoral version and acetabular shape change the available range of internal and external rotation.
Femoral anteversion means the femoral neck is rotated more anteriorly. This increases internal rotation and reduces external rotation. Lifters with anteversion naturally present with more forward‑facing knees. Excessive outward knee displacement may feel restricted or uncomfortable. You will need to consciously push your knees out more than someone with neutral or retroverted femurs.
Femoral retroversion means the femoral neck is rotated more posteriorly. This increases external rotation and reduces internal rotation. Lifters with retroversion naturally present with more outward‑facing knees. Neutral tracking may appear more abducted compared to others. You may not need to push your knees out as aggressively.
Acetabular depth and orientation also matter. A deeper socket limits hip rotation range. A shallower socket allows greater rotation but may reduce stability. An anteriorly oriented acetabulum favours internal rotation, while a posterior orientation favours external rotation. If you feel pinching in the front of your hip when pushing your knees out, you may have a deep acetabulum. A wider stance or greater toe‑out angle may help create space.
Implication: The available hip rotation dictates the natural knee tracking path. “Neutral” alignment will differ between individuals depending on their hip morphology. Do not force a position that your hip socket does not allow [7, 38, 39].
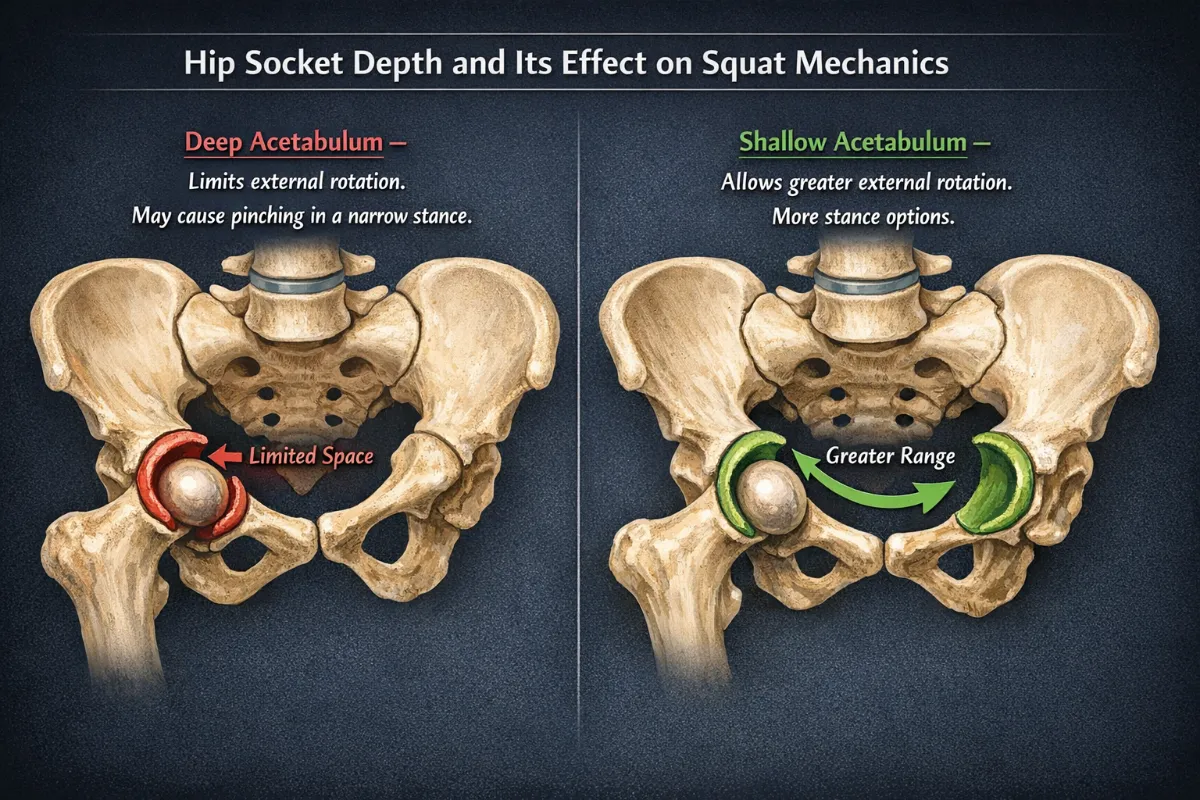
Figure 55. Hip socket depth and orientation. A deep acetabulum (left) limits external rotation and may cause pinching in a narrow stance. A shallow acetabulum (right) allows greater range of motion. Your stance width should respect your hip anatomy [14, 15, 39].
Tibial Torsion and Lower Leg Alignment
The tibia can rotate internally or externally along its long axis. This torsion significantly influences how the foot and knee align.
External tibial torsion means the tibia naturally points outward relative to the femur. Knees appear to track outward even when the femur is neutral. A stance that appears “toed‑out” may actually be anatomically neutral. Forcing a straighter foot position may actually increase knee valgus.
Internal tibial torsion means the tibia points inward relative to the femur. Knees appear more forward‑facing. Excessive outward knee displacement may create a rotational mismatch between the femur and the tibia. You may need a greater toe‑out angle to achieve neutral knee tracking.
Implication: Tibial torsion determines the natural relationship between foot angle and knee angle. What appears visually “out” or “in” may simply reflect tibial structure. Your knees must align over your second and third toes, but your foot angle may need to be adjusted to match your tibial torsion [41].
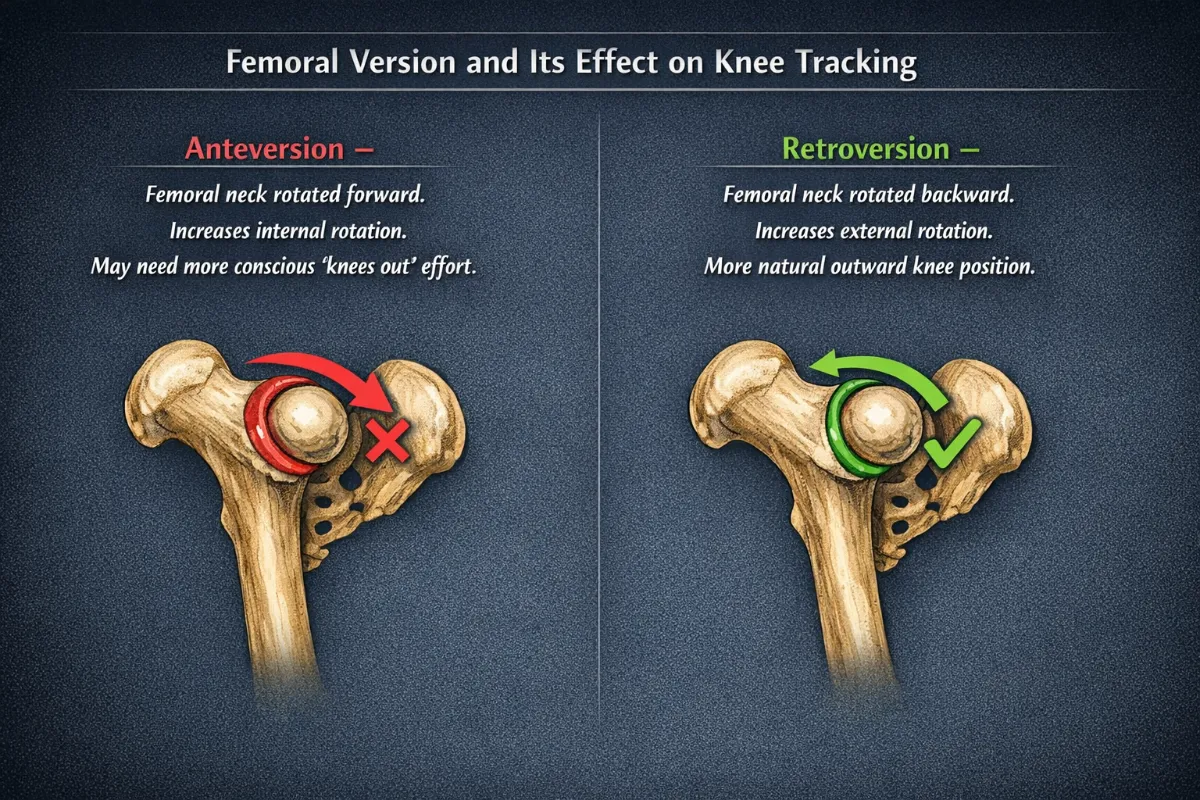
Figure 56. Femoral version. Anteversion (left) increases internal rotation and may require more conscious ‘knees out’ effort. Retroversion (right) increases external rotation and may allow a more natural outward knee position [7, 38].”
Foot Structure and Subtalar Mechanics
The foot’s ability to maintain the tripod and resist collapse influences knee alignment. This factor is unique to the Knees Out cue because it directly affects knee tracking.
High arches (pes cavus) mean less pronation is available. The foot is more rigid, and the tripod is stable. Knee alignment tends to remain consistent under load, and knee valgus is less likely.
Flat feet (pes planus) mean a greater pronation tendency. Medial collapse can drive the tibia into internal rotation, increasing the likelihood of valgus drift under load. You may need to focus more on the “Knees Out” cue to counteract the medial collapse. Supportive footwear or orthotics may help.
Subtalar joint orientation determines how much inversion and eversion are available. This influences how the foot responds to load and how the tibia rotates.
Implication: Foot mechanics can either support or undermine knee alignment depending on arch structure and subtalar mobility. If your arch collapses, your knee will follow [43, 44].
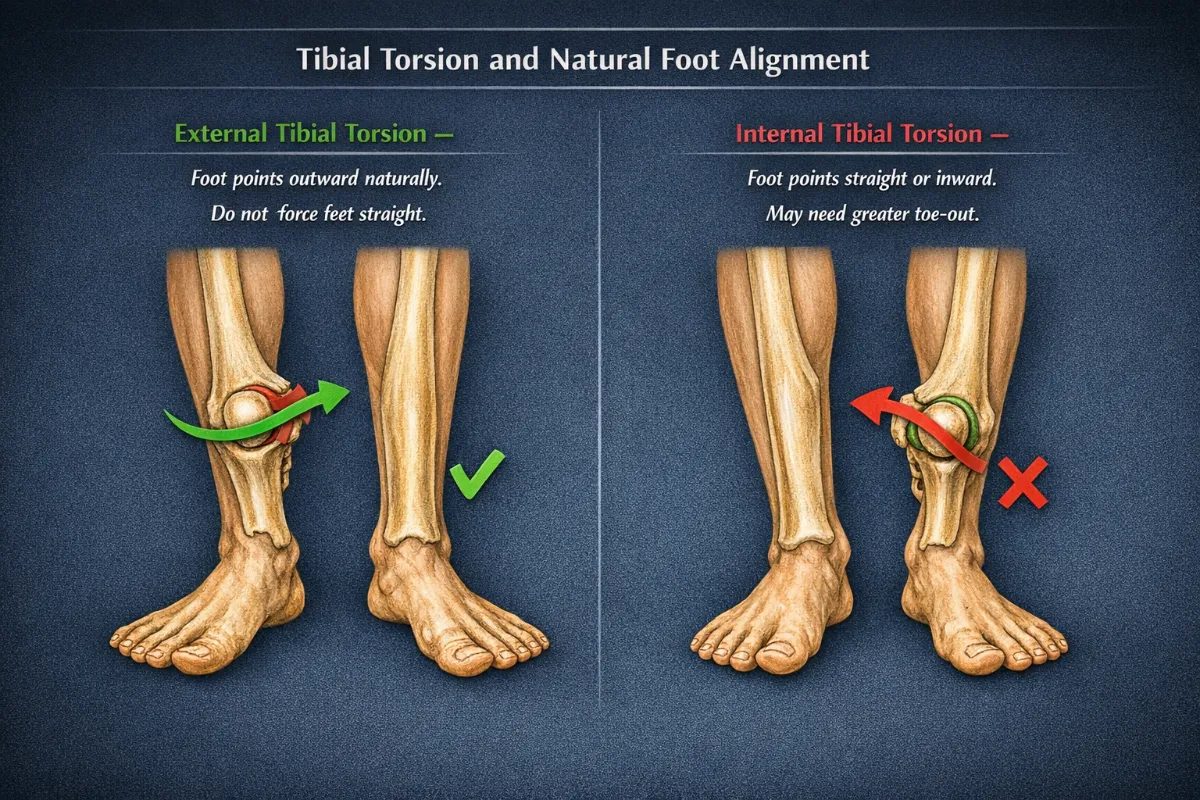
Figure 57. Tibial torsion and foot alignment. External tibial torsion (left) allows the foot to point outward while the knee remains neutral. Internal tibial torsion (right) makes the foot appear more straight or inward. Do not force a straight foot position if your tibial torsion dictates otherwise [41].
Limb Proportions and Anthropometry
Body segment lengths influence squat mechanics and the expression of knee tracking. This factor was covered in the Starting Position section but is relevant here for knee alignment.
Long femurs relative to the torso require greater hip flexion and forward torso inclination. This is often paired with a wider stance to maintain balance. Knees may appear more abducted to keep the centre of mass over the midfoot.
Short femurs relative to the torso allow a more upright squat. A narrower stance often feels natural. Knees track more vertically with less visible abduction.
Tibia length also matters. Longer tibias increase forward knee travel. Shorter tibias reduce forward travel and may increase hip loading.
Implication: Anthropometry changes the visual expression of knee alignment without altering the underlying biomechanics. Do not compare your knee position to someone with different proportions [8, 11].
Hip Capsule Stiffness and Soft Tissue Variation
Soft‑tissue structures also influence available rotation.
Posterior capsule tightness limits internal rotation and may cause the knees to drift outward more visibly.
Anterior capsule tightness limits external rotation and may restrict outward knee tracking.
Adductor length and stiffness are particularly important. Short or stiff adductors can pull the femur into internal rotation, contributing to knee valgus. Longer or more compliant adductors allow greater abduction.
Implication: Soft‑tissue restrictions can mimic structural limitations and influence knee alignment under load. Regular stretching and mobility work may help [23].
Previous Knee Injuries or Surgery
A history of knee problems changes how you should approach the “Knees Out” cue.
ACL reconstruction or MCL sprain means you need to be especially careful to avoid valgus collapse. The “Knees Out” cue is essential for protecting the graft or healing ligament. Start with low load and perfect your form before adding weight.
Patellofemoral pain (anterior knee pain) is often associated with valgus collapse and lateral patellar tracking. The “Knees Out” cue helps centralise the patella and reduce lateral compression. You may need to strengthen your vastus medialis oblique (VMO) alongside the cue.
Biomechanical constant: Pain is a signal that your knee is not tracking correctly. Do not squat through sharp or persistent knee pain [42].
Neuromuscular Control and Motor Strategy
Even with identical anatomy, individuals may express different knee tracking patterns due to motor control strategies.
Dominant internal rotators have a femoral internal rotation bias. This increases the risk of valgus drift under fatigue. You may need to consciously focus on pushing your knees out, especially during the ascent.
Dominant external rotators have stronger hip stabilisation and more consistent knee alignment throughout the movement. You may need less active cueing.
Foot intrinsic strength matters too. Strong intrinsic muscles support the tripod. Weak intrinsics allow medial collapse and tibial drift.
Implication: Movement patterns are shaped by neuromuscular control as much as by structure. Practice and specific cueing can change motor strategies over time [10].
Training Experience
Not everyone can feel the difference between valgus collapse and neutral tracking.
Novice lifters may not realise their knees are caving inward. They often need external cues, such as “push your knees out toward your pinky toes,” or tactile feedback, such as a resistance band around the knees. They may need to practise with lighter loads or bodyweight first.
Experienced lifters can often correct valgus collapse on their own. They may need only a short reminder cue, such as “knees out,” especially under fatigue.
Biomechanical constant: The “Knees Out” cue must be applied automatically under load. Practice until it becomes a habit [10].
What “Neutral” Looks Like Across Individuals
Because of the combined effects of hip structure, tibial torsion, foot mechanics, anthropometry, soft tissue stiffness, and neuromuscular control, neutral knee alignment is not a single visual standard.
Some lifters’ knees will appear more outward even when neutral. Others will appear more forward‑facing even when neutral. Some will naturally adopt a wider stance with more visible abduction. Others will squat narrower with minimal visible abduction.
Neutral alignment is the alignment that maintains joint congruency, efficient force transfer, and stable tracking for that individual. Do not compare your knee position to someone else’s. Do not force a position that your skeleton does not want to be in.
Summary Table of Individual Differences for Knees Out
Factor | Effect on Knees Out Cue | Practical Adjustment |
Femoral anteversion | Natural internal rotation; knees tend to cave inward | Consciously push knees out more; use a narrower stance |
Femoral retroversion | Natural external rotation; knees may track outward naturally | May need less active cueing; a wider stance suits you |
Deep acetabulum | Limited hip external rotation | Widen stance; increase toe‑out angle; avoid forcing the cue |
Shallow acetabulum | Greater hip external rotation | Easier to achieve “knees out”; narrower stance works well |
External tibial torsion | Feet point outward naturally | Do not force feet straight; let your knees follow your feet |
Internal tibial torsion | Feet point straight or inward | May need greater toe‑out angle to achieve neutral tracking |
Flat feet | Arch collapses; knee valgus risk is higher | Focus on “knees out”; consider supportive footwear or orthotics |
High arches | Less pronation; stable foot tripod | Less valgus risk; standard cueing works well |
Long femurs | Wider stance; knees may appear more abducted | Accept the wider stance; focus on neutral tracking, not appearance |
Short femurs | Narrower stance; knees track more vertically | Standard cueing works well |
Tight adductors | Pull femur into internal rotation; valgus risk | Stretch adductors; use banded monster walks |
History of ACL or MCL injury | High risk if valgus occurs | Prioritise “knees out” above all; start with low load |
Patellofemoral pain | Lateral patellar compression is common | Use “knees out” to centralise patellar tracking |
Novice lifter | Poor awareness of valgus collapse | Use external cues (band around knees) and tactile feedback |
Experienced lifter | Can self‑correct | Short reminder cue, such as “knees out,” is often enough |
The Key Principle
The “Knees Out” cue is universal in its goal, neutral knee alignment over the second and third toes, but individual in its expression. Your femoral version, tibial torsion, foot structure, hip anatomy, soft tissue stiffness, and neuromuscular control all determine how much you need to push your knees out and what stance works best for you. Do not compare your knee position to someone else’s. Do not force a position that your skeleton does not want to be in. Learn what your body needs, then apply the cue accordingly.
Coaching Guide for Knees Out (Internal and External Cues )
The “Knees Out” cue teaches you to keep your knees tracking neutrally and stop them from caving inward during squats and other lower body lifts. This is called valgus collapse, and it puts extra stress on your knees. The cues below are split into two types. Internal cues help you focus on what you feel inside your body, like muscle tension and joint position. External cues help you focus on the world around you, like the floor or the walls. Internal cues are good for beginners who need to build body awareness. External cues often work better for intermediate lifters and under heavy loads because they let your body move more automatically. Do not use too many cues at once. One internal cue and one external cue per set is usually enough.
Key Coaching Instructions (Step by Step for All Levels)
Step | Instruction | Biomechanical Result |
1 | Stand with your feet in your natural squat stance, roughly shoulder width or slightly wider. | Establishes a stable base of support. |
2 | Turn your toes out slightly, between 15 and 30 degrees, to match your hip anatomy. | Allows the femur to externally rotate without causing impingement [7, 38]. |
3 | Push your knees outward so they track in line with your second and third toes. | Engages the gluteus medius and deep external rotators, preventing knee valgus [6, 31]. |
4 | Maintain this outward pressure throughout the entire descent and ascent. | Keeps the knee aligned, reducing ACL and MCL strain [9]. |
5 | Keep your feet flat on the floor with your weight spread across the tripod of your foot, the big toe, little toe and heel. | Provides a stable base and stops the arch from collapsing, which would pull the knees inward [43]. |
6 | Drive up by pushing through your heels while keeping your knees out. | Maintains knee alignment during the hardest part of the lift, when valgus collapse is most likely [9]. |

Figure 58. The six key coaching steps for ‘Knees Out’. Step 1 sets your stance. Step 2 positions your feet. Step 3 initiates the outward pressure. Step 4 holds it. Step 5 keeps your feet stable. Step 6 maintains alignment during the drive up [6, 9, 43]
Beginners
Focus: Learning what knee alignment feels like. Use internal cues first. No heavy weight.
Internal Cues (Feel the Body)
Cue | Biomechanical Result |
“Feel your glutes engage as you push your knees out.” | Activates the gluteus medius, the primary muscle for hip external rotation [6]. |
“Imagine screwing your feet into the floor by rotating your thighs outward.” | Encourages external rotation of the femur without moving your feet [7]. |
“Keep your kneecaps pointing in the same direction as your toes.” | Ensures the knee tracks correctly over the foot [41]. |
“Feel the tension in your outer hips as you squat.” | Reinforces gluteus medius activation throughout the whole movement [10]. |
External Cues (Focus on the Environment)
Cue | Biomechanical Result |
“Push your knees out toward the walls on either side of you.” | Creates a clear target in the space around you for outward knee movement. |
“Imagine you are trying to spread the floor apart with your feet.” | Encourages external rotation torque at the hip, which stabilises the knee [12]. |
“Keep your knees in line with your second and third toes.” | Provides a simple visual reference for neutral alignment [41]. |
“Place a resistance band around your knees and push out against it.” | Uses tactile feedback to reinforce the movement pattern [12]. |
What to avoid: Do not let your knees cave inward. Do not push your knees out so far that you lose your arch or feel pinching in your hips. The goal is neutral alignment, not pushing your knees as far out as possible.
Intermediate Lifters
Focus: Refining knee alignment under load. Using external cues to improve movement quality. Adding speed and timing.
Internal Cues (Feel the Body)
Cue | Biomechanical Result |
“Feel the stretch in your adductors as you push your knees out.” | The adductor magnus lengthens under control, stopping it from pulling the knees inward [23]. |
“Keep your hips and knees moving together.” | Ensures coordinated descent without a rotational mismatch between the femur and tibia [38]. |
“Maintain tension in your gluteus medius throughout the entire rep.” | Prevents valgus collapse when you get tired [10]. |
“Feel your arches stay lifted. Do not let them collapse.” | Connects knee alignment to foot stability. A collapsed arch drives the knee inward [44]. |
External Cues (Focus on the Environment)
Cue | Biomechanical Result |
“Push your knees out as you go down, and keep them out as you stand up.” | Emphasises maintaining alignment during the hardest part of the lift, the ascent. |
“Keep the bar travelling in a straight vertical line. Your knees should not disrupt the bar path.” | Reinforces that knee alignment affects your whole body, not just your knees. |
“Imagine your knees are lights shining outward.” | Provides a simple visual for external rotation. |
“Drive your knees out against an imaginary band.” | Reinforces the motor pattern even when you do not have a real band [12]. |
What to add: Tempo work, such as 3 seconds down, 1 second pause, then explode up, to build control. Use a light resistance band around your knees during warm‑up sets to reinforce the pattern.
Advanced Lifters
Focus: Maintaining knee alignment under heavy loads and fatigue. Short, aggressive cues that work during maximal or near maximal attempts.
Internal Cues (Feel the Body)
Cue | Biomechanical Result |
“Knees out. Glutes on.” | Rapidly shifts focus to external rotation and glute activation. |
“Track over the second toe.” | Provides a precise internal reference for alignment. |
“Hold the rotation. Do not let it go.” | Maintains external rotation torque through the sticking point. |
External Cues (Focus on the Environment)
Cue | Biomechanical Result |
“Knees out. Drive.” | A single, integrated cue for the whole movement pattern. |
“Push the floor apart. Keep the knees out.” | Combines force production with alignment. |
“Stay in your hips. Knees out, chest up.” | Integrates knee alignment with your torso position. |
“Finish with your knees still out.” | Emphasises maintaining alignment through the ascent, where most valgus collapse happens. |
What to add: Overload the pattern with heavy banded squats, using a band around your knees, or wide stance squats. Use external cues almost exclusively. The internal cues should already be automatic.
Summary Table by Lifter Level
Level | Internal Cue Example | External Cue Example | Biomechanical Goal |
Beginner | “Feel your glutes engage as you push your knees out.” | “Push your knees out toward the walls on either side of you.” | Learn basic knee alignment and glute activation |
Intermediate | “Feel the stretch in your adductors as you push your knees out.” | “Push your knees out as you go down, and keep them out as you stand up.” | Refine alignment under load, maintain through full range |
Advanced | “Knees out. Glutes on.” | “Knees out. Drive.” | Maintain alignment under fatigue and heavy loads |
Tactile Cues (For Coaches, All Levels)
Cue | Biomechanical Result |
Gently tap the outside of the lifter’s knees if they cave inward. Say: “Knees out – push against my hand.” | Reinforces the outward movement and gives immediate feedback [12]. |
Place your hands on the outside of their knees. Say: “Push your knees into my hands.” | Gives a clear target for external rotation. |
Loop a resistance band around their knees. Say: “Keep tension on the band. Do not let it go slack.” | Uses tactile and visual feedback to maintain outward pressure [12]. |
Common Faults and Quick Fixes (All Levels)
Fault | Quick Fix | Biomechanical Reason |
Knees cave inward (valgus) | “Push your knees out toward your pinky toes.” | Activates the gluteus medius, reducing internal rotation torque [6, 9]. |
Knees push out too far (excessive abduction) | “Keep your knees over your second and third toes, not wider.” | Pushing too far reduces adductor magnus contribution and may cause hip pinching [38]. |
Loss of alignment during ascent | “Keep your knees out as you stand up. Do not let them relax.” | Valgus collapse is most common during the concentric phase when you are tired [9]. |
Feet flatten (arch collapse) | “Keep your arches lifted. Push your knees out without rolling your feet.” | Foot pronation drives the tibia into internal rotation, which pulls the knees inward [44]. |
Hip pinching when pushing knees out | “Widen your stance or reduce your toe‑out angle.” | Deep hip sockets or FAI may limit external rotation. Do not force the position [39]. |
Figure 59. Common faults in ‘Knees Out’ and their quick fixes. Correcting these faults reduces knee ligament strain and improves force transfer [6, 9, 38, 39, 44].
Pro Tip
External cues, such as “push your knees out toward the walls” or “keep the band tight”, generally lead to better motor learning and higher force production than internal cues like “squeeze your glutes”. Use internal cues only when a lifter lacks basic awareness of their own body. For lifters with femoral anteversion, which means they naturally have more internal rotation, you may need to emphasise the cue more strongly. For lifters with femoral retroversion, who naturally have more external rotation, they may need less active cueing [7, 38].
Exercises to Fix Knees Out Weaknesses
Weakness | Exercise | Primary Benefit | Biomechanical Reason |
Poor knee tracking (valgus collapse) | Banded squat (band above knees) | Reinforces outward knee tracking and gluteus medius activation | The band creates a medial pulling force, which requires the lifter to actively use hip abduction and external rotation to maintain proper alignment. |
RNT squat (band pulling knees inward) | Reflexively teaches the lifter to “fight” valgus collapse | Exaggerating the fault increases proprioceptive demand, which improves neuromuscular control of the knee position. | |
Spanish squat | Builds quadriceps and glute tension while keeping the shins vertical | The posterior band pull forces the lifter to create outward torque to stabilise the knee against the backward pull. | |
Weak gluteus medius | Banded monster walks | Strengthens the hip abductors and improves lateral stability | The gluteus medius generates frontal plane control, which prevents the femur from rotating internally. |
Clamshell with band | Isolates the gluteus medius in a low skill environment | Removing balance demands allows the lifter to focus purely on the external rotation pattern. | |
Single‑leg Romanian deadlift | Improves unilateral hip stability | The stance leg must resist hip drop and femoral internal rotation while balancing on one leg. | |
Poor foot stability (arch collapse) | Short foot drill (doming the arch) | Strengthens the intrinsic foot muscles to support the arch | A stable foot tripod reduces tibial internal rotation, which is a major driver of knee valgus. |
Single‑leg balance with knee out | Integrates foot stability with hip control | This challenges the whole kinetic chain to maintain alignment from the foot up to the hip. | |
Limited hip external rotation | Seated hip external rotation with a band | Strengthens the deep external rotators, including the piriformis, obturator internus and gemelli | Improving the ability to generate outward torque at the hip directly supports the “knees out” position. |
90/90 hip stretch (external rotation position) | Increases the range of motion available for hip external rotation | More available external rotation reduces the need for compensatory valgus at the knee. | |
Tight adductors | Copenhagen plank (isometric hold) | Strengthens the adductors in a lengthened position | Better eccentric control means the adductors will not overpower the abductors during the squat. |
Poor motor control (novice lifters) | Seated knee out with band | Teaches the movement pattern without load or balance demands | This allows the lifter to focus entirely on producing external rotation torque. |
Goblet squat with band around knees | Provides a counterbalance from the front load while reinforcing knee tracking | The front load encourages an upright torso, and the band gives tactile feedback to keep the knees out. | |
Loss of knee alignment during ascent | Pause squat (bottom) with knees out | Builds positional endurance at the deepest joint angle | Holding the bottom position removes the stretch reflex and forces active hip external rotation and abduction. |
Tempo squat (3‑1‑1) with knees out | Trains controlled knee alignment under fatigue | A slow eccentric phase exposes valgus tendencies and builds control throughout the full range of motion. |
Coaching Note: The “Screwing” Foot Drill
When you actively push your knees outward and keep your femur externally rotated, your knee stays aligned over your second and third toes. Your hip externally rotates and abducts, so your gluteus medius and deep rotators keep your femur in the right position. Your patella tracks centrally, which reduces lateral compression and makes your quadriceps work more efficiently. Your bar path stays vertical because the valgus collapse does not pull your torso out of alignment.
A note on neutral tracking versus excessive abduction. The goal is neutral alignment, not pushing your knees as far out as possible. If you push your knees out too far, you can reduce the contribution of your adductor magnus, alter your hip extension mechanics, and increase unnecessary demands on your hip. The mechanically optimal position is neutral or slightly abducted, not wide.
Weight Midfoot
Weight Midfoot
The “Weight Midfoot” cue is the foundation of balance in the squat. While cues like “Knees Out” or “Hips Back” manage joint alignment, “Weight Midfoot” ensures that the system’s centre of mass, the combined weight of your body and the barbell, remains directly over your base of support. In British Powerlifting and SBD coaching, this is often described as maintaining a “vertical bar path.” If the weight shifts toward your toes, the lever arm at your lower back increases, which can lead to a “good morning” squat. If it shifts toward your heels, you risk falling backward or losing power from your quadriceps.
The midfoot is the sweet spot where you are stable, powerful and safe. This cue is essential for maintaining a vertical bar path, protecting your knees and allowing your hips and ankles to work together efficiently. Without it, your squat becomes unbalanced and your force production drops.
Importantly, midfoot pressure is not a fixed point. It is a dynamic balance strategy. Pressure may subtly shift during the descent and ascent, but it always returns to the tripod.
Figure 60. The foot tripod and midfoot sweet spot. Pressure must be distributed evenly across the heel, the big toe and the little toe to maintain balance and efficient force transfer [2, 8].
Anatomy of the Weight Midfoot
The foot is not a simple block. It is a complex structure of bones, joints, ligaments and muscles that work together to support your body weight and transfer force from the ground to the barbell. The “Weight Midfoot” cue primarily involves the bones of the foot and ankle, the intrinsic foot muscles and the muscles of the lower leg.
Part 1: The Foot Tripod (The Base of Support)
Balance is not a single point. It is a three-point pressure system known as the foot tripod. To keep your weight over the midfoot, pressure must be distributed equally across three points: the calcaneus (heel), the first metatarsal head (base of the big toe) and the fifth metatarsal head (base of the little toe).
When your weight is evenly distributed across these three points, your foot is stable, and your arch is maintained. When the tripod collapses, typically the arch flattens and the big toe lifts or the heel lifts, your balance is lost and your knees are placed at risk [2, 8].
Part 2: The Bones and Joints
The key bones involved in maintaining a stable midfoot position are the talus, the calcaneus, the navicular, the cuboid and the three cuneiforms. These bones form the arches of the foot.
- The talus sits on top of the calcaneus and forms the ankle joint with the tibia and fibula. It transmits body weight from the shin to the foot.
- The calcaneus is the heel bone. It is the primary contact point for the ground during the squat.
- The navicular, cuboid and cuneiforms form the midfoot and help maintain the medial arch.
The foot has three arches: the medial longitudinal arch (the one that typically collapses in flat feet), the lateral longitudinal arch and the transverse arch. These arches act as shock absorbers and springs. When you keep your weight over the midfoot, these arches are maintained, allowing for efficient force transfer [2, 7].
The talocrural joint (ankle) is responsible for dorsiflexion. If ankle mobility is restricted, your weight will inevitably shift toward your toes or your heels to compensate for the lack of forward knee travel [10, 13]. The subtalar joint manages side-to-side balance (inversion and eversion). It must remain neutral to ensure the midfoot carries the load.
The midfoot “sweet spot” is anatomically located directly under the talus bone. In both high bar and low bar squats, the barbell should remain vertically aligned with this bone throughout the entire range of motion.

Figure 61. Side view of the foot bones. The talus (highlighted in electric blue) transmits body weight from the shin to the foot. The midfoot sweet spot is located directly under the talus. The barbell should remain vertically aligned with the talus throughout the squat [2, 7].
Part 3: The Muscles
The muscles that control the position of your foot during the squat are divided into two groups: the intrinsic muscles of the foot and the extrinsic muscles of the lower leg.
Intrinsic Foot Muscles
These muscles originate and insert within the foot. They are responsible for fine control of the arches and the toes.
Muscle | Role in Weight Midfoot |
Abductor hallucis | Helps maintain the medial arch and keeps the big toe stable. |
Flexor digitorum brevis | Supports the arch and assists in toe flexion. |
Quadratus plantae | Assists in toe flexion and helps stabilise the heel. |
Abductor digiti minimi | Supports the lateral arch. |
Weakness in these muscles leads to arch collapse (pronation), which then drives the tibia into internal rotation and the knee into valgus [5, 44].
Figure 62. The intrinsic foot muscles. These muscles control fine arch movements. Weakness here leads to arch collapse and knee valgus [5, 44].
Extrinsic Muscles of the Lower Leg
These muscles originate in the lower leg and insert into the foot. They control ankle movement and assist in maintaining the tripod.
Muscle | Role in Weight Midfoot |
Tibialis anterior | Dorsiflexes the ankle and helps control the descent. It also helps maintain the medial arch. |
Tibialis posterior | The primary dynamic stabiliser of the medial arch. It supports the navicular bone and prevents arch collapse. |
Peroneals (fibularis longus and brevis) | Evert the ankle (roll it outward) and help stabilise the lateral arch. |
Gastrocnemius and soleus (calves) | Plantarflex the ankle during the ascent and provide stability. |
Keeping the weight over the midfoot requires a constant “tug of war” between the muscles of the lower leg. The gastrocnemius and soleus prevent the body from falling forward; they fire to pull the weight back toward the midfoot if you drift onto your toes. The tibialis anterior prevents the body from falling backward; it fires to pull the weight forward if you drift onto your heels.
The tibialis posterior is particularly important. If it is weak, the medial arch collapses, the talus adducts and internally rotates, and the knee follows into valgus [11, 43, 44].
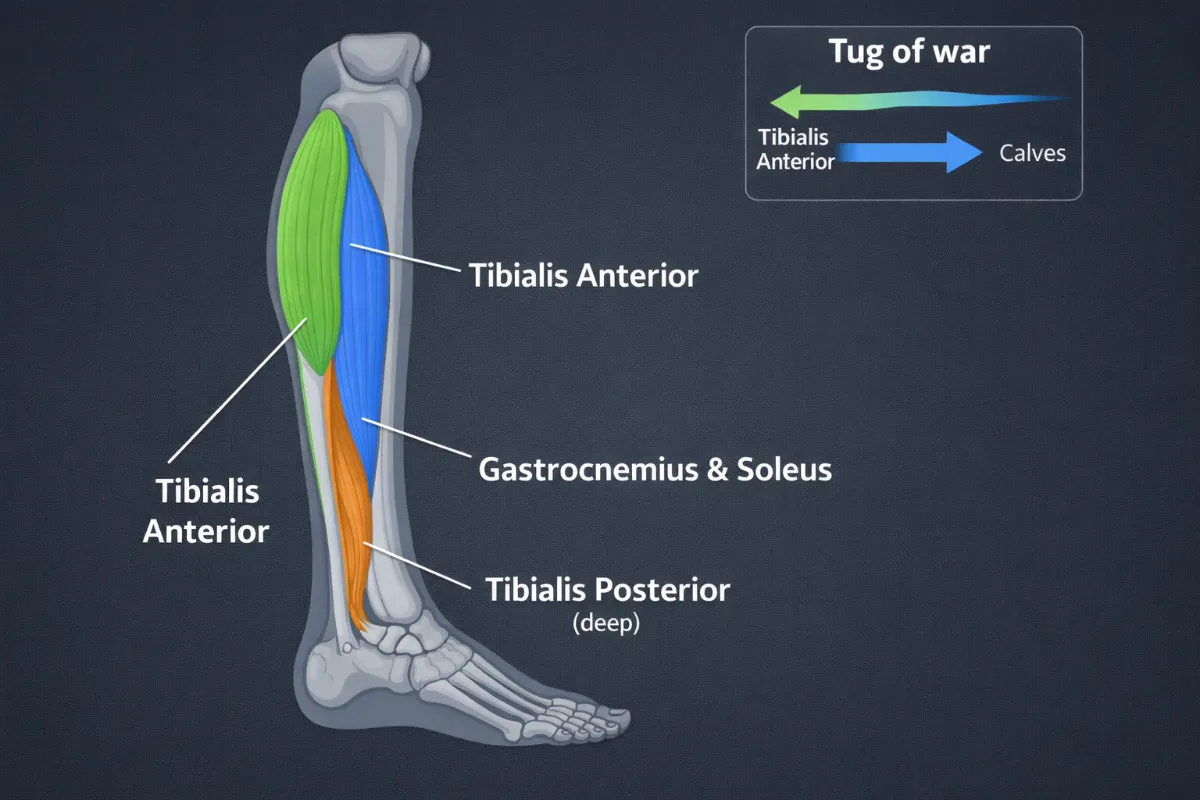
Figure 63. The extrinsic muscles of the lower leg. The tibialis anterior pulls the weight forward, while the calves pull the weight backward. The tibialis posterior is the key arch stabiliser [11, 43].
Part 4: Common Faults and Their Anatomical Causes
Fault | Likely Anatomical Cause | Why It Happens |
Weight shifts to the toes | Weak calves or tibialis anterior; limited ankle dorsiflexion | The lifter cannot keep their shin vertical or their heel down, so they fall forward. |
Weight shifts to the heels | Weak quadriceps; fear of falling forward | The lifter tries to keep their torso too upright, shifting their centre of mass backward. |
Arch collapse (pronation) | Weak tibialis posterior; weak intrinsic foot muscles | The medial arch cannot support the load, so the foot rolls inward, driving the knee into valgus [5, 44]. |
Heel lifts off the ground | Limited ankle dorsiflexion; tight calves | The lifter cannot bend their ankle enough to reach depth, so the heel comes up as a compensation [10]. |
Toes curl or grip the floor | Anxiety; poor motor control | The lifter is trying to “grab” the floor for stability instead of stabilising through the tripod. |
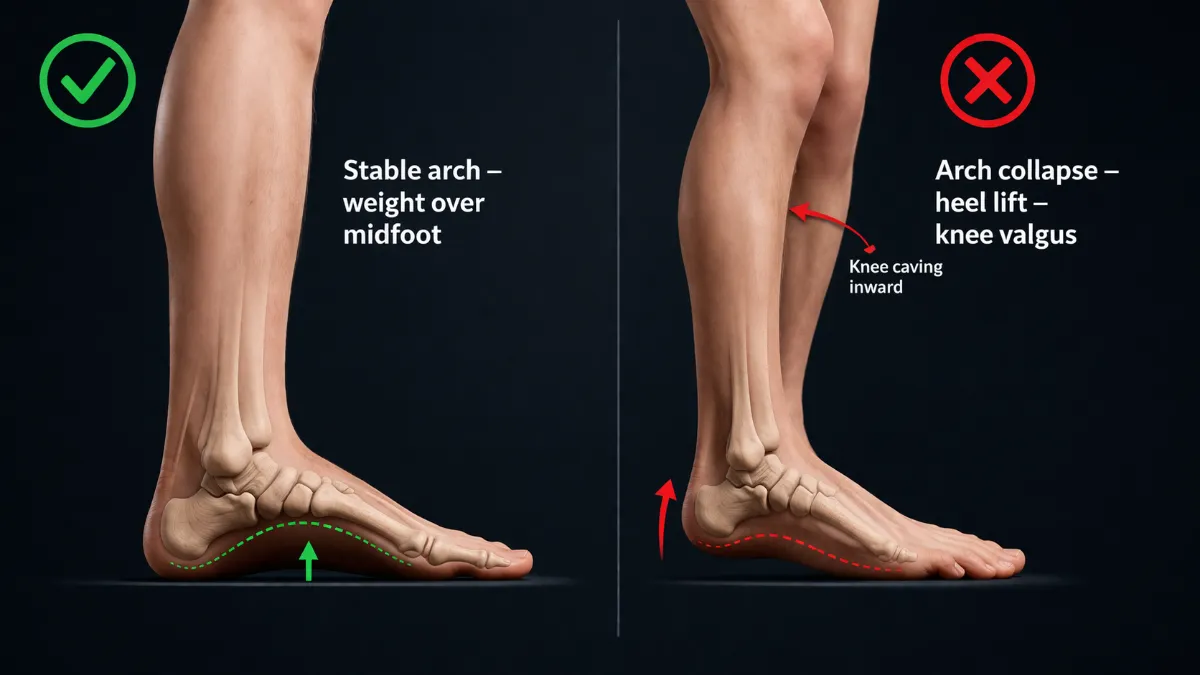
Figure 64. Common faults in midfoot loading. Arch collapse and heel lift drive the knee into valgus and reduce force transfer [5, 10, 44].
Part 5: Key Anatomical Takeaways for Weight Midfoot
- The foot tripod is your foundation. Your weight must be distributed evenly across the big toe, the little toe and the heel [2, 8].
- The tibialis posterior is the most important muscle for maintaining your arch. If it is weak, your arch collapses and your knees cave inward [11, 44].
- Arch collapse starts at the foot, not the knee. If you only cue “knees out” without addressing the foot, you may not fix the problem [5, 6].
- Limited ankle dorsiflexion forces you to lift your heels or shift your weight forward. This is a mobility issue, not a strength issue. Heel elevation (plates or squat wedges) can compensate [10, 13].
- The intrinsic foot muscles are often neglected. Strengthening them with short foot drills and toe yoga can dramatically improve your stability [5, 20].
- The “Weight Midfoot” cue is not passive. It requires active engagement of your foot and lower leg muscles to maintain the tripod throughout the squat.
- The midfoot is the point of maximal stability and efficient force transfer. When the weight is centred here, the force produced by your legs is transferred directly into the floor with no energy leaks forward or backward [1, 8].
- Midfoot pressure is dynamic, not static. It may shift slightly during the movement, but it always returns to the tripod.
The Weight Midfoot Cue. A Biomechanical Anchor.
The weight midfoot cue is not just about balance. It is a biomechanical rule that decides how forces travel through your body, how your joints handle load, and how well you transfer power from your legs to the barbell. If you shift your weight too far onto your heels or toes, your body has to compensate. That increases stress on your joints and creates energy leaks that stop you from lifting as much as you could.
Part 1. Kinematics. The Geometry of Movement.
Kinematics looks at how your joints move when your weight stays over the midfoot.
A. The Vertical Bar Path.
The main goal is for the barbell to move in a straight vertical line over the middle of your foot, specifically the talus bone. If the bar drifts forward or backward, you increase the leverage working against your hips and knees. That makes the lift less efficient and puts more strain on your joints.
B. Joint by Joint Breakdown.
When your weight is over the midfoot, your ankle stays in a good position with about five to ten degrees of eversion and ten to twenty degrees of dorsiflexion. Your knee tracks over your toes in a neutral line. Your hip follows a clean path that keeps the leverage consistent. And your lower back stays in a neutral position.
If you shift onto your heels, your ankle rolls outward too much and loses range of motion. Your knee shifts backwards, which forces your hip to bend more. Your femur drifts backward and your lower back arches too much. If you shift onto your toes, your ankle rolls inward too much and bends too far. Your knee shoots forward, increasing the strain under your kneecap. Your femur drifts forward, and your glutes lose their leverage. Your lower back is at risk of rounding.
C. Visual Cues to Help You.
Think of your foot as a tripod. Keep your heel, the base of your big toe, and the base of your little toe touching the floor at all times. At the bottom of your squat, try to wiggle your toes. If you cannot, you are too far forward. Also keep your ribs down and your pelvis level. That stops your pelvis from tilting and shifting your weight.
Figure 65. The foot tripod showing the three points of contact: heel, base of first toe, and base of fifth toe. This forms the stable base for a midfoot squat.
Part 2. Kinetics. The Forces on Your Joints.
Kinetics explains why keeping your weight over the midfoot helps you produce more force and reduces the risk of injury.
A. Ground Reaction Forces.
When you squat, the ground pushes back against you. If your weight is over the midfoot, that upward force lines up neatly with your ankle, knee and hip. That means you transfer power efficiently. If your weight shifts to your heels, the ground reaction force shifts backwards. That lowers your power output and makes you hinge at the hips more than you should. If your weight shifts to your toes, the force shifts forward. That increases the shear stress on your knee and turns the squat into an ankle-dominated movement.
B. Moment Arms and Leverage.
Torque is force multiplied by distance. The distance is the horizontal gap between your joint and the line of the ground reaction force. When your weight is over the midfoot, that distance is as small as possible. That gives you balanced torque and an efficient lift. When your weight shifts to your toes, the distance at your knee and lower back gets longer. That increases the stress on your kneecap and your lower back. When your weight shifts to your heels, the distance at your hip gets shorter. That weakens your hip drive and puts more load on your spinal discs.
Here is the key insight. A forward shift of just two or three centimetres can double the torque demand on your lower back and knees. But that depends on how heavy the weight is and your individual body shape.
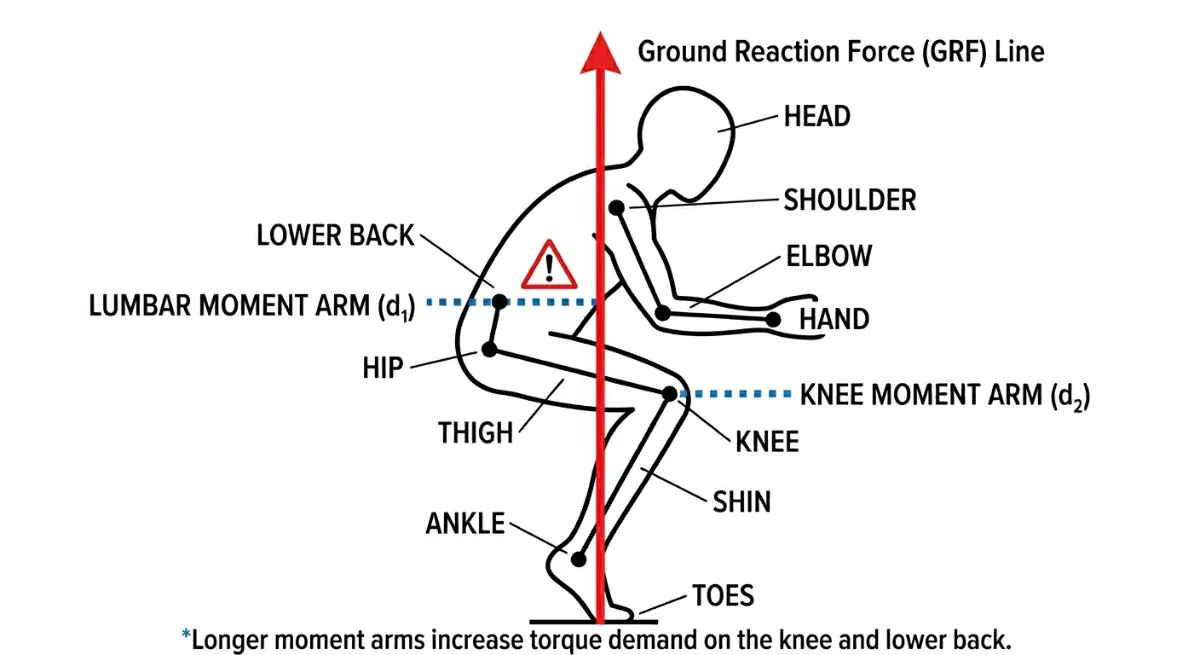
Figure 66. Forward Weight Shift. Increased Knee Moment Arm.
When the lifter’s weight shifts onto the toes, the heel lifts off the floor. The ground reaction force (GRF) line moves forward, creating a longer horizontal moment arm (d₂) from the knee joint to the GRF line. This longer moment arm increases torque demand on the knee, reduces mechanical efficiency, and raises the risk of patellar and ligament strain.
C. Which Muscles Work and When.
Scientists have used EMG to measure muscle activity in different squat positions. Here is what they found.
When your weight is over the midfoot, your quadriceps are balanced, your glute max is highly active, your hamstrings are balanced, your calves control the movement eccentrically, and your shin muscles stabilise the descent.
When your weight shifts to your heels, your quadriceps activity drops, your glute max activity drops, your hamstrings increase to compensate, your calves become tight and overactive, and your shin muscles become underactive.
When your weight shifts to your toes, your quadriceps activity drops even more because your calves take over, your glute max is only moderately active, your hamstrings drop off, your calves become underactive, and your shin muscles become overactive as you grip with your toes.
Here is the critical takeaway. Pushing through your toes does not work your quads harder. In fact, EMG shows that quad activity goes down when your weight shifts forward. Your calves take over to stabilise your ankle instead.
D. Joint Loading and Injury Risk.
Keeping your weight over the midfoot reduces the compression on your kneecap by about twenty five percent compared to squatting on your toes at parallel depth. It also reduces the strain on your ACL and MCL by about thirty percent. And it keeps the shear and compression forces on your lower back to a minimum. Shifting to your heels increases the arch in your lower back. Shifting to your toes increases the rounding of your lower back. Both put your spinal discs at risk.
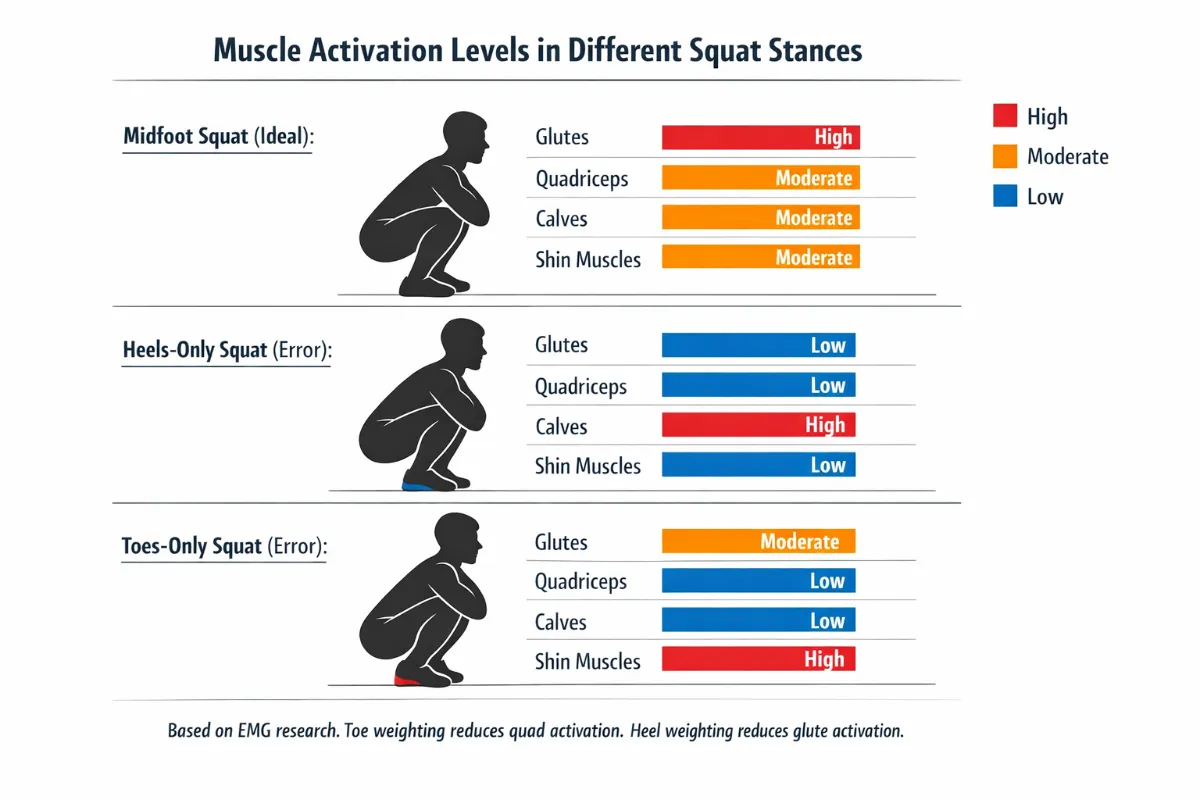
Figure 67. Muscle Activation Levels in Different Squat Stances.
EMG research shows that muscle activation changes significantly when weight shifts away from the midfoot. The midfoot position provides balanced activation across all muscle groups. Heel weighting reduces glute and quad activation while increasing calf demand. Toe weighting reduces quad activation (contrary to popular belief) and increases shin muscle activity as the toes grip the floor.
Part 3. How to Find Your Midfoot in Practice.
The Tripod Foot Drill.
Stand in bare feet or very flat shoes. Feel three points of your foot touching the floor. Your heel. The base of your big toe. And the base of your little toe. Keep all three in contact with the floor for the whole squat.
The Whole Foot Pressure Cue.
A useful teaching cue is to aim for roughly fifty to fifty five percent of your weight on your heel and forty five to fifty percent on your forefoot. But keep in mind that your natural centre of pressure sits slightly in front of the anatomical midfoot. That changes depending on your body shape and where you hold the bar. If you feel too much pressure in your toes, push your hips back a little. If you feel too much pressure in your heels, let your knees travel forward a little.
The Pause Squat Drill.
At the bottom of a bodyweight squat, rock gently forward and backward. Find the sweet spot where your heels stay down, your toes stay relaxed, and your quads, glutes and core all switch on together. That is your true midfoot.
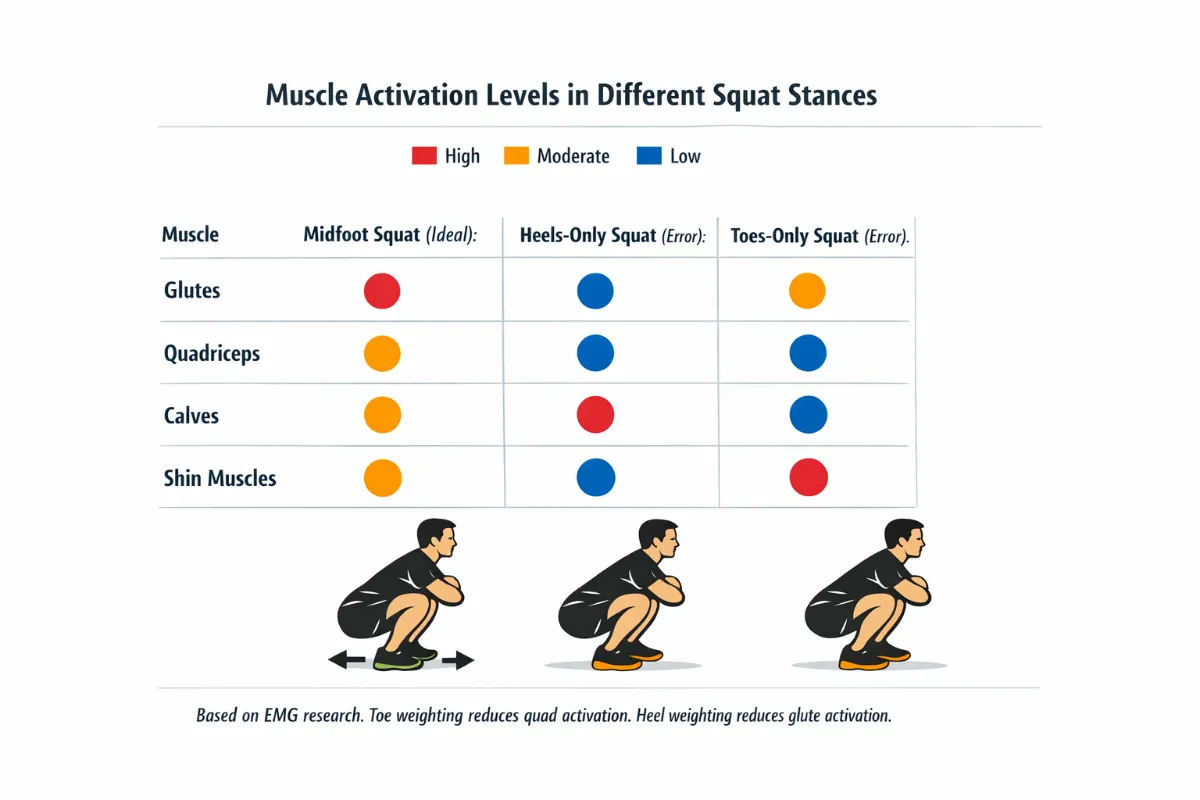
Figure 68. Muscle activation levels during squats with different foot pressure strategies. Midfoot loading (ideal) produces balanced activation of the glutes, quadriceps, calves and shin muscles. Toe‑only loading reduces quadriceps activation, while heel‑only loading reduces glute activation [1, 8].”
Summary. Kinematic and Kinetic Effects.
Here is a quick summary table.
For the primary kinematic change, midfoot gives you a vertical bar path. Toes give you a forward lean and a rounded upper back. Heels give you an upright torso but limited knee travel.
For the kinetic impact, the midfoot gives you balanced torque. Toes increase spinal and kneecap load. Heels increase hip load but weaken glute drive.
For the primary muscle strategy, the midfoot uses your whole chain. Toes rely on your calves and hamstrings to compensate. Heels use your glutes and quads but in an inefficient way.
For the ground reaction force vector, the midfoot keeps it aligned with your joints. Toes pull it forward. Heels push it backwards.
For injury risk, the midfoot is low. Toes are moderate. Heels are low to moderate, depending on your mobility.
| Midfoot (Ideal) | Heels Only (Error) | Toes Only (Error) | |
|---|---|---|---|
| Glutes | High | Moderate | Moderate |
| Quadriceps | High | Moderate | Moderate |
| Calves | High | Low | High |
| Shin Muscles | High | High | Low |
Based on EMG research. Toe weighting reduces quadriceps and shin muscle activation. Heel weighting reduces glute and calf activation [1, 8].
Final Key Points to Remember.
Why the Midfoot Matters
Ground reaction forces: Best when weight is over midfoot. Heel or toe shifts create energy leaks.
Moment arms: Smallest at midfoot. Less torque on knees and spine. A shift of two or three centimetres can double the torque demand, depending on your load and body shape.
Muscle balance: Best at midfoot. Toes make you calf dominant and reduce quad work. Heels weaken hip drive.
Joint protection: Midfoot cuts kneecap compression by about twenty five percent and ACL strain by about thirty percent compared to toe dominant squatting.
Performance: Midfoot increases vertical ground reaction force efficiency by an estimated ten to fifteen percent. That means you can lift more weight.
Individual Differences for Weight Midfoot
Not every lifter will maintain the midfoot position in exactly the same way. Your foot arch height, ankle mobility, tibial alignment, limb proportions, footwear and even previous injuries all influence how easily you can keep your weight centred over the midfoot. The goal is always the same, a stable tripod with the weight evenly distributed across the heel, the big toe and the little toe. But the route to get there varies from person to person.
This section describes the most common individual differences that affect the Weight Midfoot cue and offers practical adjustments for each.
1. Foot Arch Height
Your arch height changes how your foot responds to load.
High arches (pes cavus): Less natural pronation. The foot is stiffer and the tripod is often stable, but shock absorption is reduced. You may feel pressure on the ball of the foot or the heel. Midfoot balance is usually easier to achieve, but you may need more cushioning in your shoes. High arches also increase the risk of lateral ankle instability and peroneal tendon stress [7].
Flat feet (pes planus): Greater tendency to over‑pronate. The arch collapses during weight bearing, which drives the tibia into internal rotation and the knee into valgus. This increases the risk of ACL and MCL strain [5, 6]. Keeping weight over the midfoot is harder because the arch wants to collapse inward. You may need to focus more on the short foot drill and wear supportive footwear or orthotics.
Quick test: The wet foot test. Step onto a piece of paper with wet feet. A full print indicates flat feet. A thin print (only heel and toes) indicates high arches.
Biomechanical constant: The tripod must remain in contact with the ground. If your arch collapses, your knee will follow [5, 44].
2. Ankle Dorsiflexion Range
Ankle mobility determines how far your knee can travel forward without lifting your heel. It is the primary gatekeeper of midfoot balance.
Good ankle mobility (more than 15 degrees): You can squat deeply with your heels down. Keeping weight over the midfoot is natural because your shin can move forward enough to maintain balance. You can use flat shoes or squat barefoot.
Limited ankle mobility (less than 10 degrees): Your heel will lift off the ground when you try to reach depth. This forces your weight forward onto your toes, disrupting the midfoot position. To compensate, your hips may travel further back, increasing forward lean. You may need heel elevation (weight plates or squat wedges) or weightlifting shoes to compensate [10, 13].
Quick test: Place a ruler 10 to 12 centimetres from a wall. With your foot flat on the floor, try to touch your knee to the wall without lifting your heel. If you cannot, your ankle dorsiflexion is limited [10].
Biomechanical constant: Your heel must stay down to keep weight over the midfoot. If you cannot reach depth without your heel lifting, use heel elevation [10].
3. Tibial Torsion
The twist of your shin bone affects how your foot naturally aligns with your knee.
External tibial torsion: Your foot naturally points outward. This can make it easier to keep weight over the midfoot because your foot is already in a stable position. Do not force your feet straight.
Internal tibial torsion: Your foot naturally points straight or slightly inward. You may need to turn your toes out more to achieve a stable tripod. If you force a straight foot position, you may roll onto the outside of your foot and lose midfoot contact.
Biomechanical constant: Your knees must track over your second and third toes, but your foot angle may need to be adjusted to match your tibial torsion [7, 41].
4. Femur Length Relative to Torso
Your femur length affects how far forward your knees travel, which in turn affects your ankle and foot position.
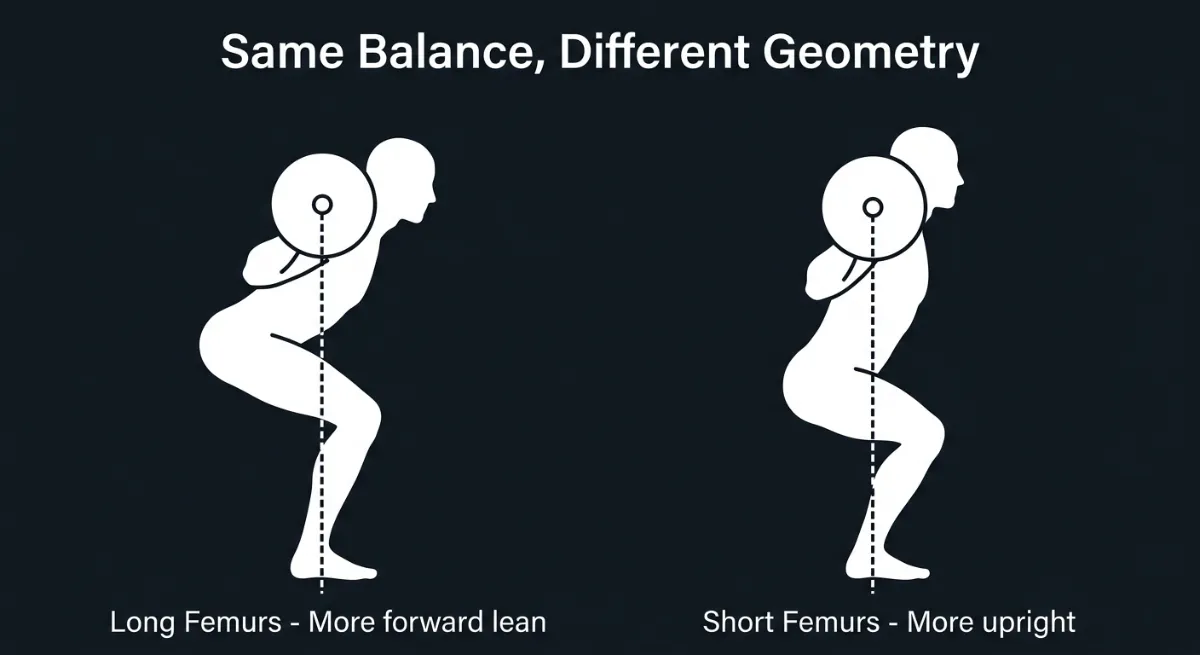
Figure 69. Same balance, different geometry. Both lifters keep the barbell over the midfoot, but the long‑femur lifter (left) requires significantly more forward lean than the short‑femur lifter (right) [2, 8].
Long femurs: You lean forward more and your knees travel further forward. This increases the demand on your ankle dorsiflexion. If your ankle mobility is limited, you will struggle to keep your heels down. You may need a wider stance or heel elevation. Your squat will naturally look more “hip dominant” even when you are balanced over the midfoot [8, 11].
Short femurs: You stay more upright and your knees travel less. Maintaining midfoot balance is easier because the ankle demand is lower. A narrower stance often works well. Your squat will look more upright, like an Olympic weightlifter.
Biomechanical constant: The barbell must stay over the midfoot. Your femur length changes the angle of your torso, but not the requirement for midfoot balance [2, 8].
5. Footwear
Your choice of shoes changes how you feel the ground.
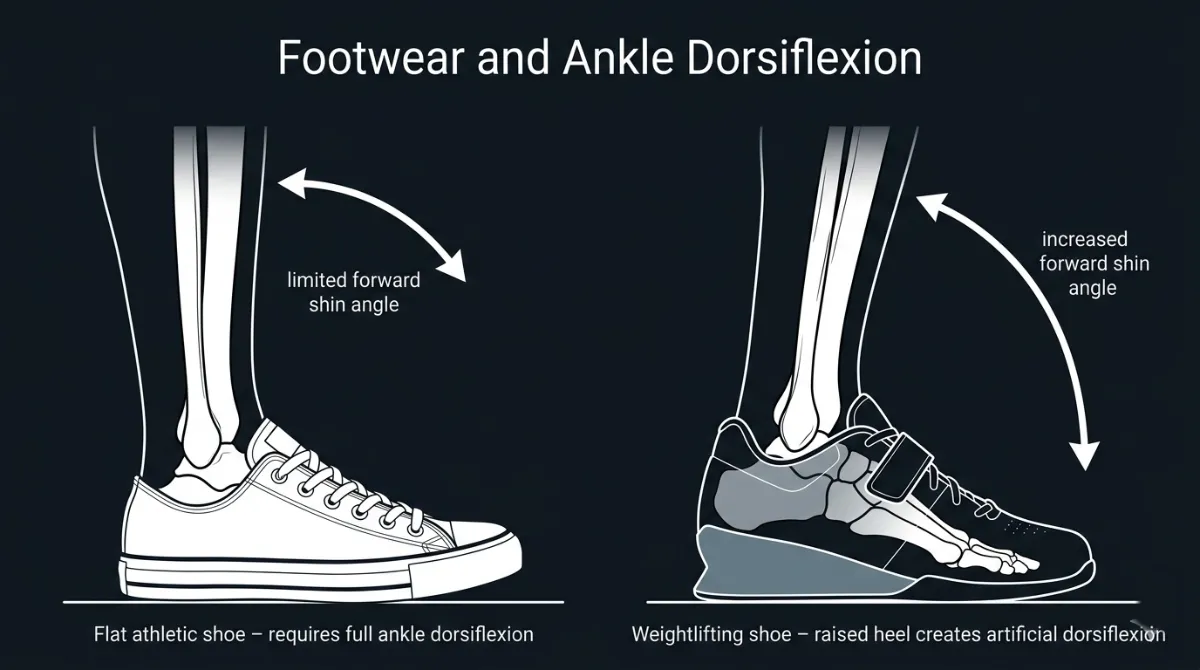
Figure 70. Footwear and ankle dorsiflexion. A flat athletic shoe (left) requires full ankle mobility to keep the heel down. A weightlifting shoe with a raised heel (right) creates ‘artificial dorsiflexion,’ allowing the shin to tilt further forward without the heel losing contact [10, 13].
Flat, hard-soled shoes (or barefoot): You get the best feedback from the ground. It is easier to feel the tripod and adjust your weight distribution. However, if you have limited ankle mobility, flat shoes may make it harder to keep your heels down. Ideal for building proprioception during warm‑up sets [20, 43].
Raised heel shoes (weightlifting shoes): The elevated heel compensates for limited ankle dorsiflexion. This helps you keep your weight over the midfoot, especially in deep squats. However, the raised heel can shift your weight slightly forward if you are not used to it. Good for lifters with stiff ankles or those who squat very deep.
Soft, cushioned running shoes: These make it harder to feel the tripod. The soft sole compresses unevenly, which can cause your weight to shift without you noticing. They are not recommended for heavy squatting.
Biomechanical constant: You need to feel the ground to control your weight distribution. Choose shoes that give you clear feedback and support your ankle mobility needs [43].
6. Previous Foot or Ankle Injuries
A history of injury changes how you should approach the Weight Midfoot cue.
Ankle sprains: Ligament damage can reduce proprioception, meaning you have less awareness of where your weight is. You may need to practise barefoot balance drills to retrain the sensory feedback [17].
Plantar fasciitis: Pain in the arch can make you avoid putting weight through the midfoot. You may shift weight to the outside of your foot. Address the underlying issue with calf stretches and arch support before heavy squatting.
Achilles tendonitis: Tightness or pain in the Achilles can limit ankle dorsiflexion, forcing your weight forward. Heel elevation and eccentric calf raises can help.
Biomechanical constant: Pain is a signal that your foot is not loading correctly. Do not squat through sharp foot or ankle pain [4, 17].
7. Training Experience and Proprioception
Not everyone can feel where their weight is.
Novice lifters: May not realise when their weight shifts to their toes or heels. They often need external cues, such as “feel your whole foot on the floor” or “wiggle your toes to check you are not leaning forward.” They may need to practise with lighter loads or barefoot.
Experienced lifters: Can usually feel small shifts in pressure. They may need only a short reminder cue, such as “midfoot” or “tripod.”
Biomechanical constant: The Weight Midfoot cue must become automatic. Practice with barefoot balance drills and slow tempo squats to build awareness [17, 20].
8. The Biomechanical Constant versus Visual Expression
The constant is that the barbell must stay over the talus (the bone that transmits weight from the shin to the foot). However, your back angle and knee travel are the variables.
If you have long femurs and stiff ankles, your “midfoot squat” will look like a powerlifting squat with a lot of forward lean. If you have short femurs and mobile ankles, it will look like an Olympic squat with an upright torso. Both are correct as long as the bar path is vertical and the weight stays over the midfoot [2, 8].
Practical Diagnostic: The Wall Squat Test
A great way to find your individual midfoot balance is the wall squat test.
- Stand facing a wall with your toes about 10 centimetres (4 inches) away.
- Squat down without letting your face or knees touch the wall.
- If you fall backward, your weight shifted to your heels. If you hit the wall, your weight shifted to your toes.
- Adjust your stance width and toe angle until you can squat smoothly while feeling even pressure on your foot tripod.
Summary Table of Individual Differences for Weight Midfoot
Factor | Effect on Weight Midfoot Cue | Practical Adjustment |
High arches | Stiffer foot, less pronation, stable tripod | Usually no adjustment needed; may prefer cushioned shoes |
Flat feet | Arch collapses, tibial internal rotation, knee valgus | Short foot drill, supportive footwear or orthotics, focus on tripod [5, 44] |
Limited ankle dorsiflexion | Heels lift, weight shifts forward | Heel elevation (plates or squat wedges), ankle mobility drills [10, 13] |
External tibial torsion | Feet point outward naturally | Do not force feet straight; let your knees track naturally |
Internal tibial torsion | Feet point straight or inward | May need greater toe‑out angle to achieve stable tripod |
Long femurs | More forward knee travel, greater ankle demand | Wider stance, heel elevation if needed; accept forward lean [8, 11] |
Short femurs | Less forward knee travel, lower ankle demand | Narrower stance works well; more upright posture |
Raised heel shoes | Compensates for limited dorsiflexion | Good for deep squats, but may shift weight forward if not used to them |
Flat shoes or barefoot | Best proprioception, but requires good ankle mobility | Ideal for building awareness; use for warm‑up sets [20, 43] |
History of ankle sprains | Reduced proprioception, poor weight awareness | Barefoot balance drills, slow tempo squats to retrain feedback [17] |
Plantar fasciitis | Avoidance of midfoot loading, shift to lateral foot | Address arch pain with calf stretches and support; avoid heavy loading until healed |
Achilles tendonitis | Limited dorsiflexion, weight shifts forward | Heel elevation, eccentric calf raises |
Novice lifter | Poor awareness of weight shifts | Use external cues, practise barefoot, wiggle toes cue |
Experienced lifter | Can self‑correct | Short reminder cue, such as “midfoot” or “tripod,” is often enough |
The Key Principle
The Weight Midfoot cue is universal in its goal, even pressure across the tripod of the foot, but individual in its expression. Your arch height, ankle mobility, tibial torsion, limb proportions, footwear and injury history all determine how easily you can maintain the midfoot position and what adjustments you need to make. Do not compare your foot position to someone else’s. Learn what your feet need, then apply the cue accordingly.
Coaching Guide for Weight Midfoot
The goal of this guide is to help you keep your weight centred over the tripod of your foot: the heel, the base of the big toe and the base of the little toe. This is the point of maximal stability and efficient force transfer. You will use a mix of internal cues (what you feel inside your body) and external cues (what you focus on in the environment). Research shows that external cues often produce better movement outcomes, but beginners sometimes need internal cues first to learn what midfoot pressure feels like. A good coach uses both.
Important note: Midfoot balance is a range, not a single point. As long as pressure stays evenly distributed across the tripod and the bar remains vertically aligned over the talus (the bone that transmits weight from the shin to the foot), you are “in the midfoot.”
Key Coaching Instructions (Step by Step for All Levels)
Step | Instruction | Biomechanical Result |
1 | Stand with your feet in your natural squat stance. | Establishes a stable base of support. |
2 | Feel the three points of your foot tripod: your heel, the base of your big toe and the base of your little toe. | Activates proprioceptive feedback from the foot [17, 20]. |
3 | Distribute your weight evenly across all three points. Do not lean forward onto your toes or shift back onto your heels. | Centres the centre of pressure over the midfoot, minimising energy leaks [1, 8]. |
4 | As you descend, keep your heels down and your arches lifted. | Prevents tibial internal rotation and knee valgus [5, 44]. |
5 | Maintain even pressure throughout the entire descent and ascent. | Keeps the barbell path vertical and the joints stacked. |
6 | Drive up by pushing through your whole foot, not just your heels. | Maximises ground reaction force transfer and quadriceps activation [8]. |
Additional cue for lifters with long femurs: “Lean forward as much as you need, just keep the bar over your midfoot.” This prevents unnecessary self‑correction and maintains talus alignment.
Beginners
Focus: Learning what midfoot pressure feels like. No heavy weight. Use internal cues first.
Internal Cues (Feel the Body)
Cue | Biomechanical Result |
“Feel your whole foot on the floor. Heel, big toe, little toe.” | Activates the tripod and improves proprioception [17]. |
“Wiggle your toes. You should be able to move them freely.” | Checks that weight is not shifted onto the toes. |
“Keep your arches lifted. Do not let them flatten.” | Prevents arch collapse and tibial internal rotation [44]. |
“Feel the pressure evenly spread across your foot.” | Encourages balanced weight distribution. |
External Cues (Focus on the Environment)
Cue | Biomechanical Result |
“Imagine you are standing on a wet sponge. Squeeze it evenly with your whole foot.” | Creates a clear mental image for even pressure distribution. |
“Keep the barbell over the middle of your foot.” | Provides a simple visual reference for bar path [2]. |
“Push the floor away with your whole foot, not just your heels.” | Encourages full foot engagement during the ascent. |
“Place a folded towel under your feet and try to flatten it evenly.” | Gives tactile feedback for pressure distribution. |
What to avoid: Do not let your heels lift. Do not roll onto the outsides or insides of your feet. Do not curl your toes to grip the floor.
Intermediate Lifters
Focus: Refining midfoot pressure under load. Using external cues to improve movement quality. Adding speed and timing.
Internal Cues (Feel the Body)
Cue | Biomechanical Result |
“Feel your weight shift slightly as you descend, but always return to the tripod.” | Reinforces that midfoot pressure is dynamic, not static. |
“Keep your shins vertical for as long as your mobility allows.” | Balances ankle, knee and hip contribution [10]. |
“Feel your arch engage. Do not let it collapse.” | Activates the tibialis posterior and intrinsic foot muscles [11, 44]. |
“Maintain even pressure through your whole foot during the pause.” | Builds endurance in the midfoot position. |
External Cues (Focus on the Environment)
Cue | Biomechanical Result |
“Keep the bar path vertical. It should not drift forward or backward.” | Reinforces that midfoot pressure affects the whole lift [8]. |
“Imagine a laser pointing straight down from the bar to the middle of your foot.” | Provides a precise visual reference for bar path and talus alignment. |
“Spread your weight evenly across a piece of paper under your foot.” | Uses an imaginary target for pressure distribution. |
“Drive through the whole foot, not just the heels.” | Ensures full engagement during the ascent. |
What to add: Tempo work (3 seconds down, 1 second pause, 3 seconds up) to build control. Practise barefoot or in flat shoes during warm‑up sets to improve proprioception.
Advanced Lifters
Focus: Maintaining midfoot pressure under heavy loads and fatigue. Short, aggressive cues that work during maximal or near maximal attempts.
Internal Cues (Feel the Body)
Cue | Biomechanical Result |
“Tripod. Midfoot.” | A single, integrated cue for the whole foot position. |
“Heels down. Arches up.” | Prevents heel lift and arch collapse. |
“Even pressure. Drive.” | Combines balance with force production. |
External Cues (Focus on the Environment)
Cue | Biomechanical Result |
“Bar over midfoot. Push.” | Reinforces bar path and force transfer. |
“Floor away. Whole foot.” | Encourages full foot engagement during the ascent. |
“Stay centred. Drive through the tripod.” | A single, integrated cue for balance and power. |
“Finish with your heels still down.” | Emphasises maintaining midfoot pressure through the ascent. |
What to add: Overload the pattern with heavy carries (farmer’s walk) to build foot stability under load. Use external cues almost exclusively. The internal cues should already be automatic.
Summary Table by Lifter Level
Level | Internal Cue Example | External Cue Example | Biomechanical Goal |
Beginner | “Feel your whole foot on the floor. Heel, big toe, little toe.” | “Imagine you are standing on a wet sponge. Squeeze it evenly.” | Learn basic midfoot awareness and tripod contact |
Intermediate | “Feel your arch engage. Do not let it collapse.” | “Keep the bar path vertical. It should not drift.” | Refine pressure distribution under load |
Advanced | “Tripod. Midfoot.” | “Bar over midfoot. Push.” | Maintain midfoot pressure under fatigue and heavy loads |
Tactile Cues (For Coaches, All Levels)
Cue | Biomechanical Result |
Gently press on the lifter’s heel and the balls of their feet. Say: “Feel even pressure here and here.” | Reinforces the three points of the tripod. |
Place your hand under their arch. Say: “Push my hand up with your arch.” | Activates the tibialis posterior and intrinsic foot muscles [11]. |
Lightly tap the outside of their foot if they roll outward. Say: “Keep the tripod flat.” | Corrects supination and lateral weight shift. |
Common Faults and Quick Fixes (All Levels)
Fault | Quick Fix | Biomechanical Reason |
Weight shifts to toes | “Sit back more. Feel your heels.” | Forward weight shift increases knee shear and reduces glute activation [1, 8]. |
Weight shifts to heels | “Push your knees forward slightly. Feel your toes.” | Backward weight shift reduces quadriceps activation and may cause falling backward. |
Heels lift off the ground | “Elevate your heels with plates or wear weightlifting shoes.” | Limited ankle dorsiflexion forces the heel up as a compensation [10, 13]. |
Arch collapses (pronation) | “Lift your arches. Feel the tripod.” | Arch collapse drives the tibia into internal rotation and the knee into valgus [44]. |
Toes curl or grip the floor | “Wiggle your toes. Relax them.” | Gripping the floor disrupts the tripod and indicates poor proprioception [17]. |
The Three Levels of Cueing (Summary)
Cue Type | Examples |
Verbal | “Root the foot”, “Tripod pressure”, “Midfoot anchor”, “Push the floor away” |
Visual | “The lead block”, “The vertical pane of glass”, “The heavy skewer” |
Proprioceptive | “Wiggle your toes”, “The paper rip” |
Pro Tip
External cues such as “stand on a wet sponge” or “keep the bar over the middle of your foot” generally lead to better motor learning and more automatic weight distribution than internal cues like “feel your arch.” Use internal cues only when a lifter lacks basic awareness of their foot position. For lifters with flat feet or limited ankle mobility, focus more on external cues and consider heel elevation or supportive footwear [5, 10].
Exercises to Fix Weight Midfoot Weaknesses
Exercises to Fix Weight Midfoot Weaknesses
Important principle: Midfoot balance is a range, not a single point. As long as pressure stays evenly distributed across the tripod (the heel, the base of the big toe and the base of the little toe) and the centre of pressure remains over the midfoot, you are “in the zone.”
The exercises below are organised by the specific weakness they address.
Corrective Exercises for Weight Midfoot Weaknesses
Weakness | Exercise | Primary Benefit | Biomechanical Reason |
Poor midfoot awareness (proprioception) | Short foot drill | Strengthens intrinsic foot muscles and teaches arch control | Pulling the ball of the big toe toward the heel without curling the toes engages the abductor hallucis and supports the medial arch [5, 44]. |
Toe yoga | Improves independent toe control and foot stability | Lifting and spreading your toes one by one restores neuromuscular control needed for tripod contact [20]. | |
Barefoot balance drill | Trains tripod awareness | Removing shoes increases sensory feedback from the sole of the foot, improving “ground feel” [17]. | |
Forward‑back‑centre rocking drill | Teaches the lifter to explore the extremes and find the midfoot “range” | Rocking onto your toes, then onto your heels, then finding the centre improves awareness of centre of pressure shifts and helps you identify the true midfoot zone. | |
Limited ankle dorsiflexion (heels lift) | Knee‑to‑wall stretch | Increases functional dorsiflexion range | A longer dorsiflexion range reduces the need for heel lift, allowing your knee to travel forward while your heel stays down [10, 13]. |
Heel‑elevated squat | Compensates for stiff ankles while maintaining midfoot pressure | Elevating the heel increases the available forward shin angle, allowing you to reach depth without losing the tripod [10]. | |
Weightlifting shoes | Provides a stable, raised heel for lifters with stiff ankles | The rigid, elevated heel creates “artificial dorsiflexion” and improves midfoot stability [13]. | |
Arch collapse (pronation) | Short foot drill (as above) | Strengthens the tibialis posterior and intrinsic foot muscles | A strong arch prevents tibial internal rotation, which drives the knee into valgus [44]. |
Banded tibialis posterior exercise | Targets the primary dynamic stabiliser of the arch | Isolates the muscle that supports the navicular bone, the keystone of the arch. Resistance must focus on controlled inversion and plantarflexion [11]. | |
Supportive footwear or orthotics | Provides external arch support for lifters with flat feet | A stable arch prevents the cascade of tibial internal rotation and knee valgus [5]. | |
Weight shifts to toes | Tempo squat (3‑1‑3) | Teaches control of the descent and exposes forward drifting | A slow eccentric phase increases time under tension, revealing exactly where your centre of pressure shifts forward [6]. |
Pause squat (bottom) with midfoot focus | Forces the lifter to find the tripod before driving up | Removing the stretch reflex means you must actively maintain midfoot pressure [6]. | |
Plate under toes (diagnostic) | Provides immediate tactile biofeedback | You will feel the plate press into your toes, cueing you to shift pressure back to the midfoot [1, 8]. | |
Weight shifts to heels | Goblet squat | The front load acts as a counterbalance | Holding the weight in front shifts your centre of mass forward, reducing the tendency to fall backward or “sit” onto your heels [11]. |
Plate under heels (diagnostic) | Prevents excessive posterior weight shift | If you press into the plate, you receive instant feedback that you are drifting backward, encouraging controlled knee travel and balanced centre of pressure. | |
Poor motor control (novice lifters) | Bodyweight squat with dowel rod on shins | Provides tactile feedback to keep shins vertical and weight centred | The dowel touches your shin if your knees travel too far forward, cueing you to sit back [2, 8]. |
Box squat with pause | Reduces the complexity of the movement, allowing focus on foot pressure | The box removes the need to control depth, so you can concentrate on the tripod [5]. |
Summary by Weakness
Weakness | Best Exercises |
Poor midfoot awareness | Short foot drill, toe yoga, barefoot balance, forward‑back‑centre rocking drill |
Limited ankle dorsiflexion (heels lift) | Knee‑to‑wall stretch, heel‑elevated squat, weightlifting shoes |
Arch collapse (pronation) | Short foot drill, banded tibialis posterior exercise, supportive footwear |
Weight shifts to toes | Tempo squat (3‑1‑3), pause squat, plate under toes |
Weight shifts to heels | Goblet squat, plate under heels |
Poor motor control (novice lifters) | Bodyweight squat with dowel rod on shins, box squat with pause |
Pro Tip
For lifters with flat feet or limited ankle mobility, prioritise the short foot drill and heel elevation before adding heavy load. Do not try to “squat through” arch collapse or heel lift. Correct the underlying mobility or stability issue first, then progress to loaded squats [5, 10, 44].
References
- Clark, M. A., Lucett, S. C., & Sutton, B. G. (2014). NASM Essentials of Personal Fitness Training (5th ed.). Jones & Bartlett Learning.
- Schoenfeld, B. J. (2010). Squatting kinematics and kinetics and their application to exercise performance. Journal of Strength and Conditioning Research, 24(12), 3497–3506.
- McGill, S. M. (2016). Low Back Disorders (3rd ed.). Human Kinetics.
- Escamilla, R. F., et al. (2001). A three‑dimensional biomechanical analysis of the squat during varying stance widths. Medicine & Science in Sports & Exercise, 33(6), 984–998.
- Hewett, T. E., et al. (2005). Biomechanical measures of neuromuscular control and valgus loading of the knee predict ACL injury risk in female athletes. American Journal of Sports Medicine, 33(4), 492–501.
- Distel, L. M. L., et al. (2017). Gluteal muscle activation during common therapeutic exercises. Journal of Orthopaedic & Sports Physical Therapy, 47(7), 502–510.
- Neumann, D. A. (2010). Kinesiology of the Musculoskeletal System (2nd ed.). Mosby.
- Cook, G. (2010). Movement: Functional Movement Systems. On Target Publications.
- Hewett, T. E., et al. (2005). (as above)
- Distel, L. M. L., et al. (2017). (as above)
- Boyle, M. (2010). Advances in Functional Training. On Target Publications.
- Delp, S. L., et al. (1999). An interactive graphics‑based model of the lower limb to study orthopaedic surgical procedures. IEEE Transactions on Biomedical Engineering, 46(2), 105–113.
- Neumann, D. A. (2010). (as above)
- Delp, S. L., et al. (1999). (as above)
- Powers, C. M. (2003). The influence of abnormal hip mechanics on knee injury: A biomechanical perspective. Journal of Orthopaedic & Sports Physical Therapy, 33(11), 639–646.
- Escamilla, R. F., et al. (2001). (as above)
- Lieber, R. L. (2002). Skeletal Muscle Structure, Function, and Plasticity (2nd ed.). Lippincott Williams & Wilkins.
- Powers, C. M. (2003). (as above)
- Powers, C. M. (2003). (as above)
- Ireland, M. L., et al. (2003). Hip strength in females with and without patellofemoral pain. Journal of Orthopaedic & Sports Physical Therapy, 33(11), 671–676.
- Neumann, D. A. (2010). (as above)
- Neumann, D. A. (2010). (as above)
- Powers, C. M. (2003). (as above)
- Sahrmann, S. A. (2002). Diagnosis and Treatment of Movement Impairment Syndromes. Mosby.
- Neumann, D. A. (2010). (as above)
- Neumann, D. A. (2010). (as above)
- Sahrmann, S. A. (2002). (as above)
- Clark, M. A., et al. (2014). (as above)
- Neumann, D. A. (2010). (as above)
- Ireland, M. L., et al. (2003). (as above)
- Neumann, D. A. (2010). (as above)
- Sahrmann, S. A. (2002). (as above)
- Neumann, D. A. (2010). (as above)
- Powers, C. M. (2003). (as above)
- Neumann, D. A. (2010). (as above)
- Sahrmann, S. A. (2002). (as above)
- Escamilla, R. F., et al. (2001). (as above)
- Distel, L. M. L., et al. (2017). (as above)
- Neumann, D. A. (2010). (as above)
- Escamilla, R. F., et al. (2001). (as above)
- Powers, C. M. (2003). (as above)
- Powers, C. M. (2003). (as above)
- Escamilla, R. F., et al. (2001). (as above)
- Sahrmann, S. A. (2002). (as above)
- McGill, S. M. (2016). (as above)
- Cook, G. (2010). (as above)
- Schoenfeld, B. J. (2010). (as above)
- Clark, M. A., et al. (2014). (as above)
- Boyle, M. (2010). (as above)
- Starrett, K., & Cordain, G. (2013). Becoming a Supple Leopard. Victory Belt Publishing.
- Starrett, K., & Cordain, G. (2013). (as above)
- Ireland, M. L., et al. (2003). (as above)
- Cook, G. (2010). (as above)
- Schoenfeld, B. J. (2010). (as above)
Depth
Depth
The “Depth” cue is about how low you descend in the squat. A full depth squat is achieved when your hip crease drops below the top of your knee, a position often called “breaking parallel.” But depth is not a fixed rule. It is a range that depends on your unique anatomy, joint structure and mobility.
Reaching depth requires coordinated movement at your ankle, knee, hip, pelvis and spine. It is ultimately limited by bone‑on‑bone contact, not just flexibility. Understanding the anatomical structures involved allows you and your coach to determine safe, optimal depth while avoiding lumbar rounding, hip impingement or loss of tension.
The goal is not to match someone else’s depth. The goal is to reach your deepest position while keeping your spine neutral, your weight over your midfoot and your knees tracking over your toes.
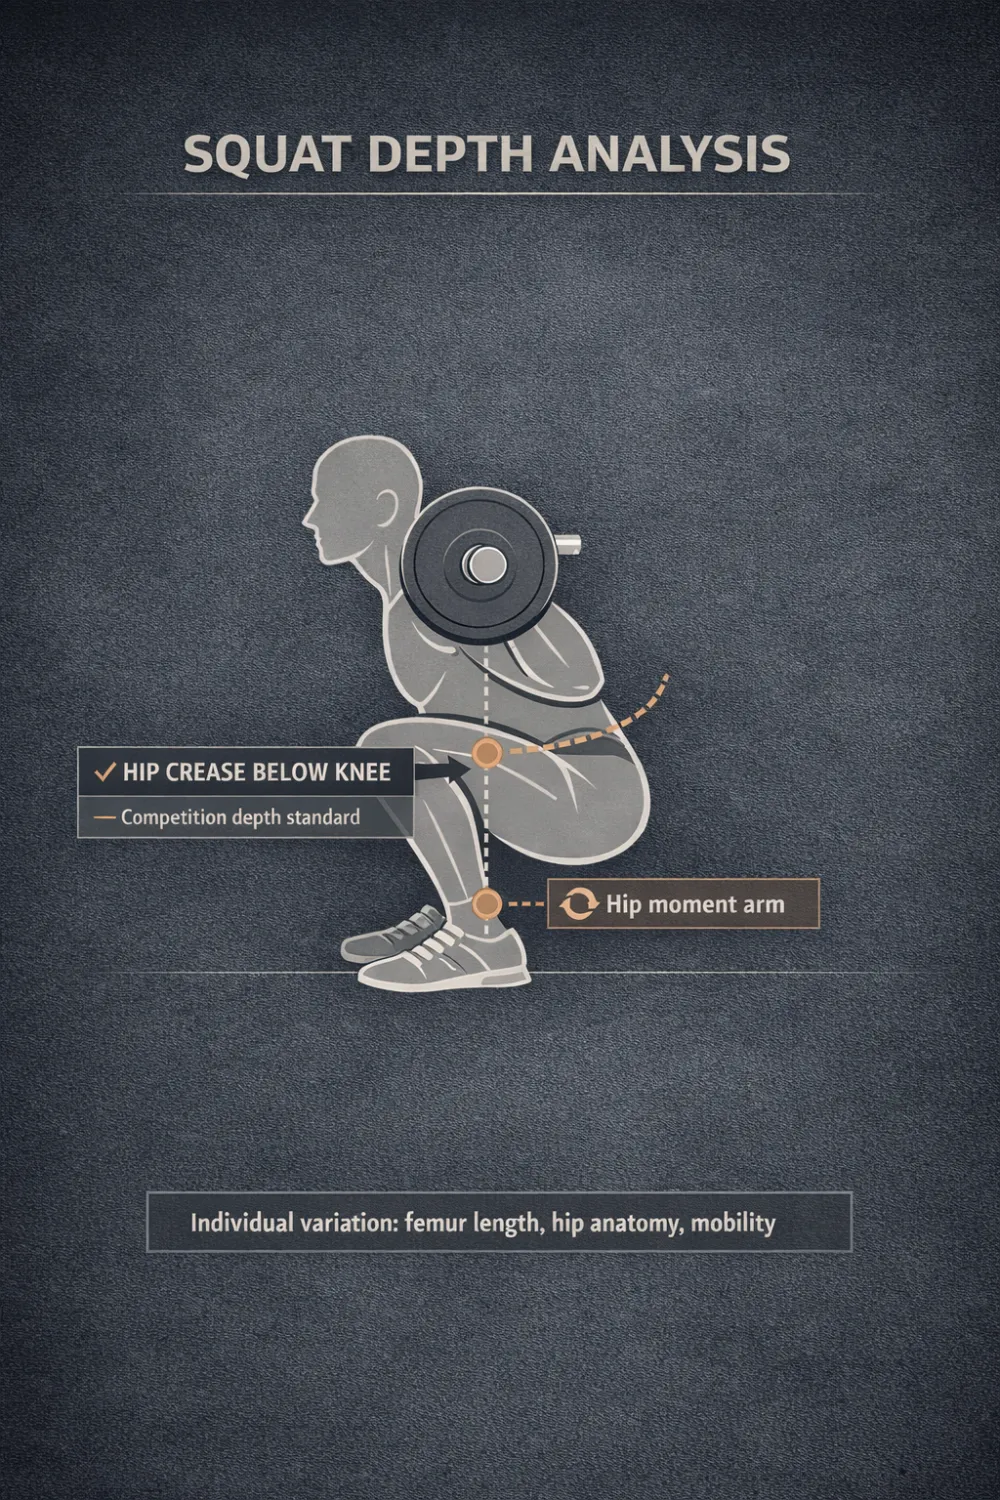
Figure 71. Full squat depth. The hip crease is below the top of the knee, and the barbell remains vertically aligned over the midfoot.
Anatomy of Depth
Reaching depth in the squat requires coordinated movement at the ankle, knee and hip joints. The primary muscles controlling the descent are the quadriceps, gluteus maximus, hamstrings and adductor magnus. Depth is limited by joint architecture, soft tissue flexibility and the structural shape of the bones involved.
Part 1: The Primary Joints Involved in Squat Depth
A. Hip Joint (Primary Depth Limiter)
The hip joint is the main anatomical limiter of squat depth. Its structure determines how far your thigh bone can flex before your pelvis must rotate.
Femoral head and acetabulum: The acetabulum is the socket. Its depth and orientation determine how far you can flex your hip before the femoral neck contacts the acetabular rim. This contact is called femoroacetabular impingement (FAI). It is a common cause of depth restriction and anterior hip pinching [1, 2]. A deeper socket or a more anterior orientation reduces available hip flexion. A shallower or more lateral socket allows deeper squatting.
Hip capsule and ligaments: The iliofemoral ligament (Y‑ligament) limits hip extension and external rotation. The pubofemoral ligament restricts abduction and external rotation. The ischiofemoral ligament limits internal rotation. A stiff capsule reduces hip flexion range, forcing your pelvis to tilt posteriorly, which is often called “butt wink” [3].
Muscles crossing the hip:
Muscle | Role in Squat Depth | Dysfunction Impact |
Gluteus maximus | Hip extension; stabilises the pelvis [4] | Weakness leads to posterior pelvic tilt (butt wink) |
Adductor magnus | Major hip extensor at depth; the “fourth hamstring” [5] | Tightness limits hip flexion |
Psoas and iliacus | Hip flexion [6] | Tightness causes anterior pelvic tilt and lumbar hyperextension |
Piriformis | External rotation [7] | Tightness may irritate the sciatic nerve |
Tensor fasciae latae (TFL) | Hip flexion and internal rotation [8] | Overactivity contributes to knee valgus |
Pro tip: The Thomas test identifies psoas and TFL tightness. Lie on your back and pull one knee to your chest. If the other leg lifts, your hip flexors are tight.

Figure 72. Anatomy of the hip joint. The depth of the acetabulum and the orientation of the femoral neck determine available hip flexion. The deep external rotators help stabilise the femoral head.
B. Knee Joint
The knee must flex smoothly and track properly to reach depth without excessive stress.
Femoral condyles and tibial plateau: Your femur rolls and glides on the tibial plateau. Patellar tendon length and the slope of your tibia influence how deeply your knee can flex [9].
Ligaments and menisci: The anterior cruciate ligament (ACL) prevents the shin from sliding too far forward. The posterior cruciate ligament (PCL) prevents it from sliding too far backward. The menisci act as shock absorbers. Deep flexion, beyond 120 degrees, increases compression on the menisci and may cause discomfort [10].
Muscles crossing the knee:
Muscle | Role in Squat Depth | Dysfunction Impact |
Quadriceps (vastus lateralis and medialis) | Knee extension; patellar tracking [11] | Weakness leads to knee valgus |
Hamstrings (biceps femoris) | Knee flexion; posterior knee stability [12] | Tightness limits knee flexion |
Popliteus | Unlocks the knee for flexion; internal tibial rotation [13] | Dysfunction causes knee stiffness |
Pro tip: The knee‑to‑wall test assesses how ankle mobility affects knee travel. Stand with your toes a few inches from a wall and try to touch your knee to the wall without lifting your heel.
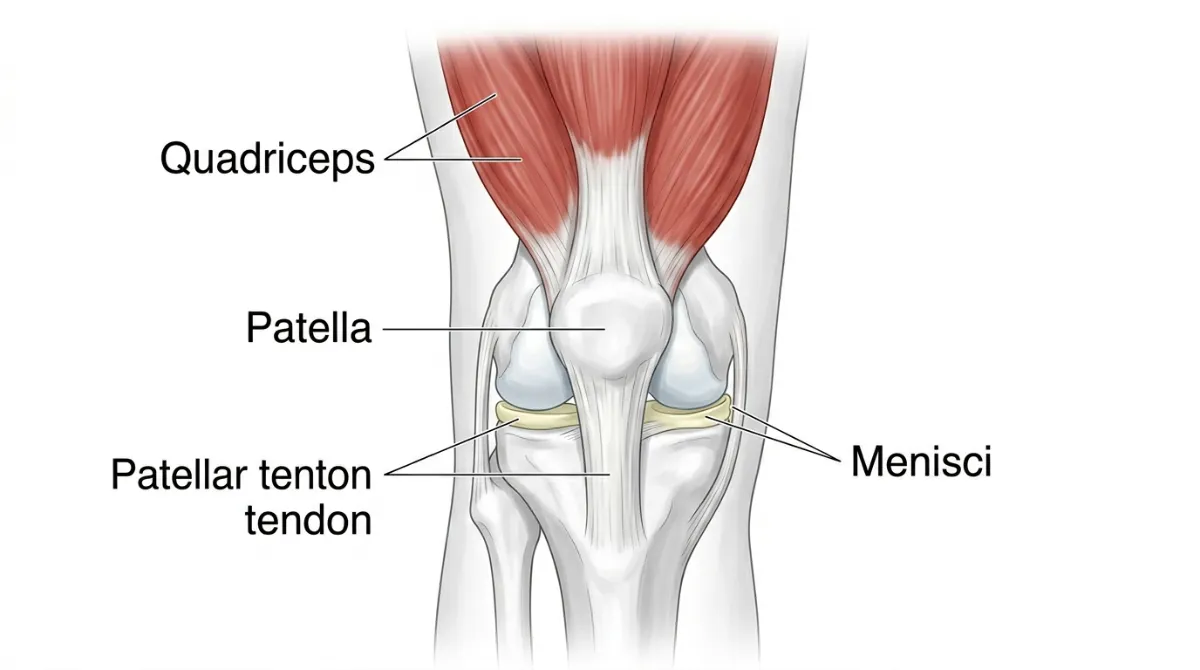
Figure 73. Anatomy of the knee joint. The quadriceps control knee extension, while the menisci absorb shock during deep flexion.
C. Ankle Joint
The ankle must dorsiflex to allow your knees to travel forward over your toes.
Talus and tibia/fibula: Your shin must glide forward over the talus. Less than 10 degrees of dorsiflexion forces your heel to lift and shifts your weight forward [14].
Ligaments and tendons: The Achilles tendon connects your calf muscles to your heel. When it is tight, it restricts dorsiflexion and causes you to put too much weight on your toes [15]. The deltoid ligament stabilises the inside of your ankle.
Muscles crossing the ankle:
Muscle | Role in Squat Depth | Dysfunction Impact |
Gastrocnemius | Plantarflexion; limits dorsiflexion [15] | Tightness causes your heel to lift |
Soleus | Plantarflexion; stabilises dorsiflexion [16] | Weakness leads to poor control during the descent |
Tibialis anterior | Dorsiflexion; supports the arch [17] | Weakness causes your foot to slap down |
Pro tip: The ankle dorsiflexion test measures how far your knee can travel forward. If your knee cannot reach 10 centimetres (4 inches) from the wall, your mobility is limited.
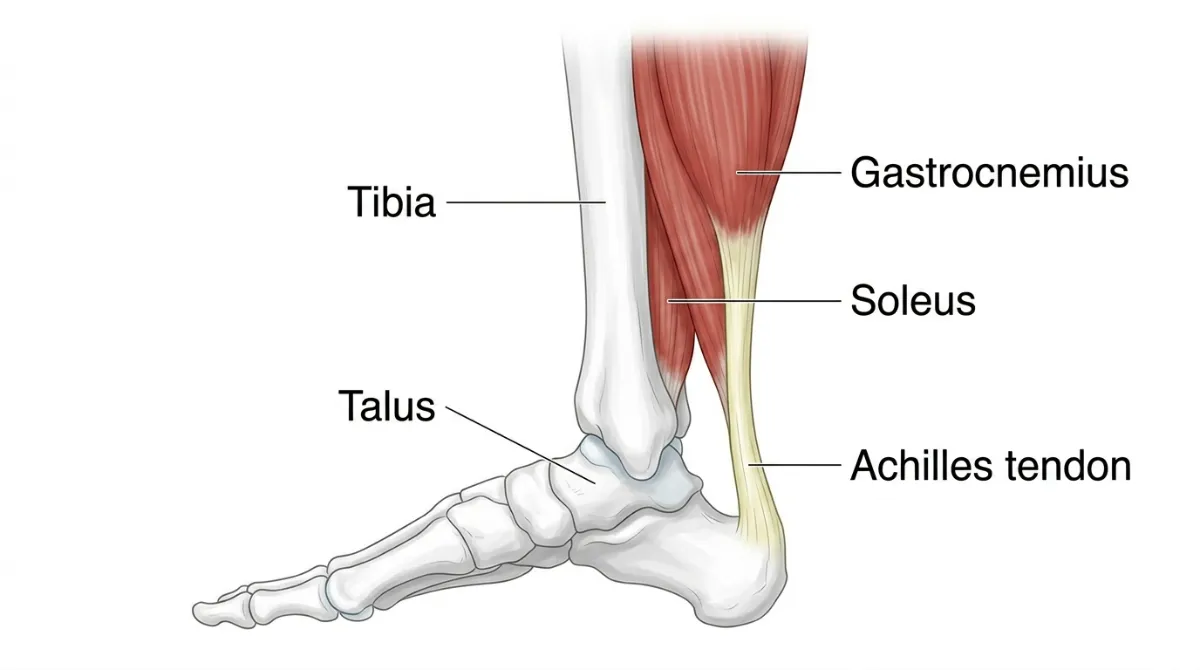
Figure 74. Anatomy of the ankle joint. The gastrocnemius and soleus control plantarflexion. Tightness here limits dorsiflexion and causes heel lift.
D. Lumbar Spine
Your lower back must stay neutral to avoid shear forces and disc compression at depth.
Vertebrae and intervertebral discs: The natural curve of your lower back is called lumbar lordosis. It is about 30 to 40 degrees. When your pelvis tucks under at depth (posterior pelvic tilt, or “butt wink”), your lumbar spine flexes and compresses the discs [18].
Ligaments and muscles: The anterior longitudinal ligament stops you from bending too far forward. The posterior longitudinal ligament stops you from arching too far backwards. Your erector spinae muscles keep your spine extended. If they are weak, your lower back will round at depth [19].
Pro tip: The deep squat test checks whether you can reach depth without rounding your lower back. Your erector spinae should feel firm and active at the bottom of the squat.
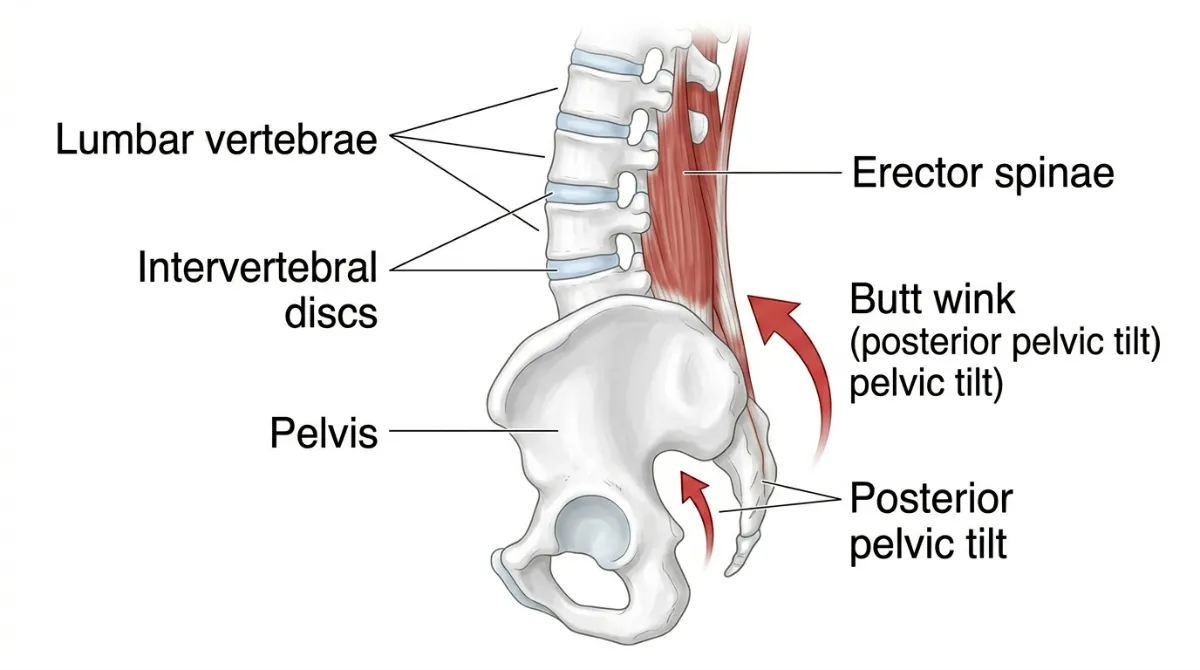
Figure 75. Anatomy of the lumbar spine. The erector spinae maintain spinal extension. Posterior pelvic tilt (‘butt wink’) compresses the discs.
Part 2: Secondary Structures Affecting Depth
Pelvic Morphology
Structure | Role in Squat Depth | Dysfunction Impact |
Pelvic tilt | Controls the position of your lower back [20] | Too much anterior tilt causes your lower back to over‑arch |
Pelvic width | A wider pelvis increases the Q‑angle. The Q‑angle is the angle between your quadriceps and your patellar tendon. A wider angle pulls your knee inward [21] | Higher risk of knee valgus |
Sacroiliac (SI) joint | Transfers force from your legs to your spine [22] | Instability causes lower back pain |
Pro tip: A simple pelvic tilt assessment (standing versus seated) helps identify postural issues that affect depth.
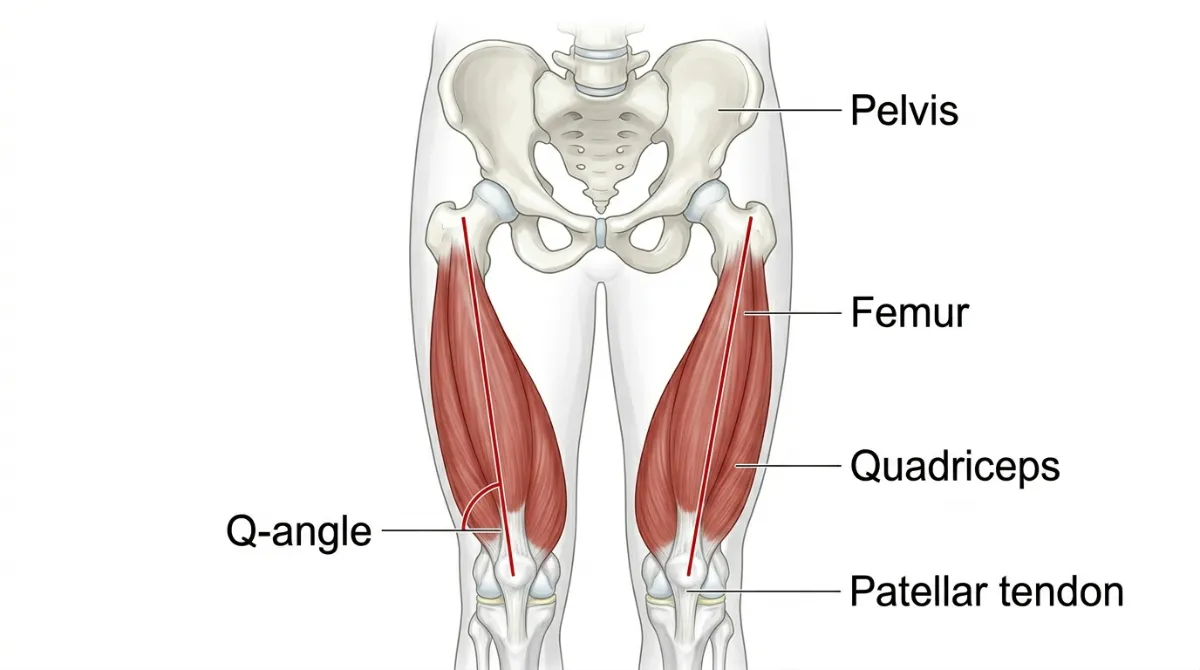
Figure 76. Pelvic width and the Q‑angle. A wider pelvis increases the Q‑angle, which can pull the knee inward and increase valgus risk.
Femur Length and Tibia Length
Structure | Role in Squat Depth | Dysfunction Impact |
Long femurs | Increase the demand on hip flexion [23] | Higher risk of butt wink; you may need a wider stance |
Short femurs | Reduce the demand on hip flexion [23] | You will squat more upright and be more quad‑dominant |
Long tibias | Allow your knees to travel further forward [24] | Your knees may track further over your toes |
Short tibias | Limit forward knee travel [24] | Your hips must shift back more to maintain balance |
Pro tip: Measure your femur‑to‑tibia ratio to understand your natural squat mechanics. Long femurs are not a fault. They just require a different technique.
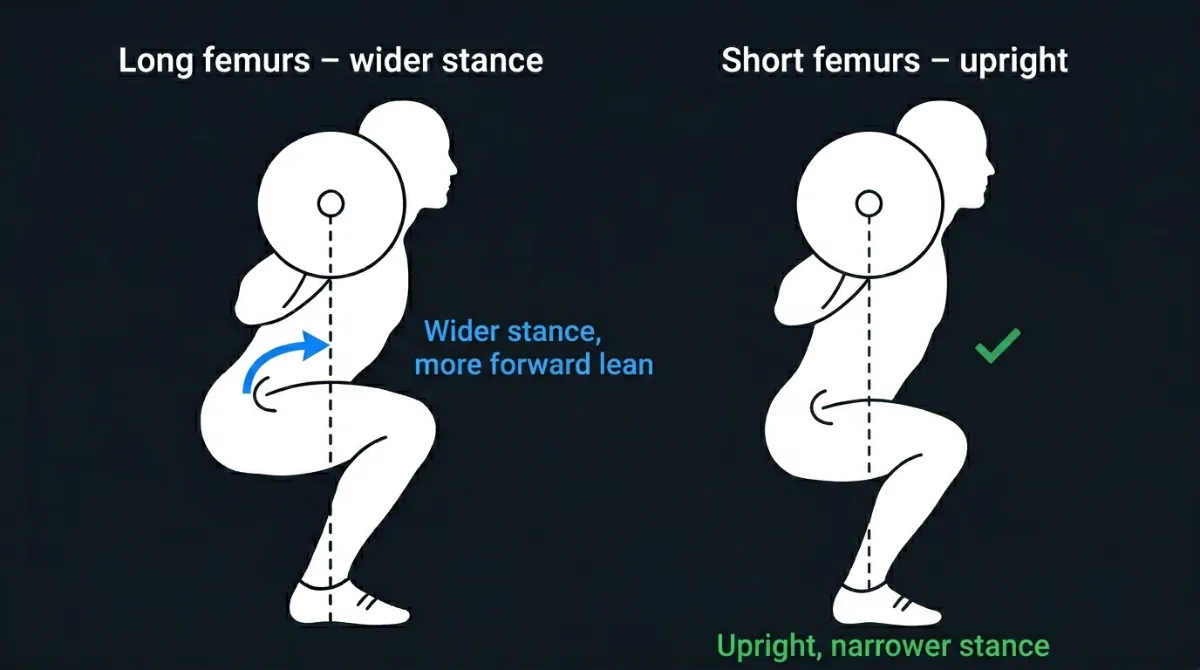
Figure 77. Femur length and squat mechanics. Long femurs (left) require more forward lean and a wider stance. Short femurs (right) allow a more upright posture.
Part 3: Common Depth Faults and Their Anatomical Causes
Fault | Likely Anatomical Cause | Why It Happens |
Heels lift off the ground | Limited ankle dorsiflexion; tight calves | Your shin cannot move forward enough, so your heel comes up to compensate [14]. |
Lower back rounds (“butt wink”) | Limited hip flexion; tight hip flexors; FAI | Your hip runs out of range, so your pelvis tucks under and your back rounds [1, 2]. |
Shallow squat (cannot reach parallel) | Limited ankle or hip mobility; fear of depth | Your joints cannot move far enough, or you lack confidence to go deeper. |
Chest collapses forward | Weak upper back; limited thoracic mobility | Your torso leans forward to maintain balance when you cannot reach depth with good posture. |
Hips shift to one side | Asymmetrical hip mobility or strength | One hip has more range than the other, causing a lateral shift. |
Pinching in the front of the hip | Femoroacetabular impingement (FAI) | The femoral neck contacts the acetabular rim at depth [1, 2]. |

Figure 78. Correct depth (left) versus butt wink (right). On the right, the pelvis tucks under and the lower back rounds, increasing disc pressure.
Part 4: Key Anatomical Takeaways for Depth
- Hip anatomy dictates depth. Deep acetabula or femoroacetabular impingement (FAI) limit hip flexion. Use a wider stance or stop before butt wink [1, 2]. A small amount of posterior pelvic tilt at depth is normal, but excessive rounding under load, especially with a heavy barbell, increases disc pressure and should be avoided.
- Knee mechanics matter. Patellar tendon length and meniscal compression influence comfort at depth. Controlled tempo squats help strengthen the vastus medialis oblique (VMO) [9, 10].
- Ankle dorsiflexion is non‑negotiable. Less than 10 degrees of dorsiflexion forces your heels to lift or your knees to shoot forward. Heel elevation or ankle mobility drills are the answer [14].
- Lumbar integrity is essential. Butt wink compresses the lumbar discs. Stop your depth before your lower back rounds [18].
- Pelvic morphology shapes technique. Wider pelves increase the Q‑angle and the risk of knee valgus. A wider stance and the “knees out” cue help [21].
- Lever lengths change mechanics. Long femurs require a wider stance to avoid butt wink. Short femurs produce a more quad‑dominant squat [23].
- Depth is individual. Do not compare your squat depth to someone else’s. Your anatomy determines your safe, optimal range. The goal is to reach the deepest position you can maintain with a neutral spine and stable joints.
Squat Depth: Kinematics & Kinetics
When we analyse squat depth biomechanically, we look at two connected ideas: kinematics (the geometry of motion, joint angles, segment positions and movement patterns) and kinetics (the forces that produce or resist motion, joint moments, ligament forces and muscle forces).
How deep you squat isn’t just about how low you go. It changes where the load lands between your hips and knees, how your ligaments and joints cope, which muscles do the work, how your centre of mass moves and how your spine behaves.
For most healthy lifters, going a little deeper than parallel, to roughly 115° of knee flexion, is biomechanically better than stopping exactly at parallel. This is where hip and knee load becomes balanced and your glutes turn on fully.
Part 1: Kinematics – The Geometry of Depth
Kinematics describes the position, angle, and movement pattern of your joints during a squat. Depth is usually defined by how much your knee bends.
Depth Classification
Depth | Knee Flexion Angle | What It Means |
Shallow | 50–70° | Above parallel |
Parallel | 90–100° | Thigh parallel to the floor |
Deep | 110–130° | Hip crease below the knee |
The Order Things Happen on the Way Down
Using 3D motion analysis, researchers have found a reliable sequence as you descend.
First, your ankle reaches its maximum dorsiflexion early. Second, your knee and hip follow, reaching their maximum angles together at the bottom. Third, coordination matters. Your depth depends on both knee and ankle movement working as a system [4].
Where Your Centre of Mass Goes
As you squat down, your centre of mass drops vertically and moves slightly forward. Different joints control different directions.
Your knee controls how low you go, which is vertical movement. Your hip controls front back balance, which is anteroposterior movement. Your ankle does both, vertical and front back [4].
If any one joint is limited, the others have to work harder to compensate.
What Happens at the Hip
Depth | Hip Flexion Angle | Risk of Butt Wink (Posterior Pelvic Tilt) |
Shallow | 60 to 70 degrees | None |
Parallel | 90 to 100 degrees | Low |
Deep | 110 to 130 degrees | High, if your hip capsule is tight or your bone shape limits movement |
A butt wink happens when your hip bends past about 110 degrees in people whose anatomy will not allow more. It is not a technique mistake. It is a physical limit [7].
What Happens at the Knee
Depth | Knee Flexion Angle | Stress on the Kneecap (Patellofemoral) |
Shallow | 60 to 70 degrees | Low |
Parallel | 90 to 100 degrees | Moderate |
Deep | 110 to 135 degrees | High, especially on the outside of the joint |
Kneecap stress shoots up beyond 120 degrees because your quadriceps are pulling hard while the contact area inside the joint gets smaller [2].
What Happens at the Ankle
Depth | How Much Ankle Bend You Need (Dorsiflexion) |
Shallow | Low, about 5 degrees |
Parallel | Moderate, about 10 degrees |
Deep | High, about 20 degrees |
If you cannot bend your ankle at least 10 degrees, something has to give. Your heels lift, your knees shoot forward, your chest drops or your pelvis tucks under early [4].
What Happens to Your Lower Back
Depth | Lumbar Spine Position | Risk to Your Discs |
Shallow | Neutral or arched | Low |
Parallel | Neutral | Low |
Deep | At risk of rounding | High |
Rounding your lower back at depth is not caused by poor bracing. It happens because your hip has run out of room, so your pelvis is forced to rotate [8].
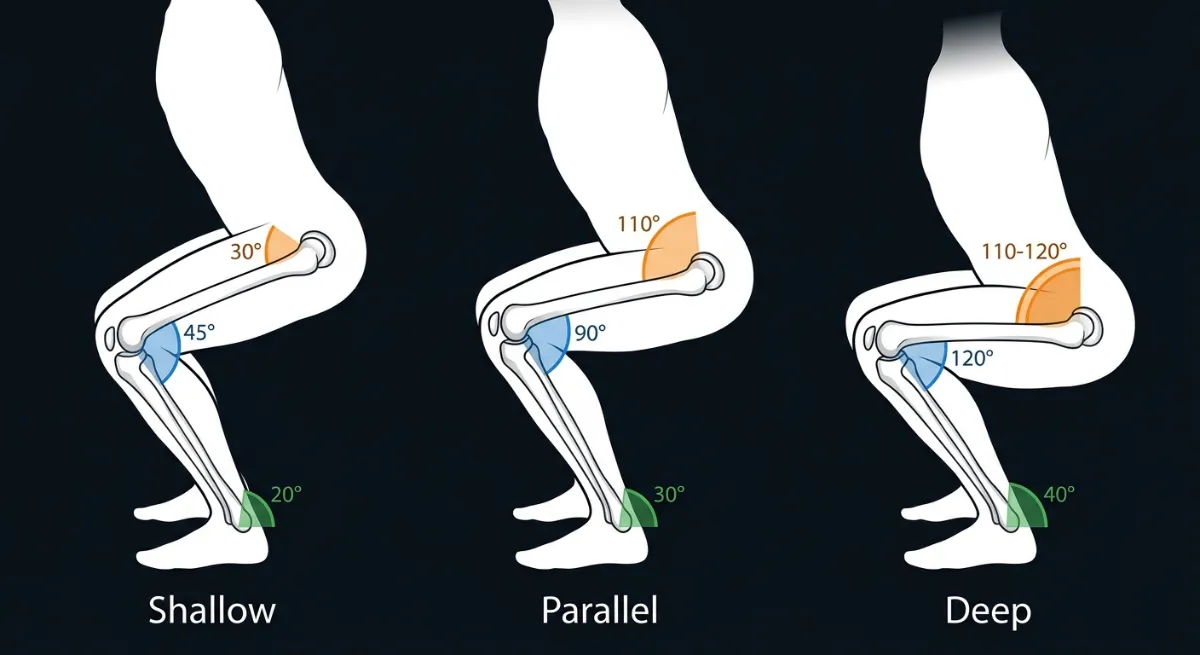
Figure 79. Knee, hip and ankle angles at shallow, parallel and deep squat depths. As depth increases, all three joints flex more. The knee shows the largest change, from 45° in a shallow squat to 120° in a deep squat. The hip reaches most of its range by parallel (110°), while the ankle continues to dorsiflex up to 40° in a deep squat. This is why limited ankle mobility is a common reason for not reaching full depth [4].
Part 2: Kinetics, the Forces at Different Depths
Kinetics looks at the forces acting on your body as you squat. As you go deeper, several things change in important ways.
How Load Shifts Between Hip and Knee
Depth (Knee Bend) | Hip to Knee Load Ratio | Where the Work Goes |
70 degrees (Shallow) | Low | Mostly knees |
90 degrees (Parallel) | Moderate | Still mostly knees |
115 degrees (Deep) | Roughly 1 to 1 | Balanced between hips and knees |
The deeper you go, the more the work shifts from your knees to your hips. At 115 degrees, your hips and knees are sharing the job almost equally [5].
Torque, the Turning Force
Torque is force multiplied by the length of the lever arm. Different depths change these lever arms.
Joint | Shallow | Parallel | Deep |
Hip lever arm | Short | Best length | Long, meaning more torque |
Knee lever arm | Moderate | Best length | Long, meaning more kneecap stress |
Ankle lever arm | Short | Moderate | Long, if your ankle is stiff |
Parallel depth, around 90 degrees, is the most mechanically efficient for balanced hip and knee torque [5].
Stress on Your Kneecap
Three things are true about kneecap stress. First, the deeper you squat, the more stress goes through your kneecap. Second, stress depends on how hard your quads pull, multiplied by how bent your knee is. Third, as your knee bends more, the contact area inside the joint changes, which affects how the stress is spread [2].
Forces Through the Knee Joint and Ligaments
What We Are Measuring | What Happens When You Go Deeper |
Force through the main knee joint | Goes up, with two peaks |
Force through the kneecap joint | Goes up, with two peaks |
Force through the cruciate ligaments | Goes up, with two peaks |
Force through the posterior cruciate ligament (PCL) | Stays low, unless you bend past 135 degrees |
The two peaks happen once on the way down when you are braking the movement and once on the way up when you are driving back up [1].
Your ACL only gets stretched dangerously if your knees collapse inward, a position called valgus. Your PCL is fine unless you are bending past 135 degrees [9].
Ground Reaction Forces: How the Floor Pushes Back
Depth | Where the Force Goes Through Your Foot |
Shallow | Mostly midfoot, quad heavy |
Parallel | Evenly spread across heel, midfoot and toes, which is most efficient |
Deep | Moves to your heels if your ankles are stiff, or moves to your toes if your knees shoot forward |
Force through your midfoot is the goal. Heel or toe bias means you are leaking energy and compensating [8].
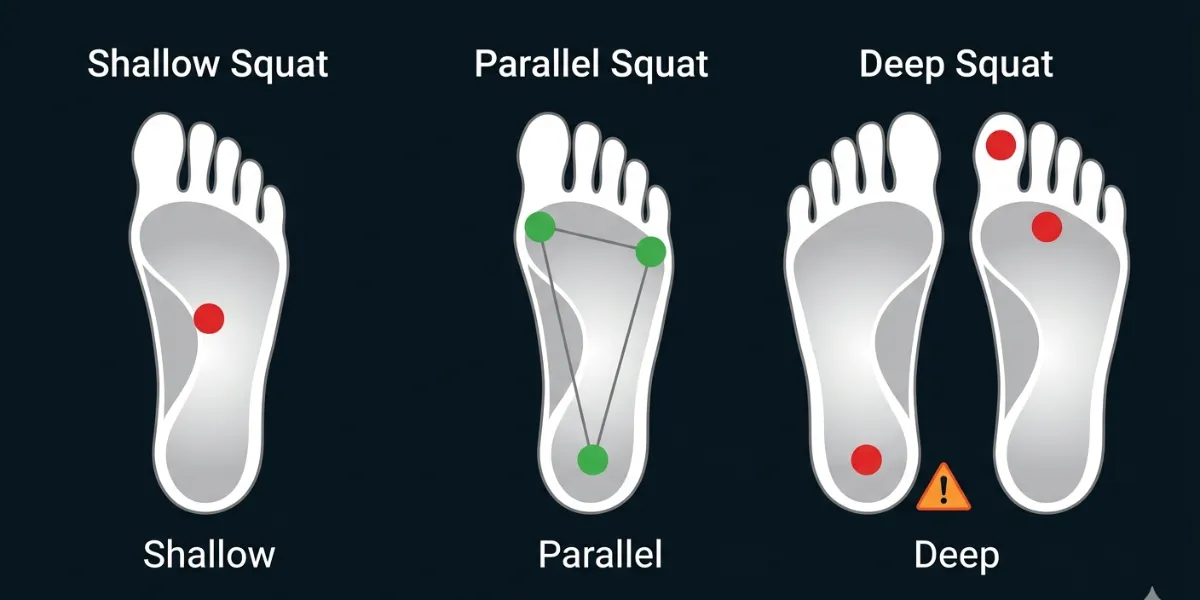
Figure 80. At parallel depth, ground reaction forces are evenly distributed across the foot tripod of heel, big toe and little toe. Shallow squats bias the midfoot. Deep squats shift the load backwards or forwards, depending on ankle mobility.
Part 3: How Muscle Forces Change With Depth
Different depths change which muscles work hardest.
Muscle Activation by Depth
Muscle | Shallow (60 degrees) | Parallel (90 degrees) | Deep (120 degrees plus) |
Gluteus Maximus, your main butt muscle | Moderate, about 60 percent | Best, about 80 percent | High, about 90 percent |
Adductor Magnus, your inner thigh or fourth hamstring | Low | Moderate, about 50 percent | High, about 70 percent |
Quadriceps, front of thigh | High, about 80 percent | Moderate, about 60 percent | Low, about 40 percent |
Vastus Medialis, the teardrop muscle above your knee | Low | Moderate, about 70 percent | High, about 90 percent |
Erector Spinae, your lower back muscles | Low | Moderate, about 60 percent | High, about 80 percent |
Calf muscles | Low | Moderate, about 40 percent | High, about 60 percent |
What this tells us.
Your quads do less work at depth, not because you are trying less but because the leverage is better [5]. Your hamstrings stay under near constant tension as your hip and knee bend together [6]. Your adductor magnus, the inner thigh muscle, becomes a key hip extender when you go deep [5]. Your glutes and adductors are most active in deep squats [5]. Your VMO, the teardrop muscle, works hardest between 90 and 120 degrees, which matters for kneecap stability. Your lower back works hardest at depth to keep your spine stable [8].
Part 4: How the Weight You Lift Changes Things
How much weight you are lifting changes how depth affects you.
Load | What Researchers Found |
Bodyweight only | Smallest forces through the knee at any depth |
About 50 percent of your one rep max | Most quad force and most kneecap stress |
About 85 percent of your one rep max | Most hamstring and calf force and most PCL force |
Why does 50 percent of your max give you the most quad work? Because you can reach the ideal knee angles without your hips having to take over and change the movement [9].
Part 5: What Happens to Ligaments and Joints
Knee Ligaments
Your ACL only gets stretched dangerously if your knees collapse inward, a position called valgus, at depth [9]. Your PCL stays relaxed unless you bend your knee past 135 degrees [10]. Your MCL and LCL get stressed if your knee bends sideways, again in valgus or varus [9].
Hip Ligaments
Your iliofemoral ligament gets stretched at depth. In people with limited hip bend, this can contribute to hip impingement [7]. Your pubofemoral ligament limits how much you can turn your hip outward at depth [7].
Discs in Your Lower Back
Depth | Compression Through Your Lumbar Discs |
Shallow, 60 degrees | Roughly 2,000 to 3,000 Newtons |
Parallel, 90 degrees | Roughly 3,000 to 4,000 Newtons |
Deep, 120 degrees plus | Up to 5,000 to 6,000 Newtons, if your pelvis tucks under |
These values come from biomechanical modelling of the lumbar spine under load [8].
Who Should Be Cautious With Deep Squats
If you have a history of patellofemoral pain (pain behind or around your kneecap), limit depth to parallel or use heel elevation to reduce kneecap stress [2]. If you have femoroacetabular impingement (FAI) , avoid forcing depth that causes pinching in the front of your hip [7]. If you are recovering from ACL reconstruction, be cautious with depth for the first 6 to 9 months and avoid knee valgus collapse [9]. If you have lumbar disc pathology, avoid deep squats that cause your lower back to round [8].
Part 6: What Your Core Does in Deep Squats
Bracing your core actively during deep squats does two useful things. It increases activation of your quads, hamstrings and glutes. It also makes your body more stable at the bottom [3].
But your core does not protect your spine all by itself. It needs two things, intra abdominal pressure and a neutral spine position [8]. What your core really does is act like a transmission, letting force travel from your legs to the bar without leaking energy through your midsection [3].
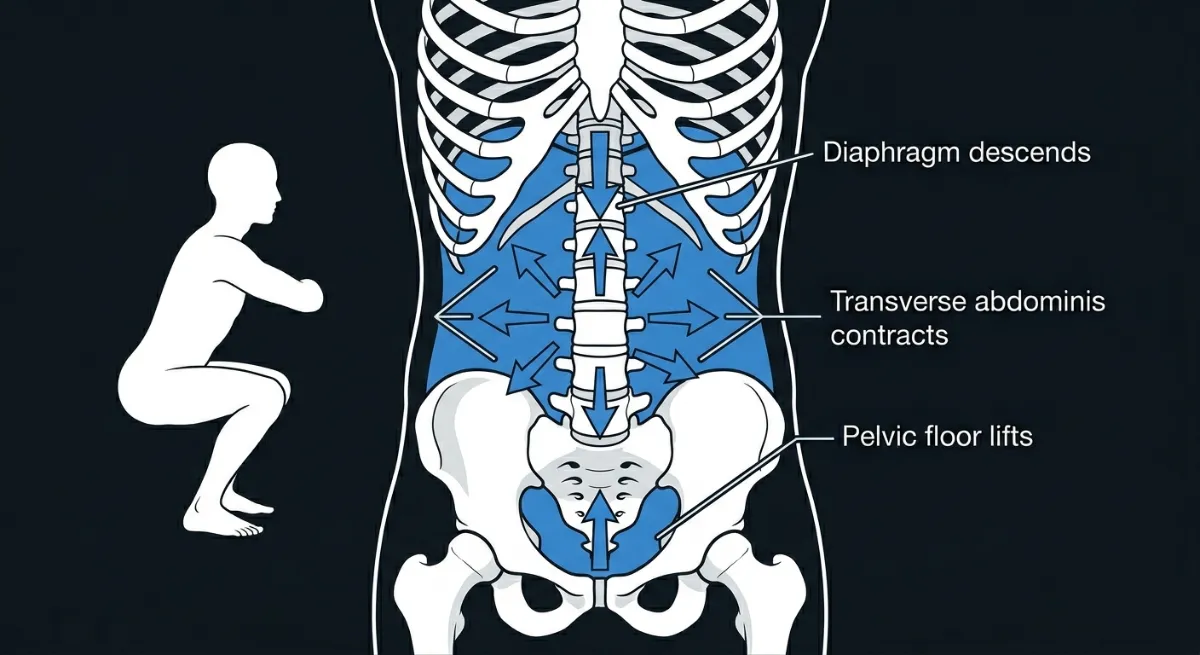
Figure 81. At depth, intra abdominal pressure (IAP) turns your torso into a pressurised cylinder. The diaphragm descends from the top, the pelvic floor lifts from the bottom, and the transverse abdominis contracts from the sides. This creates 360 degree pressure that stiffens the spine and transmits force from your legs to the bar. This is not “sucking in”. It is a active, outward brace [3,8].
The Depth Rule
Aim to break parallel. For most healthy lifters, going a little deeper than parallel (hip crease below the knee, roughly 115° of knee flexion) is biomechanically better than stopping exactly at parallel. This is where hip and knee load becomes balanced and your glutes turn on fully.
But only go as deep as your mechanics allow. If your chest drops, your knees collapse inward or your lower back rounds, stop at that depth. That is your current effective range.
Be cautious with deep squats if you have:
- Patellofemoral pain (kneecap pain)
- Femoroacetabular impingement (hip pinching)
- ACL reconstruction (first 6 to 9 months)
- Lumbar disc pathology
For most healthy lifters, the target is roughly 115° of knee flexion. For lifters with limited mobility, parallel or slightly above is a perfectly good starting point. Work on ankle and hip mobility over time to go deeper safely.
Part 7: Key Takeaways, What You Need to Remember
Idea | What the Science Says |
Recommended depth for most lifters | Aim for 115° of knee flexion (hip crease just below the knee) to balance hip knee load and maximise glute activation |
Load shifts with depth | Shallow is knee heavy. Deep is balanced between hip and knee [5]. |
Kneecap stress rises sharply beyond 120 degrees | Be careful if you have kneecap pain [2]. |
Muscle recruitment changes | Quads peak at parallel. Posterior chain peaks in deep [5]. |
The weight you lift matters | 50 percent of your max gives most quad work. 85 percent of your max gives most hamstring work [9]. |
Core engagement helps | But it needs intra abdominal pressure and a neutral spine [3,8]. |
Your PCL is fine with depth | It does not get stretched much unless you hyperflex past 135 degrees [10]. |
Ankle mobility is a gatekeeper | Less than 10 degrees of dorsiflexion forces compensations like heel lift, knee forward or early pelvic tilt [4]. |
Part 8: Trade Offs, What You Gain and What You Risk at Each Depth
Depth | What You Gain | What You Risk or Lose |
Shallow, 60 degrees | Low lower back stress and mostly quad work | Very little glute or hamstring work and less efficient force production |
Parallel, 90 degrees | Balanced torque and best force distribution through your feet | Knees still take more load than hips; glutes not fully activated; needs about 10 degrees of ankle bend |
Deep, 115 degrees plus | Balanced hip knee load; maximum glute, hamstring and adductor work; full stretch shortening cycle | Needs good ankle and hip mobility; higher kneecap stress if you have patellofemoral pain; higher risk of butt wink if your hips are tight |
Individual Differences for Depth
Not everyone can reach the same squat depth, and that is not a technique failure. It is anatomy.
Your bone structure, joint shapes, limb proportions, mobility and injury history all determine your personal depth limit. Two lifters performing a technically perfect squat will not look the same at depth.
The goal for most healthy lifters is to break parallel, which means taking your hip crease just below your knee, roughly 115° of knee flexion.
But here is the critical rule. Only go deeper if your other cues remain intact: a proud chest, knees tracking over your toes and a neutral spine. If any of these break, stop at that depth. That is your current effective range.
Below are the six most important anatomical factors that affect depth, with practical adaptations for each.
1. Hip Socket Anatomy (Acetabular Orientation)
Your hip socket’s depth and angle determine how much hip flexion you can achieve before bone contacts bone.
Anatomy | Effect on Depth | Adaptation |
Deep socket | Hip flexion is limited to roughly 110°. Early butt wink risk. | Stop at parallel or widen your stance. |
Shallow socket | Hip flexion beyond 120° is possible. | Break parallel if your other cues stay intact. |
Anteversion (forward facing) | More internal rotation. Knees may drift inward. | Widen your stance and use the knees out cue. |
Retroversion (backwards facing) | Limited internal rotation. Hips shift back more. | Narrow your stance and use heel elevation. |
Test: If you feel a pinch in the front of your hip at depth, stop there. That is your anatomical limit.
2. Femoral Head and Neck Morphology (FAI Risk)
The shape of your femoral head determines how early impingement occurs.
Morphology | Effect on Depth | Adaptation |
Cam impingement | Blocks hip flexion beyond roughly 110°. | Stop at parallel. Never force depth. |
Pincer impingement | Limits flexion and internal rotation. | Widen your stance. Stop before pain. |
Normal morphology | Full depth possible. | Break parallel if your other cues remain intact. |
Cue: If you feel a sharp hip pinch, reduce your depth by 10 to 20 degrees.
3. Femur and Tibia Length Ratios (Limb Proportions)
Your limb proportions determine your torso angle, how far your knees travel and how much demand is placed on your hips.
Ratio | Effect on Depth | Adaptation |
Long femurs | More hip flexion is required, so higher risk of butt wink. | Widen your stance and turn your toes out 30 degrees. |
Short femurs | Upright torso. Quad-dominant squat. | Use a shoulder-width stance and turn your toes out 15 degrees. |
Long tibias | More knee travel, which makes depth easier to achieve. | Use heel elevation of half to one inch. |
Short tibias | Less knee travel. Hips shift back more. | Widen your stance and emphasise the hips back cue. |
Test: Measure your femur (hip to knee) and tibia (knee to ankle). If your femur-to-tibia ratio is above 1.3, you have long femurs and should expect more forward lean.
4. Ankle Dorsiflexion Range (The Most Common Limiter)
Your depth is often limited by your ankles, not your hips.
Dorsiflexion Range | Effect on Depth | Adaptation |
Less than 10 degrees | Your heels lift at a parallel. Your knees shoot forward. | Use heel elevation of half to one inch, or reduce your depth. |
10 to 20 degrees | You can reach parallel. | Use standard depth and maintain your mobility. |
More than 20 degrees | You can reach below the parallel depth. | Break parallel if your other cues remain intact. |
Test: Place a ruler 10 centimetres from a wall. Try to touch your knee to the wall without lifting your heel. If you cannot, your dorsiflexion is limited.
Cue: If your heels lift, elevate them or reduce your depth.
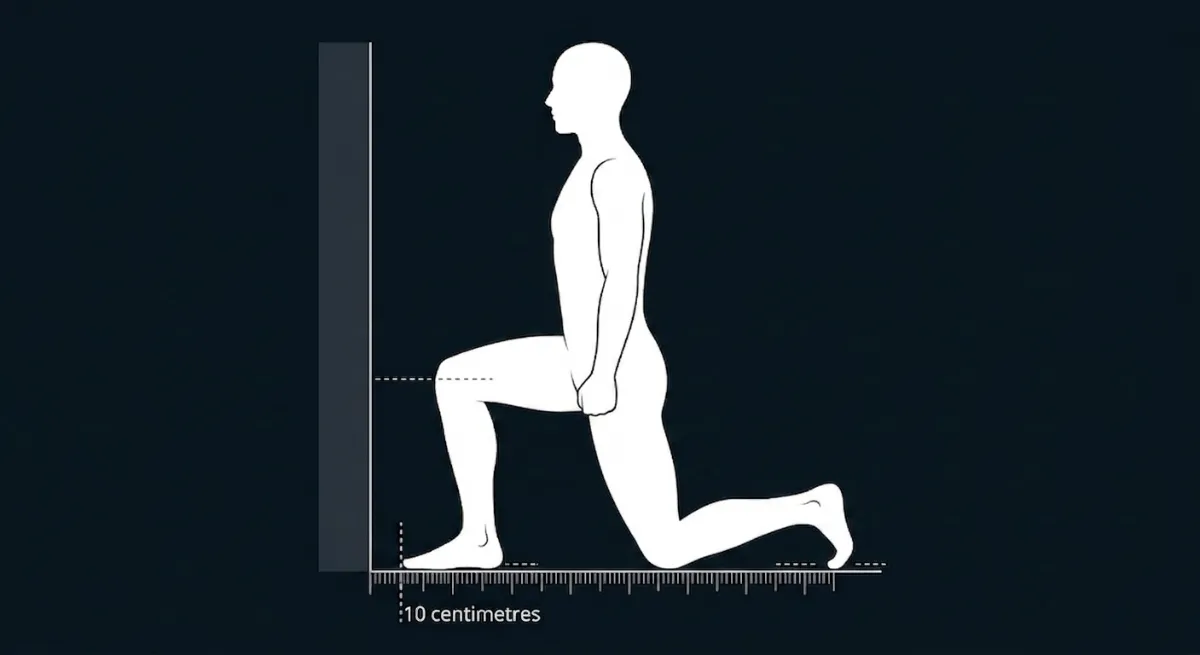
Figure 82. The knee-to-wall test. Place a ruler 10 centimetres from a wall. Keep your foot flat and try to touch your knee to the wall. If you cannot, your ankle dorsiflexion is limited, and you may benefit from heel elevation.
5. Lumbar Spine Integrity (Non-Negotiable)
Lumbar flexion at depth compresses intervertebral discs [8,18]. This is a hard stop.
Condition | Effect on Depth | Adaptation |
Disc herniation | Your spine is flexion-intolerant. Butt wink is dangerous. | Stop 2 to 5 centimetres above where your back begins to round. |
Spondylolisthesis | Your spine is shear sensitive. | Use only quarter to half squats. |
Healthy spine | You can maintain a neutral spine at depth. | Break parallel if your neutral spine is maintained. |
Test: Film yourself from the side. If your lower back rounds at depth, stop 2 to 5 centimetres above that point.
Cue: If your lower back rounds, stop higher.
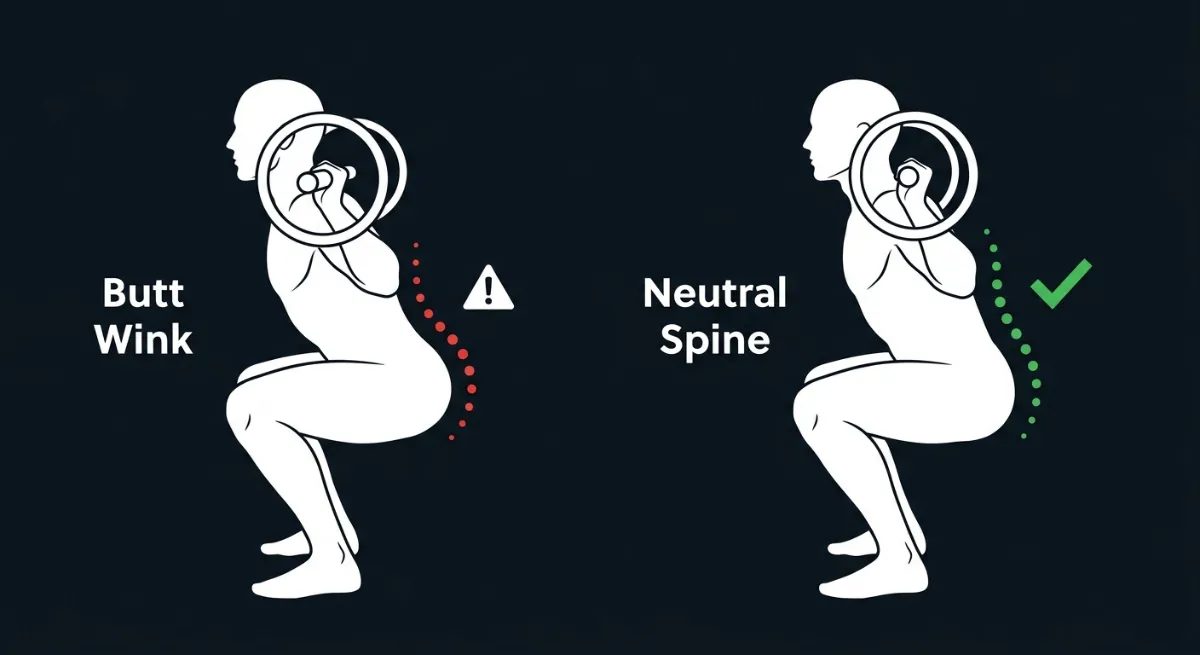
Figure 83. On the left, a deep squat with a rounded lower back (butt wink). On the right, a deep squat with a neutral spine. Stop your depth where your spine begins to round.
6. Knee Structure and Q Angle (Valgus Risk)
Your knee anatomy determines how deep you can go without pain or collapse.
Condition | Effect on Depth | Adaptation |
Patellofemoral pain | Pain beyond 120° of knee flexion. | Stop at parallel (90°). Use box squats. |
Meniscal tear | Pain in deep flexion. | Stop at parallel. Avoid full depth. |
High Q angle (above 15°) | Higher risk of knee valgus (collapse) at depth. | Widen your stance and use an aggressive knees out cue. |
Healthy knees | No pain at depth. | Break parallel if your other cues remain intact. |
Test: If your knees hurt at depth or cave inward, reduce your depth by 10 to 20 degrees.
Cue: If your knees cave inward, widen your stance and push your knees out harder.
Summary Table for Coaches and Lifters
Limitation | Effect | Adaptation |
| Deep hip socket or FAI | Hip pinch at depth | Stop at parallel. Widen your stance. |
| Long femurs | Butt wink risk | Widen your stance. Turn toes out 30 degrees. |
| Limited ankle dorsiflexion (less than 10 degrees) | Heels lift | Use heel elevation. Reduce your depth. |
| Lumbar rounding (butt wink) | Disc compression | Stop 2 to 5 centimetres above rounding. |
| Patellofemoral pain | Pain beyond 120 degrees | Stop at parallel. |
| High Q angle (above 15 degrees) | Knee valgus collapse | Widen your stance. Use strong knees out cue. |
The Key Principle
Break parallel if you can. Stop higher if you cannot.
Your depth is correct only if you maintain all three of these:
- a proud, braced chest
- knees tracking over your toes (not collapsing inward)
- a neutral spine with no rounding
If all three are intact, go deeper than parallel. This is where hip and knee torque becomes balanced, your glutes and adductor magnus work hardest, and your force production is highest.
If any of them break, stop at that depth. That is your current effective range.
Never sacrifice form for depth. Never stop short out of fear if your body is ready to go deeper.
Coaching Guide for the Depth Cue
The depth cue is different from other squat cues. You cannot force depth by trying harder. Depth is the outcome of good mechanics elsewhere. If your chest is proud, your knees track correctly and your spine stays neutral, depth will come naturally to your anatomical limit.
The goal for most healthy lifters is to break parallel, roughly 115 degrees of knee flexion, with the hip crease below the knee. But you only go that deep if your other cues remain intact. If any of them break, stop at that depth. That is your current effective range.
For visual references on depth targets, ankle mobility, hip anatomy and spinal position, see the Individual Differences for Depth section earlier in this guide.
Internal Cues (Feel the Body)
Cue | Purpose |
“Feel your hips fold between your thighs.” | Encourages controlled hip flexion, prevents early pelvic tilt. |
“Keep your ribs stacked over your pelvis.” | Maintains spinal neutrality and intra abdominal pressure [3,8]. |
“Sense equal pressure through heel, big toe and little toe.” | Reinforces midfoot balance, prevents heel lift [9]. |
“Feel your glutes and adductors stretch at the bottom.” | Indicates proper depth where posterior chain peaks [5]. |
“Notice when your chest starts to drop.” | Identifies the mechanical limit of safe depth. |
Internal cue rule: If you lose spinal neutrality, midfoot pressure or chest position, stop at that depth.
External Cues (Focus on the Environment)
Cue | Purpose |
“Reach your hips back, then down.” | Links hips back cue to controlled descent. |
“Push your knees toward your pinky toes.” | Connects to knees out cue, prevents valgus collapse [6,13]. |
“Keep the bar over the middle of your foot.” | Reinforces balance and centre of mass control. |
“Break parallel only if your chest stays proud.” | Defines safe depth threshold. |
“Imagine sitting between your heels.” | Encourages symmetrical hip descent. |
“Spread the floor apart with your feet.” | Forces knees out, clears space in the hip socket [1,2]. |
“Pull yourself down into the hole.” | Engages hip flexors, maintains midfoot balance. |
External cue rule: Depth is only safe when your bar path, knee tracking and torso angle remain stable. If any deviate, stop higher.
The Three Gatekeepers
As you approach parallel, these three checkpoints decide whether you can go deeper.
Checkpoint | The Cue | Why It Matters |
Spine | “Keep your lower back flat. Do not tuck your tailbone.” | Prevents butt wink, which compresses lumbar discs [8,18]. |
Knees | “Push your knees out toward your pinky toes.” | Prevents knee valgus, protects ACL [6,13]. |
Feet | “Keep your weight on the tripod: heel, big toe, little toe.” | Prevents forward drift, maintains midfoot balance [9]. |
If all three are intact, go deeper than parallel. This is where hip and knee torque balances and your glutes work hardest.
If any break, stop at that depth. That is your current effective range.
Beginners
Focus: Find your natural depth limit. Use bodyweight squats or goblet squats first.
Internal Cue | External Cue |
“Squat down like you are sitting into a small chair.” | “Sit down between your ankles.” |
“Stop when you feel your lower back want to round.” | “Lower yourself until your hip crease is level with your knee.” |
“Feel your heels stay heavy on the floor.” | “Pretend you are closing a car door with your backside.” |
“Go only as low as feels comfortable.” | “Touch the box, then drive up.” |
What to avoid: Do not tell a beginner to “go as deep as possible.” They will sacrifice form. Do not add load until they can reach their natural depth with a neutral spine.
Intermediate Lifters
Focus: Refine depth under load. Add tempo and pauses.
| Internal Cue | External Cue |
|---|---|
| “Breathe and brace, then sit down into your hips.” [3,8] | “Touch the box, then drive up.” |
| “Feel your adductors stretch at the bottom.” [5] | “Squat down to a target.” |
| “Push your knees out as you go deeper.” [1,2] | “Pause for one second at the bottom.” [3] |
| “Feel the weight evenly across your whole foot.” [9] | “Keep your chest proud.” [5] |
What to add: Tempo squats (3 seconds down, 1 second pause, 1 second up). Pause squats to build confidence in the bottom position.
Advanced Lifters
Focus: Maximise depth within your anatomical limits. Use short, sharp cues for heavy attempts.
| Internal Cue | External Cue |
|---|---|
| “Sit back and down. Feel the stretch in your adductors.” [5] | “Hip crease below the knee. Hold it.” |
| “Chest up. Brace hard. Go.” | “Drive through your midfoot. Stay off your toes.” [9] |
| “Ride the bounce out of the hole.” [5] | “Push the floor away through your heels and midfoot.” [8] |
What to add: Pin squats or Anderson squats (starting from the bottom). Use a mirror or video to check depth on heavy singles.
Common Faults and Quick Fixes
Fault | Quick Fix | Why |
Heels lifting | “Elevate your heels or widen your stance.” | Limited ankle dorsiflexion. See knee to wall test in Individual Differences. |
Chest collapsing | “Keep your chest proud. Push your torso up against the bar.” | Thoracic flexion increases the hip moment arm [5]. |
Knees caving inward | “Push your knees out. Widen your stance.” | High Q angle or weak gluteus medius [6,13]. |
Lower back rounding | “Stop 2 to 5 centimetres above where your back rounds.” | Hip flexion exceeded anatomical limits. See butt wink image in Individual Differences. |
Hip pinch or stuck feeling | “Stop at that depth. Widen your stance.” | Femoroacetabular impingement. See hip socket section in Individual Differences. |
Going too deep, losing tension | “Shorten your depth by 5 to 10 centimetres.” | You have passed your effective depth range. |
Tactile Cues for Coaches
Action | Verbal Cue | Purpose |
Gently press down on the lifter’s heels at depth. | “Heels heavy.” | Reinforces midfoot to heel weight distribution [9]. |
Place your hand at the depth target (hip crease level). | “Touch my hand.” | Gives a physical target for consistent depth. |
Lightly tap their lower back if it rounds. | “Stop there.” | Teaches the lifter to recognise their safe depth limit [8]. |
Summary Table by Lifter Level
Level | Internal Cue Example | External Cue Example | Depth Goal |
Beginner | “Stop when you feel your lower back want to round.” | “Sit down between your ankles.” | Find natural depth limit. |
Intermediate | “Feel your adductors stretch at the bottom.” | “Pause for one second at the bottom.” | Refine depth under load. |
Advanced | “Ride the bounce out of the hole.” | “Hip crease below the knee. Hold it.” | Maximise depth within anatomical limits. |
The Most Important Rule for Depth
Break parallel if you can. Stop higher if you cannot.
Your depth is correct only if you maintain all three:
- a proud, braced chest
- knees tracking over your toes, not falling inward
- a neutral spine with no rounding
If all three are intact, go deeper than parallel. This is where hip and knee torque becomes balanced, your glutes and adductor magnus work hardest, and your force production is highest.
If any of them break, stop at that depth. That is your current effective range.
Never sacrifice form for depth. Never stop short out of fear if your body is ready to go deeper.
Exercises to Correct Depth Mistakes
The table below matches common depth problems with specific exercises. Choose the exercise that addresses your primary limitation.
Problem | Primary Cause | Exercise | Why It Works |
Heels lift off the floor | Limited ankle dorsiflexion [9] | Heel elevated goblet squat | Reduces dorsiflexion demand, allows depth without heel lift. |
Heels lift off the floor | Limited ankle dorsiflexion [9] | Knee to wall stretch | Increases dorsiflexion range over time. |
Lower back rounds (butt wink) | Tight hip flexors or weak glutes [8] | Pause squat at parallel | Teaches control at depth without rounding. |
Lower back rounds (butt wink) | Tight hip flexors or weak glutes [8] | Box squat (parallel height) | Gives a physical stop before rounding occurs. |
Knees cave inward (valgus) | Weak gluteus medius [6,13] | Banded monster walks | Strengthens hip abductors to control knee position. |
Knees cave inward (valgus) | Weak gluteus medius [6,13] | Copenhagen adductions | Builds adductor and glute strength for knee stability. |
Cannot reach parallel | Limited ankle or hip mobility | Heel elevated squat | Accommodates anatomy while building depth confidence. |
Cannot reach parallel | Limited ankle or hip mobility | Goblet squat | Front loaded position encourages upright torso and depth. |
Hip pinch at depth | Femoroacetabular impingement [1,2] | Wide stance box squat | Creates space in hip socket, stops before pinching. |
Hip pinch at depth | Femoroacetabular impingement [1,2] | Pause squat at pain free depth | Teaches depth control within anatomical limits. |
Chest collapses at depth | Weak upper back or poor bracing [5] | Goblet squat | Front load keeps chest upright naturally. |
Chest collapses at depth | Weak upper back or poor bracing [5] | Pause squat with chest focus | Builds awareness and strength in bottom position. |
Loses tension at bottom | Poor bracing endurance [3,8] | Pause squat (2 to 3 seconds) | Forces you to maintain intra abdominal pressure at depth. |
Loses tension at bottom | Poor bracing endurance [3,8] | Dead bug with band | Teaches bracing while moving limbs. |
How to Use This Table
Step 1: Identify your main depth problem from the left column.
Step 2: Check the primary cause.
Step 3: Pick one or two exercises from the right column.
Step 4: Do these exercises as accessories after your main squat work, or on separate days.
Step 5: Re test your depth after 4 to 6 weeks of consistent work.
Sample Exercise Pairings
If you have heels lifting and cannot reach parallel: do heel elevated goblet squat and knee to wall stretch.
If you have butt wink and losing tension: do pause squat at parallel and dead bug with band.
If you have knees caving and chest collapsing: do banded monster walks and goblet squat.
If you have hip pinch and knees caving: do wide stance box squat and Copenhagen adductions.
Most Important Rule for Depth Exercises
Do not force depth that hurts or rounds your back. Use these exercises to build the mobility, strength and control you need to earn depth over time. Depth is not a gift. You earn it.
References
- Yan X, Chen L, Chen Y, Wang C, Li X. (2026). Influence of different depths and loads on knee joint mechanics and peripheral muscle force characteristics during squatting. Chinese Journal of Tissue Engineering Research, 30(9), 2236-2247.
- Kernozek TW, et al. (2025). Patellofemoral joint stress during front and back squats at two depths. Applied Sciences, 15(16), 8784.
- Shu H, Yang X, Wang Y, Fernandez J, Mei Q, Gu Y. (2025). Understanding the biomechanical influence of core contribution in squat: A systematic review. Isokinetics and Exercise Science, 33(3), 260-270.
- Kasahara S, Ishida T, Linjing J, Chiba A, Samukawa M, Tohyama H. (2024). Relationship among the COM motion, the lower extremity and the trunk during the squat. Journal of Human Kinetics, 93, 23-39.
- Escamilla RF, et al. (2001). A three dimensional biomechanical analysis of the squat during varying stance widths. Medicine and Science in Sports and Exercise, 33(6), 984-998.
- Delp SL, et al. (1999). An interactive graphics based model of the lower limb to study orthopaedic surgical procedures. IEEE Transactions on Biomedical Engineering, 46(2), 105-113.
- Neumann DA. (2010). Kinesiology of the Musculoskeletal System (2nd ed.). Mosby.
- McGill SM. (2016). Low Back Disorders (3rd ed.). Human Kinetics.
- Cotter JA, Chaudhari AM, Jamison ST, Devor ST. (2013). Knee joint kinetics in relation to commonly prescribed squat loads and depths. Journal of Strength and Conditioning Research, 27(7), 1765-1774.
- Schoenfeld BJ. (2010). Squatting kinematics and kinetics and their application to exercise performance. Journal of Strength and Conditioning Research, 24(12), 3497-3506.
- Lewis CL, Sahrmann SA. (2006). Acetabular labral tears. Physical Therapy, 86(1), 110-121.
- Philippon MJ, et al. (2007). Femoroacetabular impingement in 45 professional athletes. Knee Surgery, Sports Traumatology, Arthroscopy, 15(7), 908-914.
- Rabin A, et al. (2014). The effect of limited ankle dorsiflexion on squat biomechanics. Journal of Strength and Conditioning Research, 28(7), 1965-1973.
- Hewett TE, et al. (2005). Biomechanical measures of neuromuscular control and valgus loading of the knee predict ACL injury risk in female athletes. American Journal of Sports Medicine, 33(4), 492-501.
Drive Up
Drive up
Introduction
The drive-up is where the squat is won or lost. You can have a perfect descent and ideal depth, but none of that matters if you cannot stand back up with control.
The drive-up begins at the deepest point of your squat. From here, you must produce enough force to overcome the weight of the bar while keeping your chest proud, your knees tracking correctly, and your spine neutral.
The goal of the drive-up is to stand back up with the same alignment you had on the way down. Your chest, hips and knees should rise together, not one before the others.
Anatomy
The Sticking Point: An Anatomical View
The sticking point occurs just above parallel, roughly 100 to 110 degrees of knee flexion [6,13]. At this specific joint angle, your muscles are working at their worst mechanical disadvantage.
Here is what happens anatomically at the sticking point.
Gluteus maximus is stretched but not yet shortened enough to produce peak force. The muscle fibres are at a suboptimal length for maximal tension generation [1,2].
Quadriceps have already passed their strongest angle. Quadriceps force peaks around 90 degrees and declines sharply beyond that [7].
Adductor magnus is working hard, but only if your hip is flexed past 110 degrees. If you did not reach that depth, the adductor magnus cannot help you [3].
Hamstrings are caught between two jobs. They must assist hip extension while also controlling knee extension. This dual demand reduces their effectiveness [4].
Core canister must maintain intra-abdominal pressure to keep your spine neutral. Fatigue causes the diaphragm and transverse abdominis to lose tension, allowing your chest to drop [6].
Why the sticking point is inevitable: At 100 to 110 degrees of knee flexion, your hip and knee extensors are simultaneously too stretched and too shortened to produce their maximum force. This is not a weakness. It is basic muscle physiology.
What anatomy cannot fix: Your muscle fibre type, tendon insertion points and limb lengths all affect how long you can fight through the sticking point. A lifter with longer femurs will experience a longer, harder sticking point because their hip moment arm is larger [13].
The anatomical rule: The sticking point is where your muscles are weakest. Strength training changes how hard they can work at this angle. Anatomy determines how long the struggle lasts.
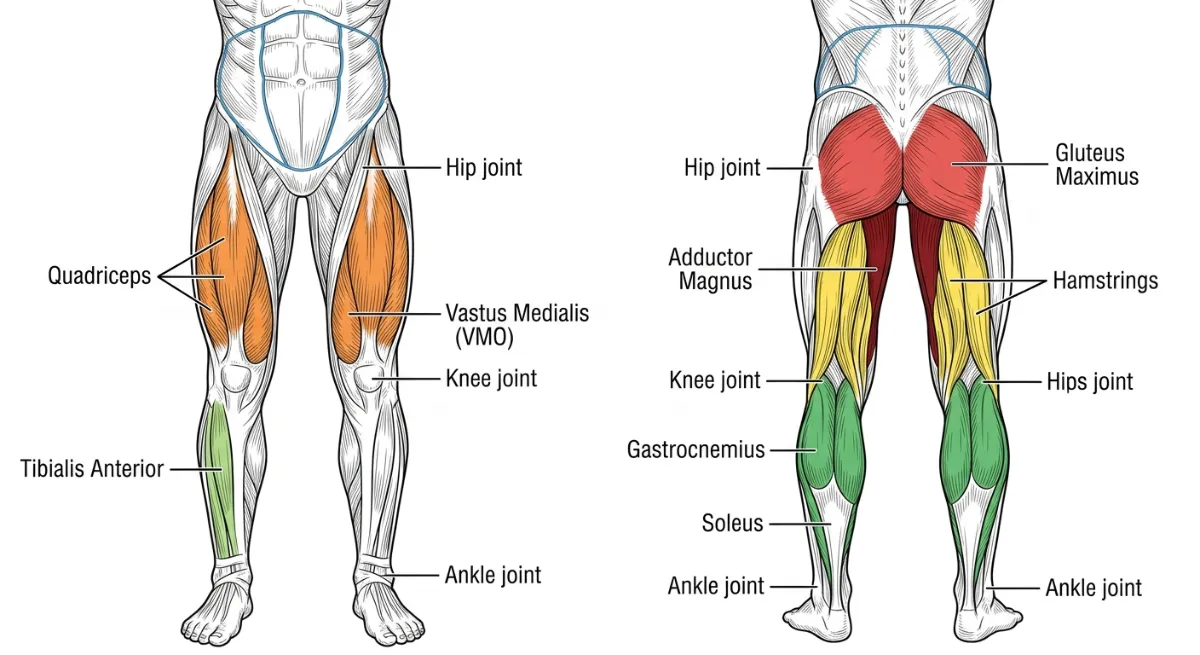

Figure 84. Anterior and posterior views of the primary muscles driving the ascent. Left (anterior): the quadriceps (orange) and VMO extend the knee. Right (posterior): the gluteus maximus (red) and hamstrings (yellow) extend the hip, while the adductor magnus (dark red) assists from the inner thigh and the calves (green) provide plantarflexion. The hip, knee and ankle joints are labelled for reference.
Primary Muscles Driving the Ascent
Three muscle groups work together to drive you up. Your quads start the movement out of the bottom. Your glutes and hamstrings take over through the sticking point. Your core keeps everything connected from start to finish.
Hip Extensors (Posterior Chain)
Gluteus maximus is your primary hip extensor. It generates roughly 50 percent of hip extension torque at 90 degrees of hip flexion [1,2]. Weakness causes lumbar hyperextension or a slow ascent.
Adductor magnus is often called the fourth hamstring. It contributes roughly 20 percent of hip extension torque, especially in deep squats [3]. Weakness contributes to valgus collapse during the drive up.
Biceps femoris assists hip extension and stabilises the posterior knee [4]. Tightness limits hip flexion depth, reducing the stretch shortening cycle.
The gluteus maximus and adductor magnus are most active between 90 and 120 degrees of hip flexion, which is parallel to below parallel depth [1,3]. Weak hip extensors force your lumbar spine to compensate through hyperextension, or make you quad dominant so your knees shoot forward [6].
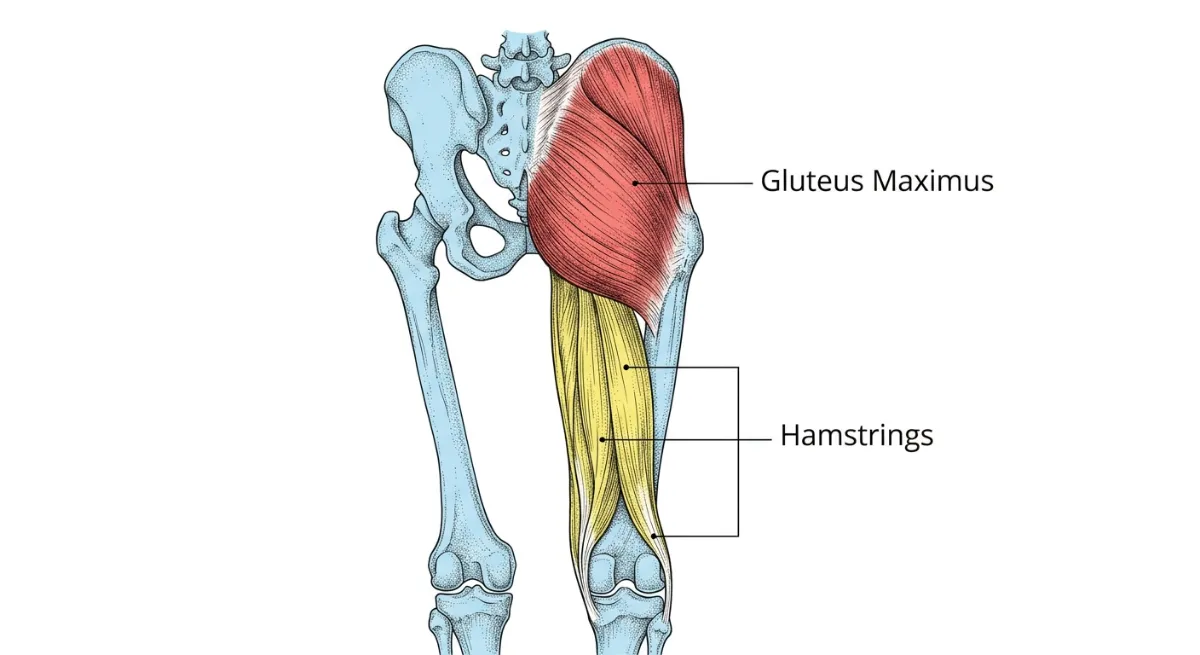
Figure 85. The gluteus maximus (red) and hamstrings (yellow) work together to extend the hip during the drive-up. The adductor magnus (not shown) assists from the inner thigh.
Knee Extensors (Quadriceps)
Vastus lateralis extends the knee and stabilises the patella [7]. Weakness leads to knee valgus or patellar pain.
Vastus medialis (VMO) controls patellar tracking and reduces lateral compression [8]. Weakness causes the knee to cave inward, a position called valgus.
Rectus femoris extends the knee and flexes the hip [9]. Tightness creates anterior pelvic tilt, increasing lumbar stress.
Your quadriceps produce roughly 60 per cent of knee extension torque at 90 degrees of knee flexion [7]. VMO weakness leads to patellar maltracking and knee valgus [8]. Rectus femoris tightness pulls your pelvis into anterior tilt [9].

Figure 86. The quadriceps muscles, especially the vastus medialis (VMO), are responsible for knee extension during the drive-up.
Ankle Plantar flexors (Calves)
Gastrocnemius provides explosive plantarflexion and aids triple extension [10]. Tightness limits dorsiflexion and causes heel lift.
Soleus stabilises the eccentric descent and assists plantarflexion [11]. Weakness leads to poor midfoot control.
Tibialis posterior provides dynamic arch support and controls pronation [12]. Weakness causes foot collapse and knee valgus.
Your calves contribute roughly 10 to 15 percent of total force during the drive up [10,11]. A tight gastrocnemius restricts ankle dorsiflexion, forcing your weight to shift forward [10]. A weak tibialis posterior leads to overpronation and knee valgus [12].
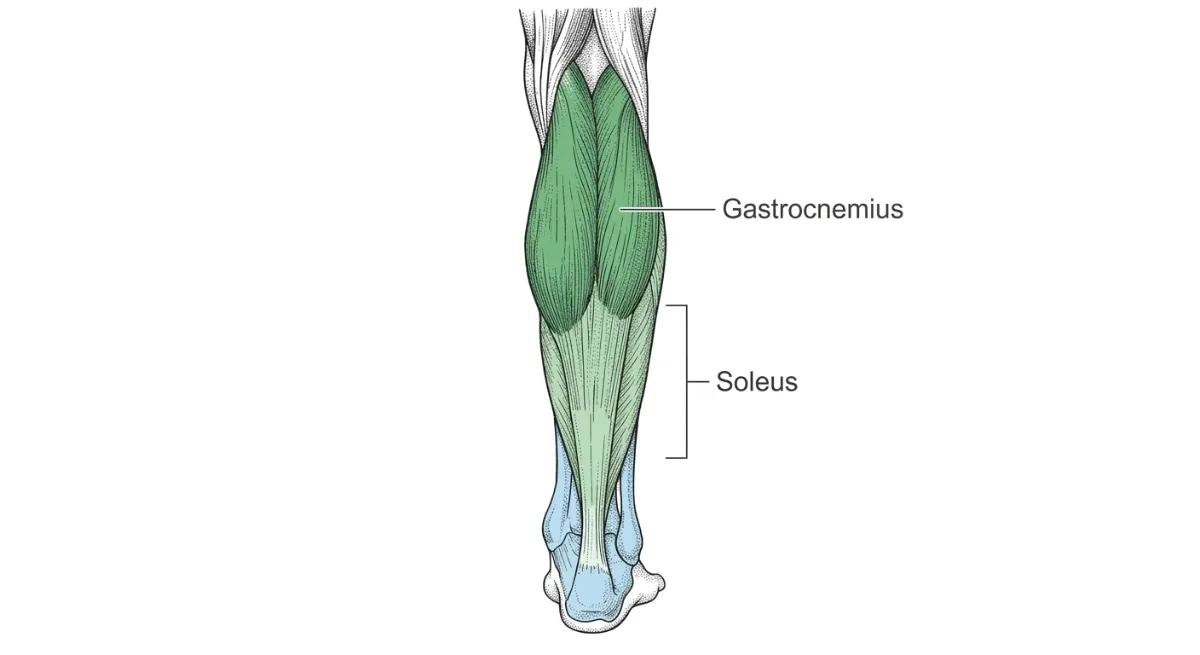
Figure 87. The gastrocnemius and soleus muscles work together to provide plantarflexion, adding roughly 15 per cent of total force during the drive-up.
Joint Actions During the Ascent
Three joints extend simultaneously during a powerful drive up. This is called triple extension, where explosive power comes from [15].
Hip extension and external rotation are driven by the gluteus maximus and adductor magnus [1,3]. The piriformis and other deep rotators stabilise the femoral head in the acetabulum [5]. Longer femurs increase the hip moment arm, requiring more glute force [13]. Femoroacetabular impingement (FAI) can block full extension [1].
Knee extension and patellar tracking are driven by the quadriceps [7]. The VMO keeps the patella centred in the trochlear groove [8]. Patellar tendon length affects knee extension torque. Patellar tendonitis or chondromalacia may limit deep knee flexion [8].
Ankle plantarflexion and subtalar stability are driven by the gastrocnemius and soleus, adding roughly 10 to 15 per cent to total force [10,11]. The tibialis posterior and peroneal stabilise the foot tripod [12]. Limited dorsiflexion forces your weight to shift forward [10]. Overpronation leads to knee valgus [6].
Visual cue: “Drive your hips, knees and ankles in one motion, like a spring uncoiling.”
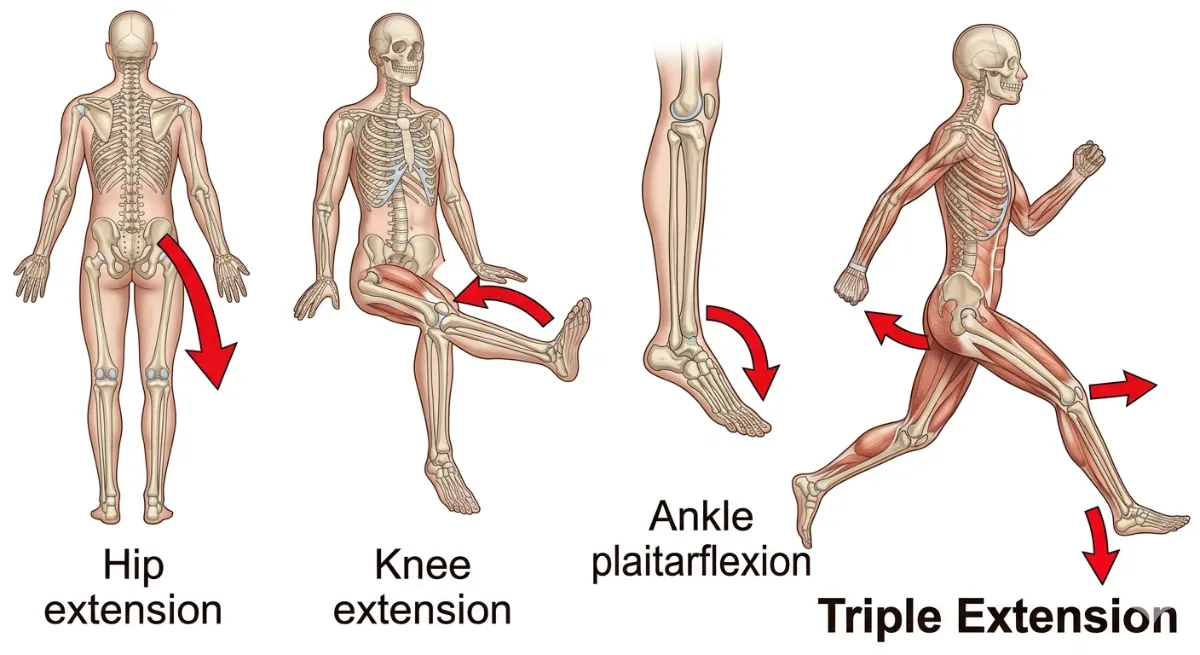
Figure 88. Triple extension of the hip, knee and ankle during the drive up. All three joints extend simultaneously to produce maximal force.
The Stretch Shortening Cycle
The stretch-shortening cycle is what gives you a bounce out of the bottom.
During the eccentric (descent) phase, your glutes, quads and calves are stretched under load. During the concentric (ascent) phase, stored elastic energy is released, boosting force output by roughly 20 per cent [14].
The rule: Control the descent, then explode up. Do not bounce recklessly, but do not pause so long that you lose the stretch reflex.
Key Anatomical Takeaways for the Drive Up
Hip extensors are your power source. Glutes and adductor magnus generate roughly 70 per cent of hip extension force [1,3]. Weak glutes force your lower back to take over.
Quadriceps give you knee stability. Your VMO keeps your kneecap tracking correctly. Weak VMO leads to knee valgus, the cave-in position [8].
Calves transfer force. Your calves contribute roughly 15 per cent of total force and keep your foot stable [10,11]. Weak calves make your heels lift.
Triple extension creates explosiveness. Your hip, knee and ankle must extend together. If one lags, you lose power [15].
Spinal integrity keeps you safe. Your core must stay braced throughout the drive. If your back rounds, your glutes lose leverage and your discs take the load [6].

Figure 88. The primary muscles driving the ascent: gluteus maximus (red), quadriceps (orange), hamstrings (yellow), calves (green), and core (blue outline).
Biomechanics of the Drive Up Cue
When we analyse the drive up biomechanically, we look at two connected domains. Kinematics describes the geometry of motion, including joint angles, bar path and segment alignment during the ascent. Kinetics describes the forces that produce or resist motion, including joint moments, ground reaction forces and muscle forces [6,13].
The drive up is not simply the reverse of the descent. Your muscles produce force differently when they are shortening, called the concentric phase, compared to when they are lengthening, the eccentric phase. The sticking point, where your mechanical advantage is lowest, occurs just above parallel and is where most lifters experience a slowdown [6,13].

Figure 89. The sticking point occurs just above parallel, roughly 100 to 110 degrees of knee flexion. At this angle, the hip and knee extensors are at their worst mechanical advantage.
Part 1: Kinematics of the Drive Up
Kinematics describes the position, angle and movement pattern of your joints as you stand back up.
The Ideal Ascent Sequence
A mechanically efficient drive-up follows a specific sequence.
From bottom to parallel (110 to 90 degrees of knee flexion): Hips and knees extend together. The chest stays proud. The bar path remains vertical.
Through the sticking point (100 to 110 degrees of knee flexion, 100 to 120 degrees of hip flexion): Hips and knees continue extending together. The torso angle stays constant. The bar does not drift forward.
From parallel to lockout (90 to 0 degrees): Hips and knees reach full extension simultaneously. The chest finishes proud. The bar ends over the midfoot.
Kinematic rule: Your chest, hips and knees should rise together. If your hips shoot up first, your torso angle becomes horizontal, and your lower back takes over. If your chest rises first, your knees shoot back, and you lose power from your quads.
Hip Joint Kinematics
At the bottom of a deep squat, your hip is bent between 110 and 130 degrees. Your gluteus maximus is at its peak activation, roughly 90 per cent, and your adductor magnus is also highly active [1,2,3]. As you rise to parallel, around 90 degrees of hip bend, your glutes reach their optimal activation at roughly 80 per cent. At lockout, when your hips are fully straight, glute activation drops to roughly 30 percent [1].
Key kinematic insights for the hip: The gluteus maximus produces maximal force between 90 and 120 degrees of hip flexion, which is parallel to below parallel depth [1,2]. The adductor magnus, often called the fourth hamstring, contributes roughly 20 per cent of hip extension torque [3]. Hip hyperextension at lockout compresses lumbar discs and should be avoided [6].
Knee Joint Kinematics
At the bottom of a deep squat, your knee is bent between 120 and 135 degrees. Your vastus medialis, the teardrop muscle above your knee, is at its peak activation at roughly 80 percent. Your vastus lateralis is moderately active at roughly 60 percent [7,8]. As you rise to parallel, around 90 degrees of knee bend, your quadriceps reach their optimal activation. At lockout, quad activation drops to low levels [7].
Key kinematic insights for the knee: The vastus medialis peaks between 90 and 120 degrees of knee flexion, where it stabilises the patella [8]. Knee valgus, where the knee collapses inward, increases ACL strain significantly [9]. Patellofemoral stress is highest below parallel due to lateral compression of the kneecap [8].
Ankle Joint Kinematics
At the bottom of a deep squat, your ankle is bent between 20 and 30 degrees of dorsiflexion. Your soleus is highly active at roughly 60 per cent, controlling the descent and early drive. Your gastrocnemius is moderately active at roughly 40 per cent [10,11]. As you rise, your gastrocnemius peaks at mid ascent for explosive plantarflexion. At lockout, your ankle moves into slight plantarflexion [10].
Key kinematic insights for the ankle: The soleus dominates eccentric control during the descent and the early part of the concentric drive [11]. The gastrocnemius peaks at mid ascent for explosive plantarflexion [10]. Heel lift shifts ground reaction force forward, increasing shear forces at the knee [10].
Triple Extension Synergy
The drive up relies on simultaneous hip extension, knee extension and ankle plantarflexion. This is called triple extension. In explosive lifts, all three joints reach full extension within roughly 0.2 seconds of each other [15]. Disruptions such as early heel lift or knee valgus can reduce power output by roughly 30 percent [15].
Kinematic rule: Your hip, knee and ankle must extend together. If one joint lags behind, force production drops and the bar path may drift.

Figure 90. Triple extension of the hip, knee and ankle during the drive up. All three joints extend simultaneously to produce maximal force.
Common Kinematic Faults
Hips rise first: The hips shoot up while the chest stays down. The torso becomes nearly horizontal. This happens due to weak quadriceps or poor bracing [5,6].
Chest rises first: The chest lifts while the hips stay back. The knees shoot back too early. This happens due to weak glutes or hamstrings [1,2].
Knees cave inward (valgus): The knees collapse toward the midline during the ascent. This happens due to weak gluteus medius or VMO [8,9].
Bar path drifts forward: The bar moves toward the toes instead of staying over midfoot. This happens due to chest drop or loss of bracing [6,11].
Lower back rounds: The lumbar spine flexes during the ascent. This happens when hip flexion exceeds anatomical limits or due to core fatigue [8,14].
Part 2: Kinetics of the Drive Up
Kinetics examines the forces that produce or resist motion during the ascent. Several kinetic variables change as you move from the bottom to lockout.
Ground Reaction Forces
Ground reaction forces travel upward through your feet during the drive up. Your ability to produce force depends on keeping the barbell over your midfoot.
Optimal distribution: Force is evenly spread across the tripod of your foot, meaning your heel, first metatarsal head and fifth metatarsal head. This allows maximal force transfer from your legs to the bar [11].
Forward shift: Force moves toward your toes. This usually happens when your chest drops or your knees shoot forward. Force transfer becomes less efficient [11].
Backward shift: Force moves toward your heels. This usually happens when your hips shoot up first, or you are too far back. Force transfer is also reduced [11].
Kinetic rule: Midfoot pressure is where force transfer is most efficient. Heel or toe bias means you are leaking energy.
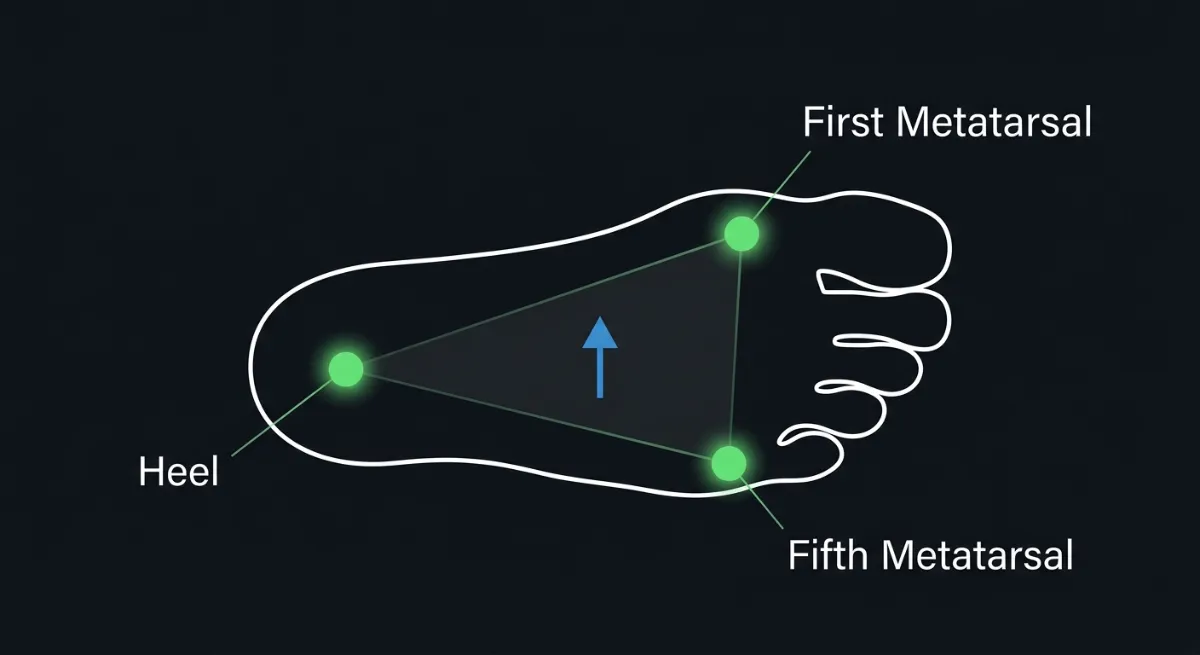
Figure 91. Optimal ground reaction force distribution during the drive up. Force is evenly spread across the tripod of the foot: heel, first metatarsal head and fifth metatarsal head.
Joint Moments and Torque
Torque is force multiplied by the length of the lever arm. During the drive up, your muscles must produce enough torque to overcome the external torque created by the barbell.
At the bottom of a deep squat, roughly 110 to 120 degrees of knee flexion, your hip moment arm is longest. This requires high torque from your glutes and adductor magnus. Your knee moment arm is also long, requiring high torque from your quadriceps [5,11].
Through the sticking point, roughly 100 to 110 degrees, your hip and knee moment arms are at their most unfavourable ratio. Your muscles are working at a mechanical disadvantage. This is where force production is lowest relative to the load [6,13].
At lockout, your moment arms approach zero. Torque demand is lowest. Your muscles are now at their shortest length and can produce maximal force [5,11].
Kinetic rule: The sticking point is hard not because you are weak, but because your muscles are working at their worst leverage. Strength training changes how much force they can produce at this angle.
Muscle Forces During the Ascent
Different muscles dominate at different phases of the drive up.
From bottom to parallel (110 to 90 degrees of knee flexion): Your quadriceps produce the most force. Your adductor magnus assists in deep squats. Your glutes begin to engage but are not yet at their peak [1,5].
Through the sticking point (90 to 100 degrees of knee flexion, 100 to 110 degrees of hip flexion): Your gluteus maximus and hamstrings take over as the primary hip extensors. Your quadriceps force declines. Your adductor magnus continues to assist [1,2,5].
From parallel to lockout (90 to 0 degrees): Your glutes and hamstrings dominate hip extension. Your quadriceps finish knee extension. Your calves contribute to final lockout through plantarflexion [10,11].
The Sticking Point: A Kinetic Analysis
The sticking point occurs just above parallel, roughly 100 to 110 degrees of knee flexion and 100 to 120 degrees of hip flexion [6,13]. At this specific position, three kinetic factors combine to make the lift hardest.
First, the hip moment arm is at its longest. The horizontal distance from the barbell to your hip joint is maximum, creating high external torque that your glutes must overcome [5,11].
Second, the knee moment arm is also at its longest. The distance from the barbell to your knee joint is maximum, creating high external torque that your quadriceps must overcome [5,11].
Third, your muscles are at unfavourable lengths for force production. Your glutes and hamstrings are stretched but not yet shortened enough to produce peak force. Your quadriceps have already passed their strongest angle [1,7].
Why lifters fail at the sticking point: Failure occurs when your muscles cannot produce enough torque to overcome the external torque from the barbell. This is usually due to weak glutes, weak quadriceps or poor bracing. However, even strong lifters will experience a slowdown at the sticking point because it is a mechanical inevitability, not a weakness [6,13].
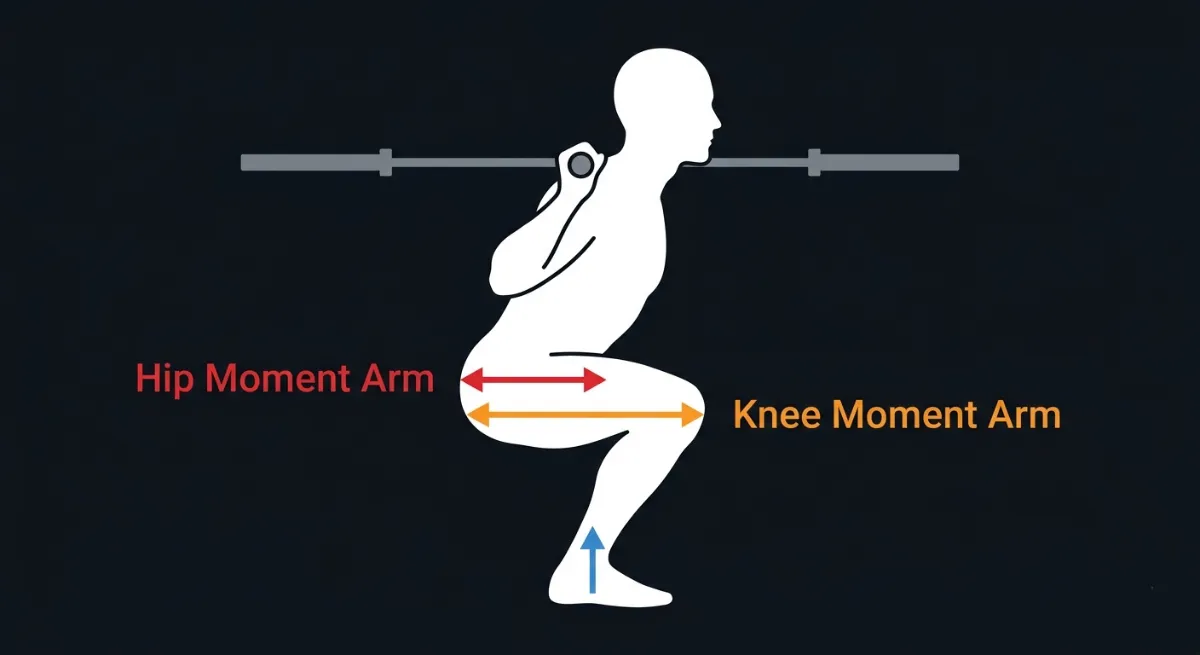
Figure 92. At the sticking point, the hip and knee moment arms are at their longest, creating high external torque that the glutes and quadriceps must overcome.
The Stretch Shortening Cycle
The stretch-shortening cycle is what gives you a bounce out of the bottom. It is a kinetic mechanism that stores elastic energy during the descent and releases it during the ascent [14].
During the eccentric phase, your descent, your glutes, quadriceps and calves are stretched under load. Elastic energy is stored in your muscle tendons and connective tissues.
During the amortisation phase, the brief transition between descent and ascent, you must reverse direction quickly. If this pause lasts longer than one second, the stored elastic energy dissipates, and you lose the bounce.
During the concentric phase, your ascent, the stored elastic energy is released. This boosts your force output by roughly 20 per cent compared to a squat started from a dead stop [14].
Kinetic rule: A controlled descent of 1 to 2 seconds maximises the stretch-shortening cycle. A pause of more than one second at the bottom kills the bounce. A reckless drop with no control can cause injury and does not improve the stretch-shortening cycle.
Triple Extension Kinetics
Triple extension is the simultaneous extension of the hip, knee and ankle. It is the kinetic signature of a powerful drive up [15].
When triple extension works well, all three joints extend together. Force is transferred efficiently from your legs to the bar. The bar path remains vertical. You feel powerful and smooth.
When triple extension breaks down, one joint lags behind the others. The most common breakdowns are hips rising first, which indicates glute weakness, or knees shooting back early, which indicates quad weakness. Force transfer becomes less efficient. The bar path may drift forward or backward [6,11].
Kinetic rule: Triple extension is not something you do. It is the result of all your muscles working together in the right sequence.
Part 3: Key Biomechanical Takeaways for the Drive Up
Hips and knees must rise together. If your hips shoot up first, your lower back takes over and your glutes stop working [5,6].
The sticking point is mechanical, not mental. At 100 to 110 degrees of joint flexion, your muscles are at their worst leverage. Strength training changes how much force they can produce at this angle [6,13].
Midfoot pressure equals efficient force transfer. Heel or toe bias means you are leaking energy. Keep the bar over your midfoot [11].
The stretch-shortening cycle gives you a bounce. A controlled descent of 1 to 2 seconds with a short pause of less than one second maximises elastic energy [14].
Triple extension is the goal. Your hip, knee and ankle must extend together. If one joint lags behind, your power drops [15].
Individual Differences for the Drive Up
Not everyone drives up from the bottom of a squat the same way. Even with perfect technique, your anatomy, muscle fibre composition and previous injuries all affect how fast you rise, where you feel the load and when you stall.
Two lifters with identical coaching can have completely different drive up mechanics. One may feel their quads burn out of the hole. Another may feel their glutes take over through the sticking point. Neither is wrong. Both are working with the body they have.
The goal of the drive-up is to stand back up with the same alignment you had on the way down. How you get there depends on your individual anatomy. But the standard for form does not change.
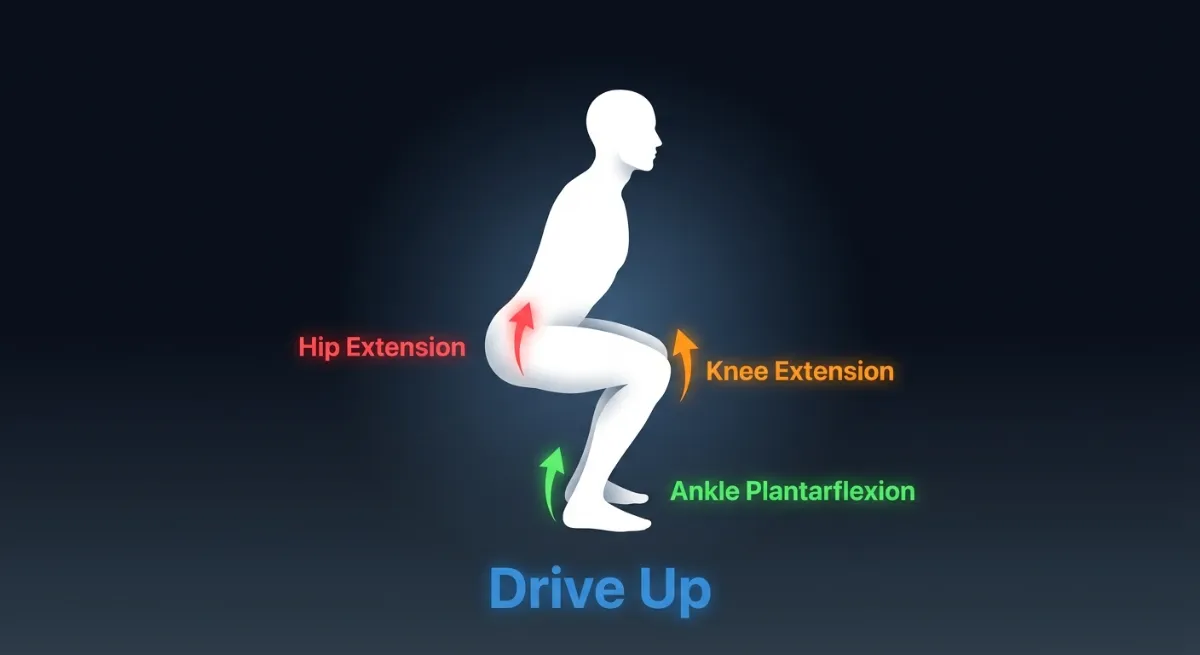
Figure 93. The drive up requires coordinated hip, knee and ankle extension. Your anatomy determines where you feel the load and where you stall.
Femur Length Relative to Torso
Your femur length compared to your torso length affects your torso angle during the drive up [5,13].
Long femurs with a short torso mean you lean forward more at the bottom. During the drive up, your torso wants to stay horizontal. Your lower back and glutes take more load while your quads work less. The best approach is to accept this forward lean. Strengthen your glutes and lower back. Do not try to force an upright chest at the expense of spinal neutrality.
Short femurs with a long torso mean you stay more upright at the bottom. During the drive up, your chest stays proud more easily. Your quads take more load while your glutes work less. The best approach is to strengthen your quadriceps. A high bar squat or front squat may feel stronger than a low bar squat.
What this means for your drive up: A lifter with long femurs will naturally feel the drive up in their glutes and lower back. A lifter with short femurs will feel it in their quads. Train your weaker muscles, but do not fight your anatomy.
Femoral Torsion (The Twist in Your Thigh Bone)
The angle at which your femoral neck sits on your thigh bone affects how your knees track during the drive-up. This is fixed from birth [1,2].
Femoral anteversion (inward twist) means your thigh bone naturally turns inward. During the drive up, your knees may want to cave inward, a position called valgus. The best approach is to test your stance width and toe angle dynamically. A slightly wider stance with moderate toe out often works best. Do not force your feet straighter than your hips allow. Strengthen your gluteus medius.
Femoral retroversion (outward twist) means your thigh bone naturally turns outward. During the drive up, your knees may track too wide or feel unstable. The best approach is to test your stance width and toe angle dynamically. A narrower stance with less toe out may feel more stable. Accept your natural toe angle.
What this means for your drive-up: If your knees cave inward despite your best efforts, you may have femoral anteversion. Widen your stance instead of forcing a position your hips cannot hold. Experiment with small changes to find what works for you.
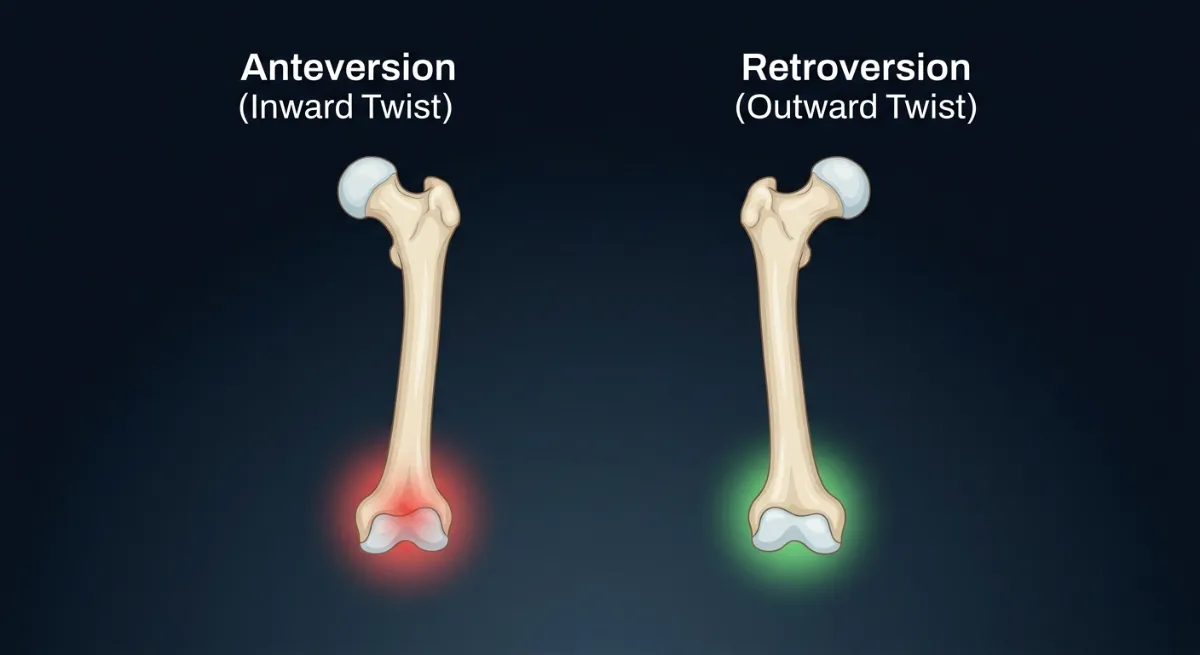
Figure 94. Femoral anteversion (inward twist) causes the knees to track inward. Femoral retroversion (outward twist) causes a wider, more stable track.
Hip Socket Shape and Femoroacetabular Impingement (FAI)
The shape of your acetabulum and femoral head determines how much hip flexion you can achieve and how your hip moves during the drive-up [1,2].
Deep hip sockets or cam impingement mean your hip flexion is limited to roughly 110 degrees. If you force depth, you will feel a pinch. During the drive up, you may feel pain or stiffness as you extend. Stop depth at parallel or slightly above. Do not force through pain. A wider stance may reduce impingement.
Shallow hip sockets mean your hip flexion range is full, often beyond 120 degrees. During the drive up, you have no bony restrictions. Break parallel if your other cues allow. Your drive-up will feel smoother than someone with FAI.
A retroverted acetabulum (backwards-facing sockets) means your hips naturally sit back. During the drive up, you may feel stable but less explosive out of the bottom. Use a slightly wider stance. Focus on driving your hips forward, not just up.
What this means for your drive up: If you feel a sharp pinch in your hip during the drive up, you have reached your anatomical limit. Stop there. Do not force through pain. See a physiotherapist if it continues.
Quadriceps to Hamstring Strength Ratio
Your ratio of quadriceps strength to hamstring strength affects where you stall during the drive-up [5,7].
Quad dominant (strong quads, weak hamstrings) means your quads do most of the work out of the bottom. But as you rise through the sticking point, your quads lose leverage, and you stall because your hamstrings cannot take over. Strengthen your hamstrings with Romanian deadlifts, leg curls and good mornings. Your drive up will become smoother through the sticking point.
Hamstring dominant (strong hamstrings, weak quads) means your hamstrings try to take over too early. Your hips rise faster than your chest. Your torso becomes horizontal, and your lower back takes the load. Strengthen your quadriceps with front squats, leg extensions and high bar squats. Your torso will stay more upright.
Balanced means your quads drive you out of the bottom. Your glutes and hamstrings take over through the sticking point. Your drive up is smooth and powerful. Maintain balance with mixed training. Do both the quad and posterior chain work.
What this means for your drive up: If your hips rise first, your hamstrings are too strong relative to your quads. If you stall at the sticking point, your hamstrings are too weak. Train the weaker muscle group specifically.

Figure 95. Quad-dominant lifters rise with an upright chest. Hamstring-dominant lifters rise with the hips first, causing a horizontal torso.
Muscle Fibre Type Composition
Your proportion of fast-twitch (type II) to slow-twitch (type I) muscle fibres is largely genetic. It affects how explosively you can drive up [14].
More fast-twitch fibres (explosive) mean you have a powerful bounce out of the bottom. Your drive-up is fast and aggressive. You may struggle with slow, controlled reps. Use the stretch-shortening cycle to your advantage. Do not pause at the bottom. Train tempo work to build control.
More slow twitch fibres (endurance) means you have less bounce out of the bottom. Your drive-up is slower but more controlled. You may struggle with explosive or heavy singles. Pause squats and tempo work will feel natural. Train explosive movements like jump squats to develop power.
Mixed fibres mean you have a balance of bounce and control. You can adapt to different training styles. Train both fast and slow tempos. Do not specialise too early. Build both power and control.
What this means for your drive up: If you naturally bounce out of the bottom, you are fast-twitch dominant. Do not force slow reps. If you naturally rise slowly, you are slow-twitch dominant. Do not force an explosive bounce that is not there.
Ankle Dorsiflexion Range
Your ankle mobility affects your drive up as much as your descent. If your ankles are stiff, your weight shifts forward during the ascent [10,11].
Less than 10 degrees of dorsiflexion means your heels want to lift at the bottom. During the drive up, your weight shifts forward onto your toes. Your knees shoot forward. Your quads take extra load. Use heel elevation of half to one inch. This is not cheating. It is accommodating your anatomy. Work on ankle mobility daily.
10 to 15 degrees of dorsiflexion means you can reach parallel without heel lift. During the drive up, your weight stays relatively centred. Maintain your ankle mobility with regular stretching. Do not let it get worse.
More than 15 degrees of dorsiflexion means you can reach below parallel without heel lift. During the drive up, your weight stays centred, and your knees track well. Keep doing what you are doing. You have above-average ankle mobility.
What this means for your drive up: If your weight shifts to your toes during the ascent, your ankle mobility is the most likely culprit. Elevate your heels and see if the problem disappears. If it does, you have your answer.
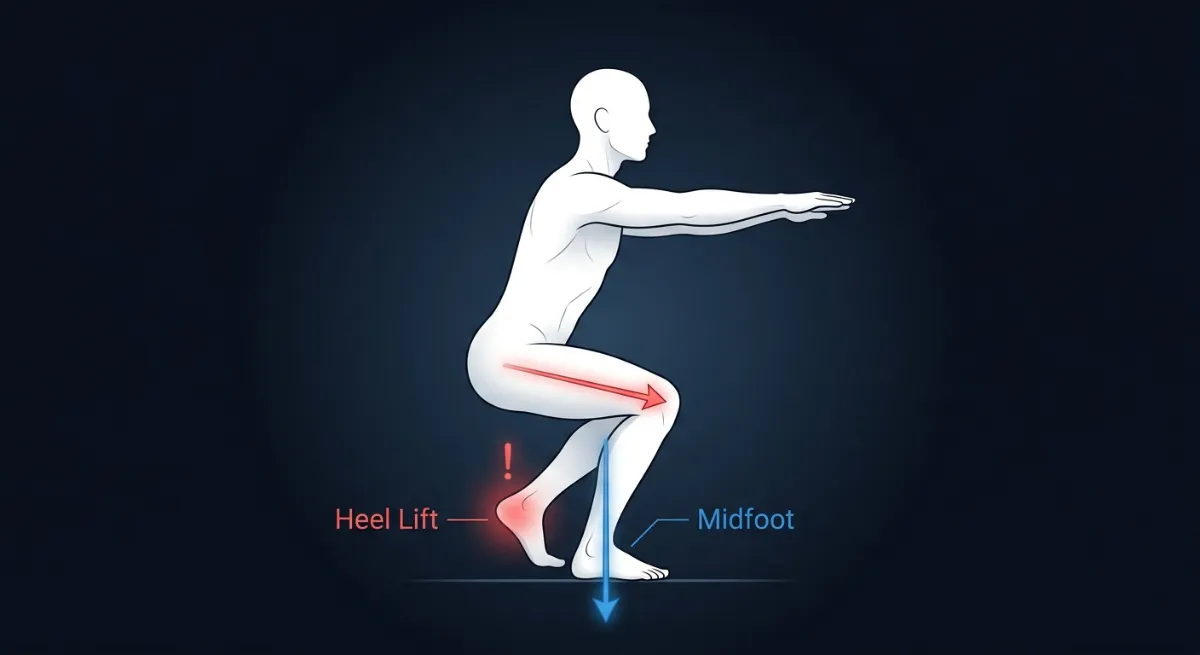
Figure 96. Limited ankle dorsiflexion causes the heels to lift during the drive-up, shifting weight forward onto the toes and increasing knee shear.
Previous Injuries and Surgeries
Your injury history changes how your drive-up feels and how you should train it [6,8,9].
ACL reconstruction (same knee) means your quadriceps may be weaker on that side. You may unconsciously shift weight to the other leg during the drive-up. Your knee may feel unstable at depth. Strengthen your quadriceps equally on both sides. Use bilateral training (both legs together) to build symmetry. Avoid deep squats for the first 6 to 9 months. Work with a physiotherapist.
ACL reconstruction (both knees) means you may have bilateral quad weakness. Your drive up may feel slow and unstable. Prioritise quad strength. Use heel elevation to reduce knee shear. Avoid explosive training until strength returns.
Meniscus surgery may cause pain or clicking in deep flexion. During the drive up, you may feel catching or instability. Stop depth before pain. Use box squats to control depth. Avoid deep squats if they cause symptoms.
Lower back disc issues mean your spine may be flexion-intolerant. During the drive up, rounding your back compresses your discs. You may feel pain or sciatica. Keep your spine neutral throughout the drive-up. Stop depth before your back rounds. Use front squats to reduce spinal shear.
Hip labral repair may cause reduced hip flexion range. During the drive up, you may feel pinching or stiffness. Stop depth before pinching. Use a wider stance. Work with your physiotherapist on range of motion.
What this means for your drive-up: Previous injuries change your mechanics permanently in some cases. Work with your body, not against it. See a physiotherapist if pain persists.
Age and Training Age
Your age and how long you have been training affect your drive up speed, recovery and injury risk [6,10].
Younger lifters (under 25) recover quickly. Your drive up may be explosive. Your risk of injury is lower, but poor form can still cause problems. Focus on technique first. Do not rely on youth to save you from bad mechanics. Build strength slowly.
Older lifters (over 50) have a slower drive up. Your recovery takes longer. Your discs and joints are less tolerant of high loads. Prioritise spinal neutrality. Do not force depth that rounds your back. Use heel elevation. Train with submaximal loads.
Beginners (less than 6 months of training) have an uncoordinated drive up. Your hips and knees may not extend together. Focus on bodyweight and goblet squats first. Do not add load until your drive up is smooth. Use tempo work to build control.
Experienced lifters (more than 2 years of training) have an efficient drive up. Your muscles fire in the right sequence. But you may have developed compensatory patterns from old injuries. Use video analysis to check for asymmetries. Address muscle imbalances directly. Do not assume your technique is perfect just because you have been lifting for years.
What this means for your drive up: Younger lifters can get away with more mistakes, but they should not. Older lifters need to be more careful with depth and spinal position. Beginners need to earn the drive up with good mechanics first.
Psychological Factors
Confidence at depth affects your drive-up speed and your ability to use the stretch-shortening cycle [14]. If you are hesitant or fearful at the bottom, you will pause longer, lose elastic energy and rise slower. This is not a weakness. It is a natural response to uncertainty.
What this means for your drive-up: Build confidence progressively. Start with lighter loads and controlled tempos. Use box squats to reduce fear of depth. As you become more comfortable, your drive-up will become faster and more explosive without any change in muscle strength.
Summary of Key Individual Differences
Use these individual differences to personalise your cueing and programming. The goal is not identical form across all lifters. The goal is identical control relative to each lifter’s anatomy.
If a lifter has long femurs, accept their forward lean. Do not force an upright chest. Cue them to drive their hips through, not just up.
If a lifter has femoral anteversion (knees caving inward) , test their stance width and toe angle dynamically. Widen their stance. Cue them to push their knees out, but not past their natural limit.
If a lifter is quad dominant and stalls at the sticking point, strengthen their hamstrings with Romanian deadlifts and leg curls. Cue them to feel their hamstrings load at the bottom.
If a lifter is hamstring dominant and their hips rise first, strengthen their quads with front squats. Cue them to keep their chest proud as they drive up.
If a lifter has limited ankle mobility, use heel elevation. Cue them to drive through their midfoot, not their toes.
If a lifter shows fear or hesitation at depth, use box squats. Build their confidence with lighter loads. Cue them to control the descent, then explode without pausing.
The standard is not a single shape. The standard is control, balance and spinal neutrality. Everything else can vary.
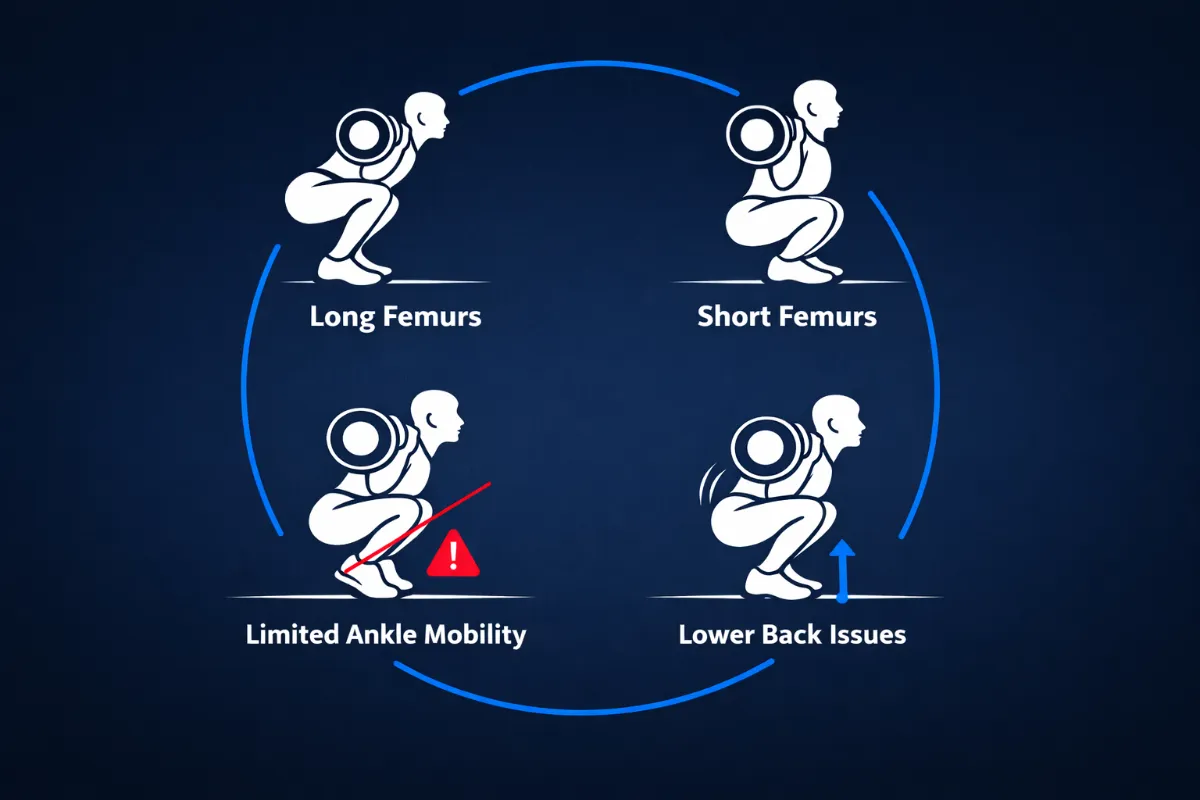
Figure 97. Your anatomy, injury history, training age and confidence all affect how you drive up. Work with your body, not against it.
The Takeaway
Your anatomy is not an excuse for poor form, but it is the reason your form will not look like anyone else’s. Focus on keeping your hips, knees and ankles rising together, and keeping the bar over your midfoot. Everything else can vary.
Coaching Guide for the Drive Up
The drive up is the coordinated reversal of the descent. Every cue must preserve tension, direction and sequencing. These cues are divided into internal cues, which help the lifter feel what is happening inside their body, and external cues, which direct the lifter’s attention to movement outcomes and environmental targets.
Use one internal cue and one external cue per set. Match your cue selection to the lifter’s dominant error pattern. Reinforce cues during warm ups, not maximal attempts.
Figure 98. The drive-up begins at the bottom of the squat. From here, every cue focuses on rising with control and alignment.
Internal Cues (Sensory and Kinaesthetic)
These cues help the lifter feel what is happening inside their body.
“Push the floor away.”
Biomechanical result: Reinforces leg drive and ground reaction force through the midfoot tripod. The lifter feels the floor pushing back as they extend, which increases vertical force production [11].
“Chest and hips rise together.”
Biomechanical result: Prevents hip chest separation and maintains bar path over midfoot. If the hips rise first, the torso becomes horizontal, and the lower back takes over. If the chest rises first, the knees shoot back, and the quadriceps lose leverage [5,6].
“Brace and expand.”
Biomechanical result: Keeps intra abdominal pressure constant through the transition from descent to ascent. This maintains spinal rigidity and prevents energy leakage through the midsection [6].
“Feel the glutes drive the pelvis up.”
Biomechanical result: Directs awareness to hip extension and posterior chain engagement. The gluteus maximus and adductor magnus are the primary hip extensors during the drive-up, especially through the sticking point [1,2].
“Keep the spine tall.”
Biomechanical result: Encourages spinal extensors to maintain neutral alignment under load. A tall spine keeps the barbell over the midfoot and reduces shear forces on the lumbar discs [6].
External Cues (Visual and Task Oriented)
These cues direct the lifter’s attention to movement outcomes and environmental targets.
“Drive the bar straight up.”
Biomechanical result: Simplifies direction and prevents forward drift. A vertical bar path keeps the centre of mass over midfoot, minimising the hip moment arm and reducing torque demand on the glutes [11].
“Stand the bar up, not your hips.”
Biomechanical result: Corrects early hip rise and maintains synchronised extension. When hips and knees extend together, the quadriceps and glutes share the load efficiently. Early hip rise shifts load to the lower back [5,6].
“Push evenly through heel, big toe and little toe.”
Biomechanical result: Reinforces midfoot balance and prevents pressure shift. Optimal ground reaction force distribution requires the foot tripod to stay connected to the floor. Heel or toe bias leaks energy [11].
“Keep the logo on your shirt facing forward.”
Biomechanical result: Visual cue for thoracic extension and chest position. A proud chest keeps the barbell over midfoot and prevents forward drift. Thoracic flexion increases the hip moment arm and spinal shear forces [6,11].
“Imagine the ceiling is low. Drive up without ducking forward.”
Biomechanical result: Encourages vertical torso movement and bar control. This prevents the lifter from collapsing forward as fatigue sets up, maintaining a vertical bar path through the sticking point [6].
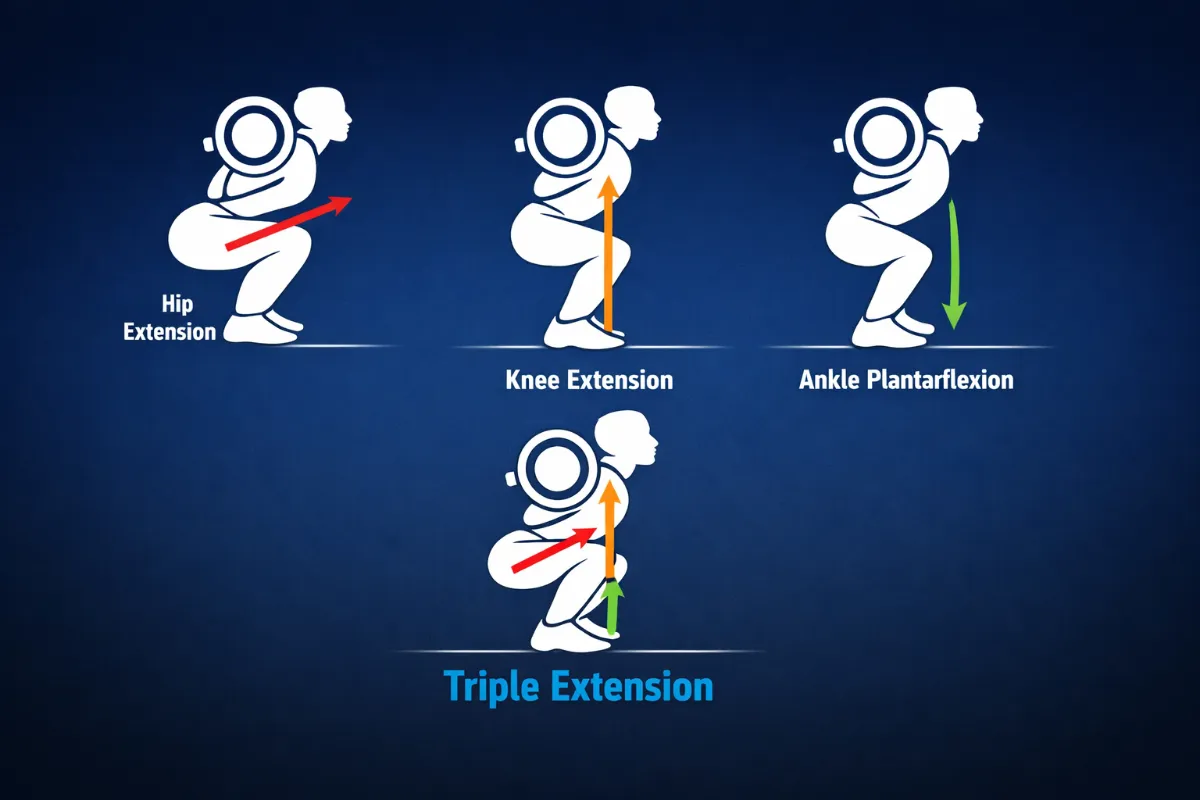
Figure 99. Triple extension of the hip, knee and ankle during the drive up. All three joints extend simultaneously to produce maximal force.
Beginners
For beginners, the focus is on learning to extend the hips and knees together. Use bodyweight squats or goblet squats first. Do not add load until they can stand up with the same alignment they had on the way down.
Internal cues for beginners: “Squeeze your quads as you stand up.” Biomechanical result: Activates the knee extensors, which are responsible for the first phase of the ascent [5]. “Feel your hips and chest rise at the same time.” Biomechanical result: Prevents hip chest separation and maintains a vertical bar path [6]. “Keep your heels heavy on the floor.” Biomechanical result: Maintains midfoot pressure and prevents forward weight shift [11].
External cues for beginners: “Push the floor away and stand tall.” Biomechanical result: Maximises ground reaction force transfer [11]. “Imagine a string pulling your head up toward the ceiling.” Biomechanical result: Encourages spinal extension and a proud chest [6]. “Stand up like you are closing a car door with your hips.” Biomechanical result: Reinforces hip extension and posterior chain engagement [1,2].
What to avoid: Do not let beginners rush the ascent. A slow, controlled drive up teaches proper sequencing better than an explosive but sloppy one.
Intermediate Lifters
For intermediate lifters, the focus is on refining drive-up mechanics under load, using the stretch-shortening cycle, and adding speed and power.
Internal cues for intermediates: “Feel the bounce out of the bottom.” Biomechanical result: Uses stored elastic energy from the stretch-shortening cycle to boost force output by roughly 20 per cent [14]. “Drive your hips through as you rise.” Biomechanical result: Ensures full hip extension and prevents early hip rise [1,2]. “Keep your chest proud through the sticking point.” Biomechanical result: Maintains thoracic extension when moment arms are longest, and torque demand is highest [6]. “Feel your glutes fire as you pass parallel.” Biomechanical result: The gluteus maximus peaks between 90 and 120 degrees of hip flexion [1].
External cues for intermediates: “Ride the rebound like a spring.” Biomechanical result: Optimises the amortisation phase of the stretch shortening cycle [14]. “Push your hips to the bar.” Biomechanical result: Reinforces hip extension and prevents the torso from becoming horizontal [5]. “Stay tall. Do not let the bar push you down.” Biomechanical result: Maintains bar path over midfoot against increasing external torque [6]. “Finish strong. Squeeze your glutes at the top.” Biomechanical result: Ensures full hip extension and proper lockout [1,2].
What to add: Tempo squats with a fast concentric, meaning one second down, no pause, explode up. Pause squats at the sticking point to build strength in the weakest position.
Advanced Lifters
For advanced lifters, the focus is on maximising power and speed under heavy loads. Use short, aggressive cues for maximal attempts.
Internal cues for advanced lifters: “Explode. Do not pause.” Biomechanical result: Minimises amortisation phase, preserving elastic energy from the stretch shortening cycle [14]. “Hips and chest together. Now.” Biomechanical result: Forces synchronised extension, which distributes load efficiently between quads and glutes [5,6]. “Finish through the hips.” Biomechanical result: Ensures complete hip extension, which is the final phase of triple extension [15].
External cues for advanced lifters: “Rip the floor apart.” Biomechanical result: Activates hip abductors and external rotators, preventing knee valgus [9]. “Stand up like your life depends on it.” Biomechanical result: Maximises rate of force development and motor unit recruitment [15]. “Drive the bar through the ceiling.” Biomechanical result: Encourages vertical bar path and full triple extension [11].
What to add: Overload the drive-up with chains or bands to build acceleration. Use video analysis to check for asymmetries in hip and knee extension.
Figure 100. Quad-dominant lifters rise with an upright chest. Hamstring dominant lifters rise with the hips first, causing a more horizontal torso.
Error Pattern Matching
Use these pairings to match cues to the lifter’s specific fault.
If the lifter’s hips rise first, use the internal cue “Chest and hips rise together” (prevents hip chest separation) or the external cue “Stand the bar up, not your hips” (corrects early hip rise) [5,6].
If the lifter’s chest drops, use the internal cue “Keep the spine tall” (maintains neutral alignment) or the external cue “Keep the logo on your shirt facing forward” (reinforces thoracic extension) [6].
If the lifter’s weight shifts forward, use the internal cue “Push the floor away” (reinforces leg drive) or the external cue “Push evenly through heel, big toe and little toe” (maintains midfoot balance) [11].
If the lifter’s drive-up is slow or segmented, use the internal cue “Feel the glutes drive the pelvis up” (directs awareness to hip extension) or the external cue “Drive the bar straight up” (simplifies direction) [1,2,11].
If the lifter loses bracing at the transition, use the internal cue “Brace and expand” (maintains intra-abdominal pressure) or the external cue “Imagine the ceiling is low” (encourages vertical control) [6].
If the lifter’s knees cave inward, use the internal cue “Push your knees out” (activates hip abductors) or the external cue “Spread the floor apart with your feet” (reinforces external rotation) [9].
Summary by Lifter Level
For beginners, the goal is to learn coordinated extension. Use the internal cue “Feel your hips and chest rise together” (prevents hip chest separation) and the external cue “Push the floor away and stand tall” (maximises ground reaction force transfer) [6,11].
For intermediate lifters, the goal is to use the stretch-shortening cycle under load. Use the internal cue “Feel the bounce and drive your hips through” (uses elastic energy) and the external cue “Ride the rebound like a spring” (optimises amortisation phase) [14].
For advanced lifters, the goal is to maximise power and speed. Use the internal cue “Explode. Hips and chest together” (forces synchronised extension) and the external cue “Rip the floor apart” (activates hip abductors and external rotators) [9,15].
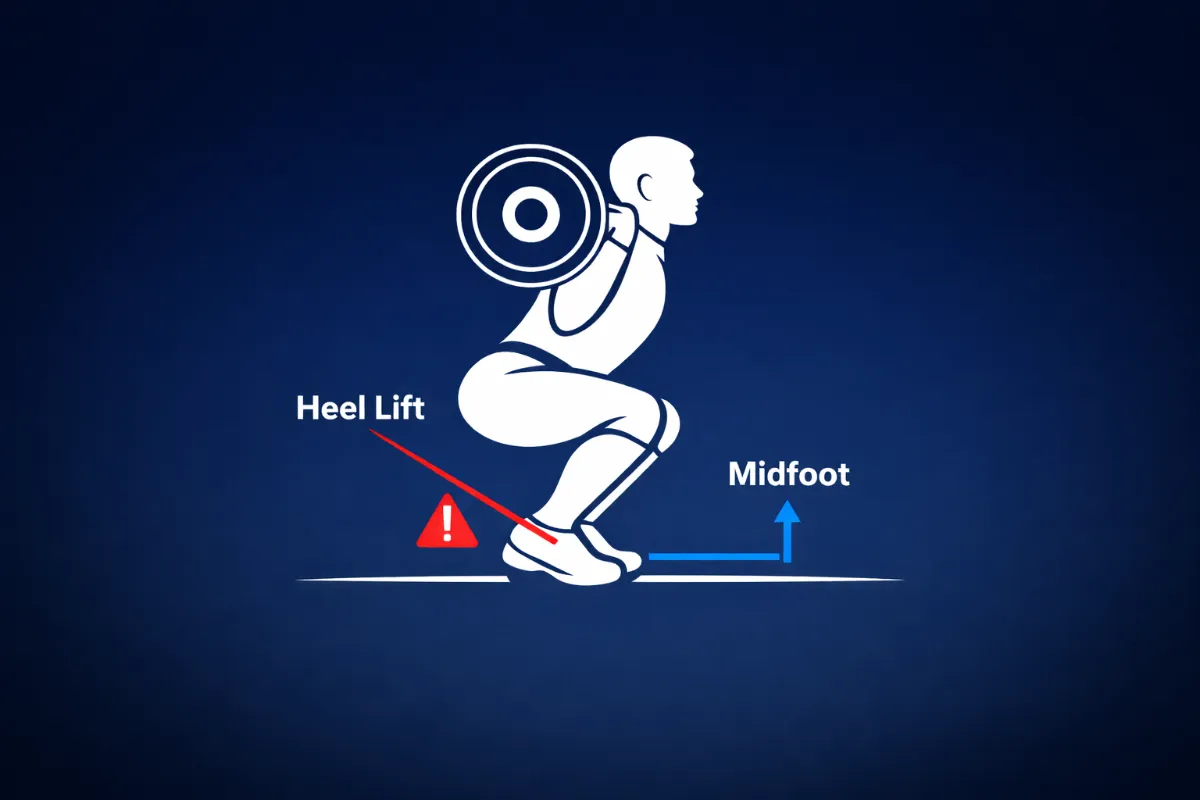
Figure 101. Limited ankle dorsiflexion causes the heels to lift during the drive-up, shifting weight forward onto the toes.
The Most Important Rule for the Drive Up
Do not let your technique break down at the sticking point.
Your chest drops, your knees cave, or your hips shoot up because one muscle group is failing. Identify which one, train it specifically, and your drive up will become stronger and smoother.
A slow drive up is usually a weak glute problem. A chest drop is usually a core or upper back problem. Knee cave is usually a VMO or gluteus medius problem. Heels lifting is usually an ankle mobility or calf strength problem.
Fix the muscle, fix the drive up. This means that if you identify a weak link, you train that muscle group directly. The drive-up will not improve by trying harder. It improves by strengthening the specific muscle that is failing at the specific joint angle where it fails.
Never sacrifice form for speed. But also do not lift so slowly that you lose the stretch-shortening cycle. Control the descent, then explode.
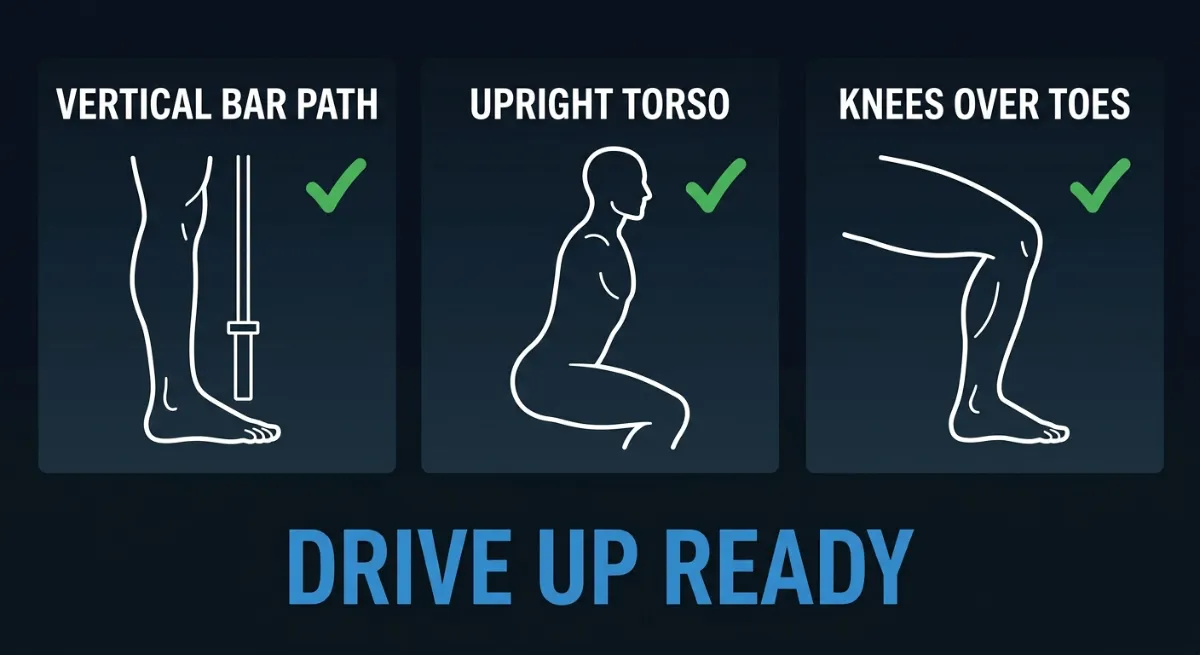
Figure 102. Before you drive up, check your bar path, torso angle and knee tracking. If all three are correct, explode.
Exercises to Correct Drive Up Mistakes
The drive-up fails for specific reasons. Your hips rise first, your chest drops, your knees cave, you stall at the sticking point, or you lose tension at the bottom. Each fault has a specific cause and a specific exercise to fix it.
Pick one fault. Train the exercise for 4 to 6 weeks. Retest. Then move to the next fault. Do not try to fix everything at once.
Exercise Suitability by Level
Exercise | Corrects | Beginner | Intermediate | Advanced |
Front squat | Hips rise first | Yes | Yes | Yes |
High bar squat | Hips rise first | Yes | Yes | Yes |
Paused front squat | Hips rise first | No | Yes | Yes |
Goblet squat | Chest drops | Yes | Yes | Yes |
Paused squat with chest focus | Chest drops | No | Yes | Yes |
Thoracic extension | Chest drops | Yes | Yes | Yes |
Banded monster walks | Knees cave | Yes | Yes | Yes |
Copenhagen adductions | Knees cave | Yes (bent knee) | Yes | Yes (straight leg) |
Terminal knee extensions | Knees cave | Yes | Yes | Yes |
Banded squat (RNT) | Knees cave | No | Yes | Yes |
Pause squat at sticking point | Stalls | Yes | Yes | Yes |
Pin squat | Stalls | No | Yes | Yes |
Hip thrust | Stalls | Yes | Yes | Yes |
Romanian deadlift | Stalls | Yes | Yes | Yes |
Pause squat (3 seconds) | Loses tension | Yes | Yes | Yes |
Dead bug with band | Loses tension | Yes | Yes | Yes |
Pallof press | Loses tension | Yes | Yes | Yes |
Heel elevated goblet squat | Heels lift | Yes | Yes | Yes |
Knee to wall stretch | Heels lift | Yes | Yes | Yes |
Weight bearing lunge stretch | Heels lift | No | Yes | Yes |
Beginners should start with:
- Front squat
- High bar squat
- Goblet squat
- Thoracic extension
- Banded monster walks
- Copenhagen adductions (bent knee)
- Terminal knee extensions
- Pause squat at the sticking point
- Hip thrust
- Romanian deadlift
- Pause squat (3 seconds)
- Dead bug with band
- Pallof press
- Heel elevated goblet squat
- Knee to wall stretch
Intermediate lifters should add:
- Paused front squat
- Paused squat with chest focus
- Banded squat (RNT)
- Pin squat
- Weight bearing lunge stretch
Advanced lifters should add:
- Copenhagen adductions (straight leg)
Hips Rise First (Weak Quads)
This fault happens when your hips shoot up, and your chest stays down. Your torso becomes horizontal. Your lower back takes over.
Front squat corrects this by forcing an upright torso. Suitable for all levels.
High bar squat shifts load to your quadriceps. Suitable for all levels.
Paused front squat removes the bounce and demands quad strength from a dead stop. Suitable for intermediate and advanced lifters.
Chest Drops (Weak Upper Back or Bracing)
Your chest falls forward as you rise. The bar drifts toward your toes. Your upper back rounds.
Goblet squat keeps your chest upright naturally. Suitable for all levels.
Paused squat with chest focus teaches you to maintain chest position without momentum. Suitable for intermediate and advanced lifters.
Thoracic extension over foam roller improves upper back mobility. Suitable for all levels.
Knees Cave Inward (Weak Gluteus Medius or VMO)
Your knees collapse toward the midline as you drive up. Your feet may roll inward.
Banded monster walks strengthen your gluteus medius for knee control. Suitable for all levels.
Copenhagen adductions build adductor and glute strength. Beginners use a bent knee. Advanced lifters use a straight leg.
Terminal knee extensions strengthen your VMO for patellar tracking. Suitable for all levels.
Banded squat (RNT) uses a band that pulls your knees inward. You push out to resist. Suitable for intermediate and advanced lifters.
Stalls at Sticking Point (Weak Glutes or Hamstrings)
You are fast out of the bottom, but hit a wall just above parallel. The bar slows down or stops.
Pause squat at the sticking point builds strength at the exact angle where you fail. Suitable for all levels.
Pin squat (Anderson squat) removes the stretch reflex. You generate pure concentric force from a dead stop. Suitable for intermediate and advanced lifters.
Hip thrust isolates your gluteus maximus for hip extension. Suitable for all levels.
Romanian deadlift strengthens your hamstrings and glutes in a stretched position. Suitable for all levels.
Loses Tension at Bottom (Poor Bracing Endurance)
You relax at the bottom. You sink into your joints instead of staying tight. The drive up is slow and segmented.
Pause squat (3 seconds) forces you to maintain tension at depth. Suitable for all levels.
Dead bug with band teaches you to brace while moving your limbs. Suitable for all levels.
Pallof press strengthens anti-rotation, keeping your torso rigid under load. Suitable for all levels.
Heels Lift or Weight Shifts Forward (Limited Ankle Mobility)
Your heels lift off the floor during the drive up. Your weight shifts onto your toes. Your knees shoot forward.
Heel elevated goblet squat reduces dorsiflexion demand. Suitable for all levels.
Knee to wall stretch increases dorsiflexion range over time. Suitable for all levels.
Weight-bearing lunge stretch uses a loaded stretch for your calf and ankle capsule. Suitable for intermediate and advanced lifters.
Quick Reference by Fault
Hips rise first – Start with front squat.
Chest drops – Start with a goblet squat.
Knees cave inward – Start with banded monster walks.
Stalls at sticking point – Start with a pause squat at the sticking point.
Loses tension at the bottom – Start with pause squat (3 seconds).
Heels lift – Start with heel elevated goblet squat.
The Rule
Pick one fault. Train the exercise for 4 to 6 weeks. Retest. Do not try to fix everything at once. These are corrective tools, not warm-ups.